Tag Archives: sous vide

Omaha Steaks

It seems like everyone in the country knows about Omaha Steaks delivery service. Over the years, I’ve had many boxes delivered to me, but I just realized that I never actually took the time to review them. Recently my wife and I were given a box of various goodies, and the steaks within were tenderloins.

I did a simple preparation, which is becoming my go-to method of cooking steaks at home: sous vide and then a blow torch finish. You can see the recipe post HERE.

I think the issue with Omaha Steaks is that they spread themselves too thin by offering a bunch of other items aside from beef/steaks. They do chicken, pork, meatballs, baked potatoes, french fries, etc. As a result, maybe the steaks suffer?

My filets, while tasty, were a bit on the thin side. I enjoyed the ones from Nebraska Famous Steaks better, mainly because they were thicker and actually felt like a real steakhouse filet mignon. That said, the Omaha jams were still great in the way I prepared them.

Nebraska Famous Steaks

Nebraska Famous Steaks sends frozen steaks out to customers who purchase meat from them. Most people are familiar with this concept by way of other companies like Omaha Steaks. I had not heard of Nebraska Famous Steaks until they reached out to me. Their ask was simple: Would I like for them to send me some meat to try out at home and post some pictures, write a review, etc? My answer was fast: Yup.

Here’s what they sent me:

I was blown away. I wasn’t expecting so much!

I have to say, their filet mignon destroys Omaha Steaks. The filets I recently cooked up from Omaha were thin, while these were nice and thick. Quality was similar, however, at good choice.

The Nebraska Famous Steaks rib eyes had some really nice marbling throughout the muscle tissue, and a nice sized spinalis cap. I was impressed! And also excited to eat them.

I did my usual quick and easy cooking method for steaks at home: sous vide followed by blow torch. Here’s a video of the whole process, from unboxing through to plating.

And I took a shitload of photos, of course. I simply seasoned with salt, pepper and garlic, then seared, and then added some flake salt. We also ate this with some wasabi as well. Nice touch!

Here’s another:

Pat LaFrieda Meats: A Steak Feast At Home

Pat LaFrieda. You’ve all probably seen the name before, and you’ll definitely see it again – especially because I’m about to publish a feature article on LaFrieda early next month for my “Meet Your Meat” series. But the man is a top notch, high quality beef purveyor with a rich family tradition of killing it in the meat biz. He provides the goods to the restaurants and chefs that make my favorite steaks.

He recently sent over two cuts of steak for me to enjoy at home; both dry-aged for 60 days, both prime, and both 2.5″ thick. One was a porterhouse, and the other a rib eye.

A video posted by Johnny Prime (@johnnyprimecc) on

This stuff is not just set aside for restaurants and hotels! You can order it for home delivery right here.

So, what to do with all this beef? I mean, I would have loved to eat it all myself, but that’s just rude. Instead, I invited over a handful of foodie friends and cooked up a feast for them.

Here’s how it went down:

Appetizers

For starters, I sliced up some truffle salami and made a very basic wedge salad with iceberg, grape tomatoes, thick bacon and a crumbled blue cheese and black truffle oil dressing.

Main Courses

I decided to cook the porterhouse in the sous vide machine, and then finish it off with a hard Searzall blowtorch sear. I loaded the sous vide bag up with some truffle oil (I froze this ahead of time, that way the contents in the bag were dry when I sealed it), rosemary and thyme. I also seasoned the steak with salt and pepper before sealing it up.

After about four hours in a 128 degree bath, I pulled it out and dropped it into some ice water to stop the cooking process. After a few minutes, I removed it from the bag, dried it off and blasted it with the Searzall to get that nice outer crust.

Before serving, I sliced it up and plated it, then drizzled black truffle oil on top, and hit it with some finishing salt and fresh cracked black pepper.

I picked up an extra filet from the grocery store as well, which I cooked the same way. This was mainly as extra meat, in case we didn’t have enough, and also as a control group to compare the meat quality from a nice grocery store cut against Pat LaFrieda. The cut I picked from Morton Williams looked nicely marbled and it was reasonably thick for just under $12.

When comparing the filet side of the LaFrieda porterhouse to the grocery store filet, the LaFrieda steak was hands down WAY better. There is no question about it. That 60-day dry-aging process really infuses an incredible amount of flavor into the meat.

If you are a beef lover, then Pat LaFrieda cuts are the way to go. In fact, one of my friends cooks up Pat LaFrieda steaks every Friday, and he calls it “LaFrieda Fridays.” HA!

For the rib eye, I went with a traditional cast iron skillet sear with maple bacon fat and herbs, and then I finished it in the oven. I let it rest, and then sliced that up and served it on a salt block, also with a drizzle of truffle oil.

Unfortunately for me, the temperature jumped from 120 to 145 WAY faster than it was climbing while going from 68 to 120. I turned around to snap pics of the porterhouse and BOOM. The steak went beyond medium rare. Lesson learned. In any event, it was still incredibly delicious at medium. The fat cap was heavenly!

To go with these steaks, I roasted some bulbs of garlic for slathering onto the meat and grilled some lemons.

Sides

I put together a nice side of roasted mushrooms and onions, sauteed broccolini (got to have something green I guess), and made a big bowl of tater tots.

Dessert

But no meal at Johnny Prime’s Food Research Lab would be complete without a dessert by The Cake Dealer!

The inside of the cupcakes were marbled vanilla and red velvet, which was perfect to represent the marbling of good prime beef!

Or it was just because Valentine’s Day is right around the corner…

Oh and by the way, here are the foodies that came by. Check out their profiles for pics of the feast, if you have a chance:

@thecakedealer (she’s always there, because she’s my lovely wife)
@thedishelinguide
@theninabobo
@rebecca_chews_nyc
@dequinix

Salt Block Tenderloin

I decided to go bonkers this year on Superbowl Sunday with some Omaha Steaks tenderloin cuts that my wife and I received as a gift from her father. It had been a while since I used my sous vide machine, so I knew I wanted to use that.

I also figured this would be a good time to bust out the Searzall again, since the cuts were only about an inch thick, and, fearing a blasphemous overcooking, I didn’t want to put them in a pan to get that coveted sear on the outside.

Nothing new there. I’ve given you recipes for that before. The ringer here, for this meal I envisioned, was the Bitterman Salt Co. Himalayan salt block that I had chilling in my freezer. I keep it cold for serving sliced sashimi and raw fish items, but I thought it might be nice for medium rare, seared, thin-sliced tenderloin as well.

Essentially, I cooked the steak to rare at 130 degrees in the sous vide machine, right from the sealed Omaha Steaks bags (no seasoning beforehand). Then I popped the steaks into an ice bath to cool them down quickly and halt the cooking process. I know that the Searzall can continue to cook the steak’s interior with prolonged exposure, so I wanted them rare when they came out of the sous vide machine.

After blasting them with the Searzall, I had a good crisp on the outside and a perfect medium rare pink on the inside. Then I sliced them on the salt block, using that as a serving platter. I finished them off with a drizzle of Trader Joe’s black truffle oil, a few cranks of fresh cracked black pepper, and some ground sea salt.

Check out the video demo that I posted on youtube:

And some photos of the finished product:

It was a great, cool-temperature, lean beef dish that really packed a delicious flavor profile. The truffle oil was a great way to bring out the earthy flavors from the steak. Simple but robust. Try it at home!

The Ultimate Guide to Cooking Steak

Every food-oriented website out there, whether it’s Eater, Grub Street, Thrillist or what have you, has their own version of “The Ultimate Guide for Cooking a Steak,” or whatever it may be. Many of them do offer good information, but they’re almost all incomplete. They set you up with one method for one cut of meat. This piece will serve as a place where you can get instructions for cooking several different cuts of steak via several methods. Let’s get right to it.

GRILLING

This is probably the method that most people are familiar and comfortable with. Since it is actually my least favorite way to cook one of the four major cuts, I will discuss it first, up front, with the caveat that I do actually prefer grilled skirt steak to any other cut that’s done on the grill. That said, there are some significant pros and cons for grilling. Depending on what you want out of your steak eating experience, you should take these into consideration before deciding if this is the right method for you. What time of year is it? Summer, winter? Are you grilling over charcoal or propane?

DSC04730

Johnny’s Preferred Cuts for Grilling: Skirt, Flank, Hanger

Pros

  • Easily accessible
  • Familiar and comfortable to most home cooks
  • No smells or smoke indoors
  • Can easily cook many steaks at once

Cons

  • Fat, flavor and juices fall through the grill bars
  • Can be difficult to control heat levels
  • Lowered ability to sear evenly

Grilling is perfect for outdoor cooking in the warm months, and especially for large groups of people. You don’t get any lingering smells in your home, and you can enjoy the day like a good American, beer in hand as you cook. Since I like a good even sear across the entire cut of meat, I generally don’t like cooking the four major cuts of beef in this manner. Generally I go for skirt or flank, something that benefits from a good, fast blast of heat; something where I don’t mind if I lose a little fat or juice through the grill bars; and something cheap that can be sliced up and served family style. Charcoal is a tough medium to master. Some people are experts at creating and maintaining even heat levels for a cooking session. Others use propane. This is easier, cleaner, and more convenient, but you lose some of that desired charcoal and smoke flavor unless you’re adding soaked wood chips to the grill as you cook. If grilling is right for you, then read on below.

DSC06461

Instructions

  1. Get your steak up to room temperature and pat it dry.
  2. Crank up your grill to as high as it will possibly get.
  3. Season the skirt/flank generously with salt and pepper.
  4. Grill the meat with the grill top open. Do not poke, prod, press or move the meat once it is set down on the grill bars. Allow the bars to create nice markings on your meat.
  5. After a few minutes, flip once and repeat the previous step.
  6. Use a meat thermometer or the “hand test” to ensure that your steak is properly cooked to medium rare. Remove it from the grill at 125F.
  7. Let the steak rest for a few minutes on an elevated and porous surface, like a metal baking rack. During this time the meat will continue to cook a bit more while off the flames, and it will retain more juices during the next step.
  8. Slice against the grain of the meat, or “against the bias,” and serve.

PAN SEARING

This is probably my favorite method for cooking steak. I always try to use a cast iron skillet, as they just work better for creating that crusty sear that we have all come to know as steak lovers. If you can’t get your hands on one, then a standard pan will do.

Johnny’s Preferred Cuts for Searing: Filet Mignon, Strip, Rib Eye, Porterhouse

Pros

  • Even sear across entire steak
  • Juices stay put
  • Easy to execute

Cons

  • Smoke smell can permeate the home, set off smoke detectors
  • Pan cleanup can be annoying
  • Large pan needed for big or multiple cuts
  • Cast iron not ideal for glass electric cook tops

Instructions

  1. Get your steak up to room temperature and pat it dry.
  2. Crank up your burner to as high as it will possibly get, and heat up the pan with a small amount of butter.
  3. Season the steak generously with salt and pepper.
  4. Sear the shit out of your steak, and add a wad of butter to melt in the pan. Throw in some rosemary and garlic too, if you like. Do not poke, prod, press or move the meat once it is set down. Allow the meat to stick to the pan a bit, with as much of the bottom surface touching the pan as possible.
  5. Spoon the melted butter over the top as the meat cooks, basting it in flavor.
  6. After a few minutes, flip the cut with tongs and do the same thing of the other side of the steak.
  7. Once both sides are seared, then you should also sear the edges if you are working with a thick-cut steak. Anything over an inch and a half should get a little side sear if possible.
  8. Use a meat thermometer or the “hand test” to ensure that your steak is properly cooked to medium rare. Remove it from the pan at 125F.
  9. Let the steak rest for a few minutes on an elevated and porous surface, like a metal baking rack. During this time the meat will continue to cook a bit more while out of the pan, and it will retain more juices.

Alternative Instructions From Step 8 Onward

This secondary step is helpful if you have a very thick cut of steak, and a good, hard sear is all you can really get from the pan without overcooking. You want your meat to be pink from top to bottom, with no “grey band” in sight. To achieve this on thick cuts, lots of people will put the steak into the oven at a low temperature, like 250-300F, to allow the internal temperature to come up to medium rare once the pan-searing steps (1-7) are complete. Here, a meat thermometer is key to ensure that your meat is cooked to the proper temperature inside.

REVERSE SEARING

This is very similar to searing with an oven finish, like above, only done in the reverse order.

DSC06893

Johnny’s Preferred Cuts for Reverse Searing: Thick Cuts of Filet Mignon, Strip, Porterhouse, Rib Eye

Pros

  • Even sear across entire steak
  • Juices stay put

Cons

  • Slightly more difficult to execute than a simple sear
  • Multiple cooking steps and waiting

Instructions

Here, the first step is to cook your steak in the oven at a low temperature, like 250-300F, to allow the internal temperature to come up to rare or medium rare. Again, use a meat thermometer to ensure accuracy. Once that step is done, the steak gets finished in the hot searing pan with butter. This will form the desired crust on your steak. You just have to be careful not to overcook your steak in the pan as you are trying to get that crust to form. I recommend allowing your steak to cool down to room temperature before searing it off, and/or getting that pan screaming hot before you put the steak in.

BROILING

Generally speaking, broiling means that the heat source is coming from above the meat and close to the meat. Contrast with baking, which means that the heat source is below and more diffused or distant from the meat. Broiling a steak gives you more direct exposure to the heat source than baking, whether it’s an open flame (gas oven) or the heating element (electric). While not as direct as, say, touching a hot pan, broiling is better for cooking traditional cuts of steaks than baking, because you can get a charred outer crust easier and still get the inside of the meat to the desired temperature. Baking is better suited for roasting meats, since the heat source is often diffused a bit by the oven bottom when baking.

DSC06903

Johnny’s Preferred Cuts for Broiling: Thick Cut Bone-In Porterhouse, Thick Cut Bone-In Rib Eye, Bone-In Tenderloin, Bone-In Strip, Large T-Bone

Why the bones, you ask? When cooking with “surrounding” heat, like roasting or broiling in an enclosed oven, bones are very effective at radiating heat into the center of the meat tissue. This method, therefore, also makes large/thick cuts easier to work with.

Pros

  • Cleaner, less smoke and permeating odors
  • Relatively easy to execute
  • Easier to get an evenly cooked center of your meat

Cons

  • Easy to overcook if not careful
  • Requires meat thermometer (puncturing meat is never good)
  • Harder to get the desired crust than other methods

Instructions

  1. Get your steak up to room temperature and pat it dry.
  2. Set your oven to broil.
  3. Season the steak generously with salt and pepper.
  4. Bring your oven rack close to the heat source (near the top) and place steak in the oven in a shallow roasting pan that can catch any drippings.
  5. Once the top crisps up a bit, flip the meat in the roasting pan to get the crust on the other side as well.
  6. Use a meat thermometer to ensure that your steak is properly cooked to medium rare. Remove it from the oven at 125F.
  7. Let the steak rest for a few minutes in the roasting pan. During this time the meat will continue to cook a bit more, and it will retain more juices.
  8. Slice the major muscles off the bone, slice the muscle against the bias, and arrange the meat on a platter for serving.

DSC06489

ROASTING

Roasting is synonymous with low and slow diffused heat from a bottom source, or all around the meat, from all sides. This method is best suited for large hunks of meat that take a long time to cook down to the center, generally for serving many people.

Johnny’s Preferred Cuts for Roasting: Standing Rib Rack Roast, Chateaubriand, Large Brisket

Pros

  • Great for large format dining
  • Easy to execute
  • Result is very juicy, tender and delicious

Cons

  • Takes a long time to finish
  • May require extensive carving
  • Generally lacks outer crust like a standard cut of steak

Instructions

  1. Many people like to brine their meats before roasting. While this is generally more common with pork roasts or fowl, some steps can be taken with beef to increase flavors. You can crush up some garlic and stuff it into your roast (flavor injectors), or rub it on the outside of the meat; you can rub it with rosemary or roast it on a bed of herbs; and you should season it generously with a multitude of spices. You want all those flavors to permeate deep into the meat, so massaging, rubbing and pushing into the meat is all recommended. If you use a flavor injector, I suggest getting a lot into one or a few injections, that way you don’t pierce the meat too many times.
  2. Set your oven to a low bake temperature, like 350F.
  3. Place your meat on a roasting pan to catch any drippings, and set it in the center/middle rack of your oven.
  4. Place your meat thermometer into the center of the roast.
  5. As the meat cooks, use a turkey baster to suck up liquids from the bottom of the roasting pan, and squirt it over the top of the roast occasionally. This will add some flavor to the outside and help to create a flavorful edge to the roast.
  6. Remove it from the oven at 125F. Let the meat rest for a few minutes in the roasting pan. During this time the meat will continue to cook a bit more, but the resting phase will help the meat retain more juices for the next step.
  7. Slice and carve for serving. Sliced roast beef pairs perfectly with both hot gravy and cold horseradish sauces (either cream-based or tomato-based).

DSC07210

SOUS VIDE

Sous Vide means “under vacuum” in French. In this method of cooking, you are cooking your steaks in vacuum sealed bags by submerging them in a hot water bath to precisely the desired temperature, and then finishing them in a pan as a secondary step. This may sound like high tech restaurant science only kind of stuff, but there are items available in the consumer market to do this with great results at home.

Johnny’s Preferred Cuts for Sous Vide: Thick Cuts of Filet Mignon, Boneless Strip, Boneless Rib Eye, Bavette, Denver Cut/Blade Steak

Pros

  • Perfect internal temperature every time
  • No monitoring necessary
  • Easy to achieve success

Cons

  • Requires a special unit or item, a vacuum sealer and bags
  • Wait time can be lengthy
  • Still need to use a pan (or torch) to sear the outside

Instructions

Lucky for you all, I’ve got a nice discussion of the sous vide cooking method here, with pretty pics and everything. In any case, here is the gist of it:

  1. Season the steak however the you want. I use salt, pepper, garlic powder, garlic oil and crushed red pepper.
  2. Place steak into vacuum seal bag and seal it up with some butter and herbs inside (rosemary is always nice).
  3. If you’re a poor bastard and can’t afford a vacuum sealer, you can use ziplock bags. Place your meat into the bag and begin to submerge the bag into the water bath. Once you are all the way close to the zipper, zip it shut. The water surrounding the outside of the bag will push out all the air from inside. This is the poor man’s vacuum sealer. If you do this, you may want to put a smooth, clean rock in there too, just for good measure, to keep the meat from floating.
  4. Set your temperature to however you like your steak cooked. I put mine at 125F for a nice medium rare. I’m dealing with grocery store meat here, people. Don’t give me any shit about that being too well done.
  5. Wait about an hour or two. Don’t panic! You can’t overcook your steak in a sous vide bath. That’s the whole point of it!
  6. Remove your steak from the water bath and let it cool back down to room temperature.
  7. Re-season it a bit, if so desired.
  8. Sear it. I use a Searzall, because why not? But you can easily just toss this baby into a real hot cast iron pan with some more butter and herbs to get that brown and crispy coating.

DIRECT FROM FROZEN

Some food scientist people were messing around and cooking strip steaks in a test kitchen; some cuts were thawed in a fridge overnight, and others were still frozen. The results stunned them. The steaks were cooked more evenly, with less “grey band” when cooked direct from frozen, and those steaks retained more juices (they lost less moisture during the cooking process). While they took longer to cook, they still browned at nearly the same rate as a thawed steak.

I think a major issue that home cooks with have here is that it may be difficult to prevent ice crystals to form on the outside of the meat during the freezing process. When cooking, these ice crystals will melt into water or sublimate into water vapor. At that point you are either boiling or steaming the bottom of your steak in the pan, which is bad. When doing that, you won’t ever achieve the crust that we carnivores all desire.

The scientists attempt to solve this problem by freezing the steaks in a special way at first, uncovered and flat. Once they’re frozen, they are then wrapped and bagged for storage. If you’re going to attempt this you will want to be very careful to replicate the freezing technique that the scientists utilized, to avoid excessive ice crystals from forming on the outside of the meat.

This method involves cooking in a pan that contains a good amount of oil. This is done to ensure that the nooks and crannies of the steak surfaces all get cooked the same amount, and it helps to displace any water that may melt out of ice crystals. Second, it also retains more heat, so you can bring the steak surface up to browning point faster, without overcooking any of the interview (which should still remain pretty cold since it is frozen). The result is less grey banding, and a more end-to-end pink steak interior.

You will still need to finish the steak in the oven, however, since the interior will likely be too rare or still frozen if you only use the pan.

In any event, here is my analysis:

Scientists’ Preferred Cuts for Frozen Steak Cooking: Strip

Pros

  • No waiting for steak to thaw or come to room temperature
  • Less meal planning needed ahead of time
  • Nice, even cook temp throughout

Cons

  • Difficult to avoid ice crystals
  • Complicated freezing technique
  • Still requires second step in the oven

Instructions

Refer to this link and the embedded video below for proper steak preparation and cooking instructions.

DIRECT ON COALS

I haven’t tested this method out myself yet, so you’ll have to take this with a grain of salt, as above, with the “Direct from Frozen” method. My first exposure to this method was when I saw Alton Brown discuss it on his blog. I was intrigued enough to include it here, but since I no longer have the ability to cook often with real wood, I have never tested this out.

Alton’s Preferred Cut for Coal Cooking: Skirt

Pros

  • Fast
  • Natural flavors

Cons

  • Covering in foil step essentially steams the meat
  • Potential for soot contamination

Instructions

I think the best bet here is to just follow the directions from Master Alton, since he’s a culinary wizard, and I’m a mere apprentice. One thing I’m apprehensive about, which I noted in the “cons” section, is the part where Alton wraps the hot steak in foil. This means the meat will cook in steam. He then tosses it back into the juices. All of this makes me think “wet steak,” and that turns me off.

___

For more specific recipes, as opposed to these more general methods of cooking, check out my recipe page.

The Pines

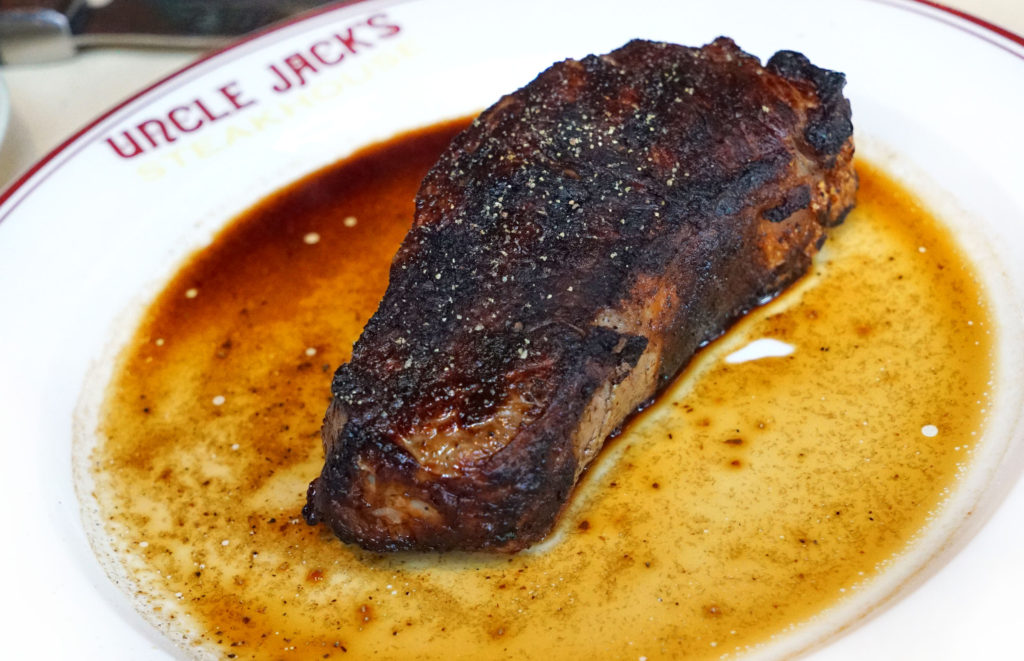
NOTE: THIS JOINT IS NOW CLOSED

Last month when I was at Meatopia I had the pleasure of meeting John Poiarkoff, the genius chef behind the wheels of steel at The Pines in Brooklyn.

DSC08698

DSC09563

In our inevitable conversation about meat and steak, I discovered that his carnivorous endeavors at the restaurant were not only out of the ordinary and interesting, but exemplified that rare love of beef possessed only by a true connoisseur.

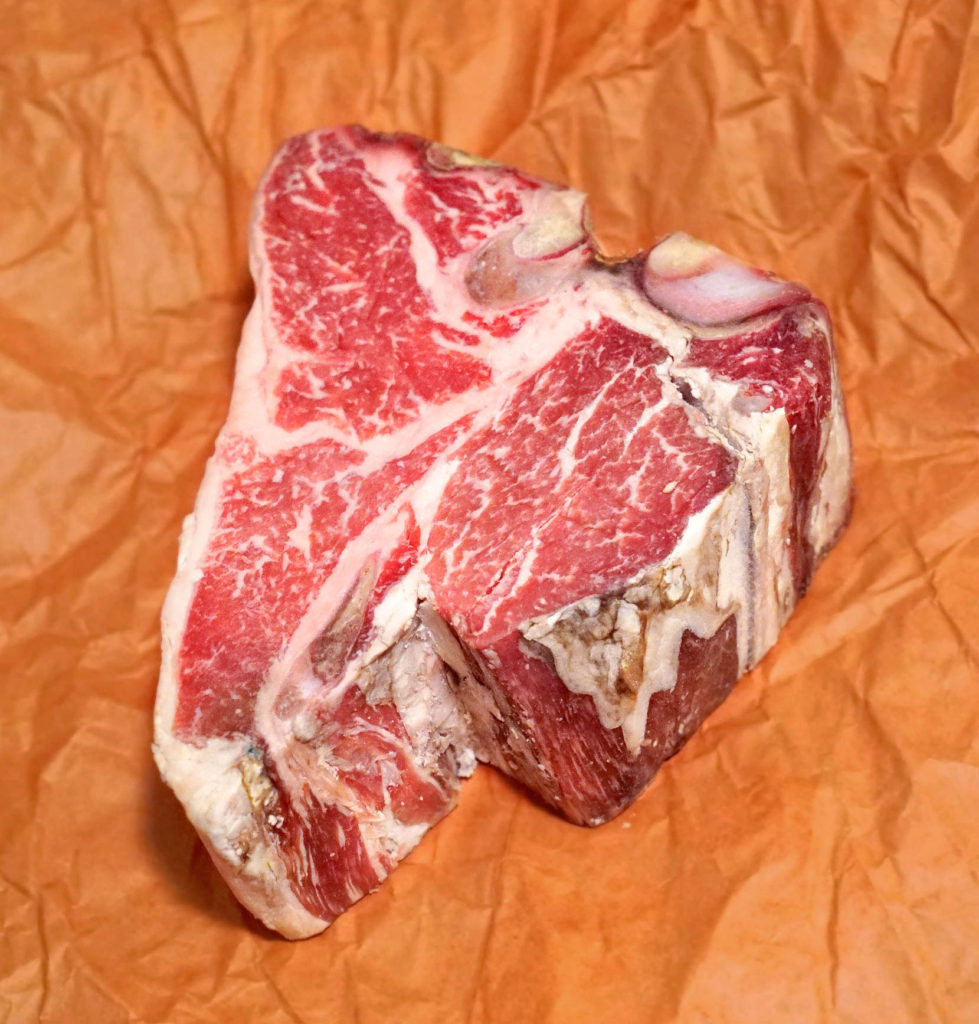
For example, he explained how the blade steak (aka Denver cut, part of the chuck) on the menu was prepared sous vide style. It bathes for several hours in a sealed bag, allowing the tentacle-like marbling to render down, making the steak super tender before it gets seared off in a pan for a nice outer crisp.

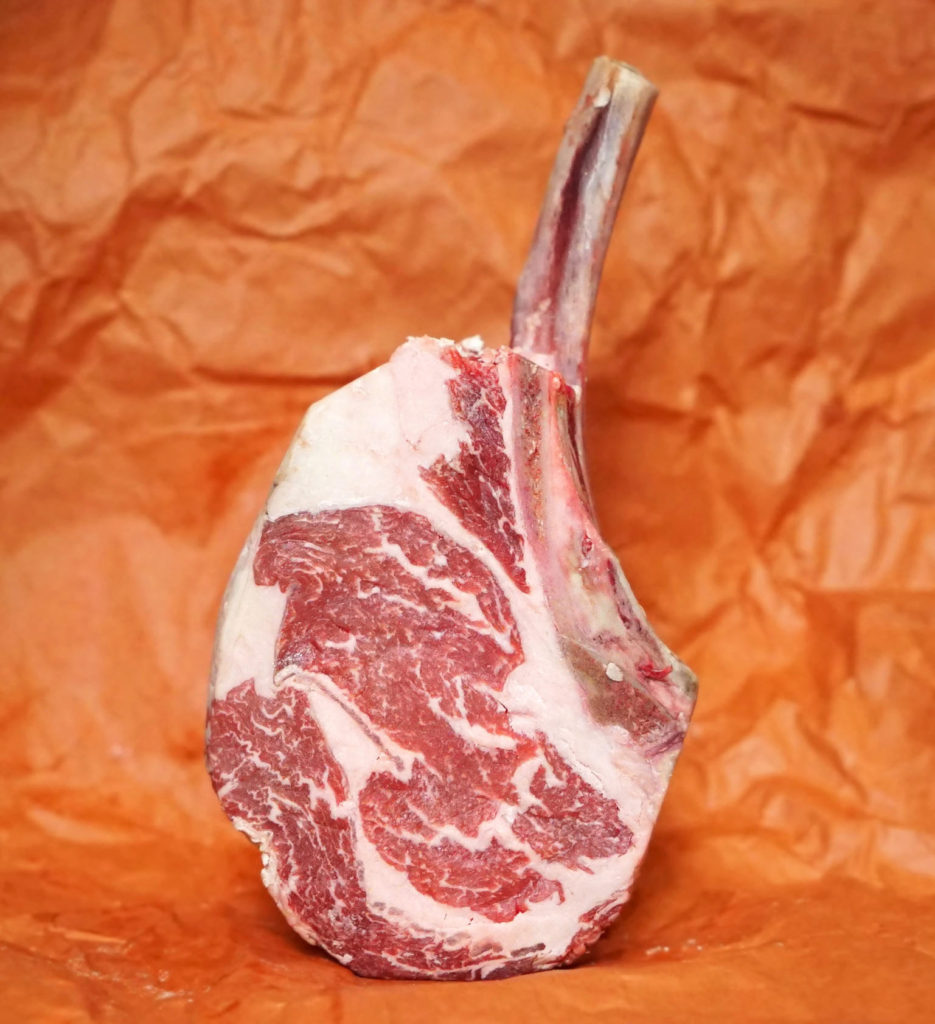
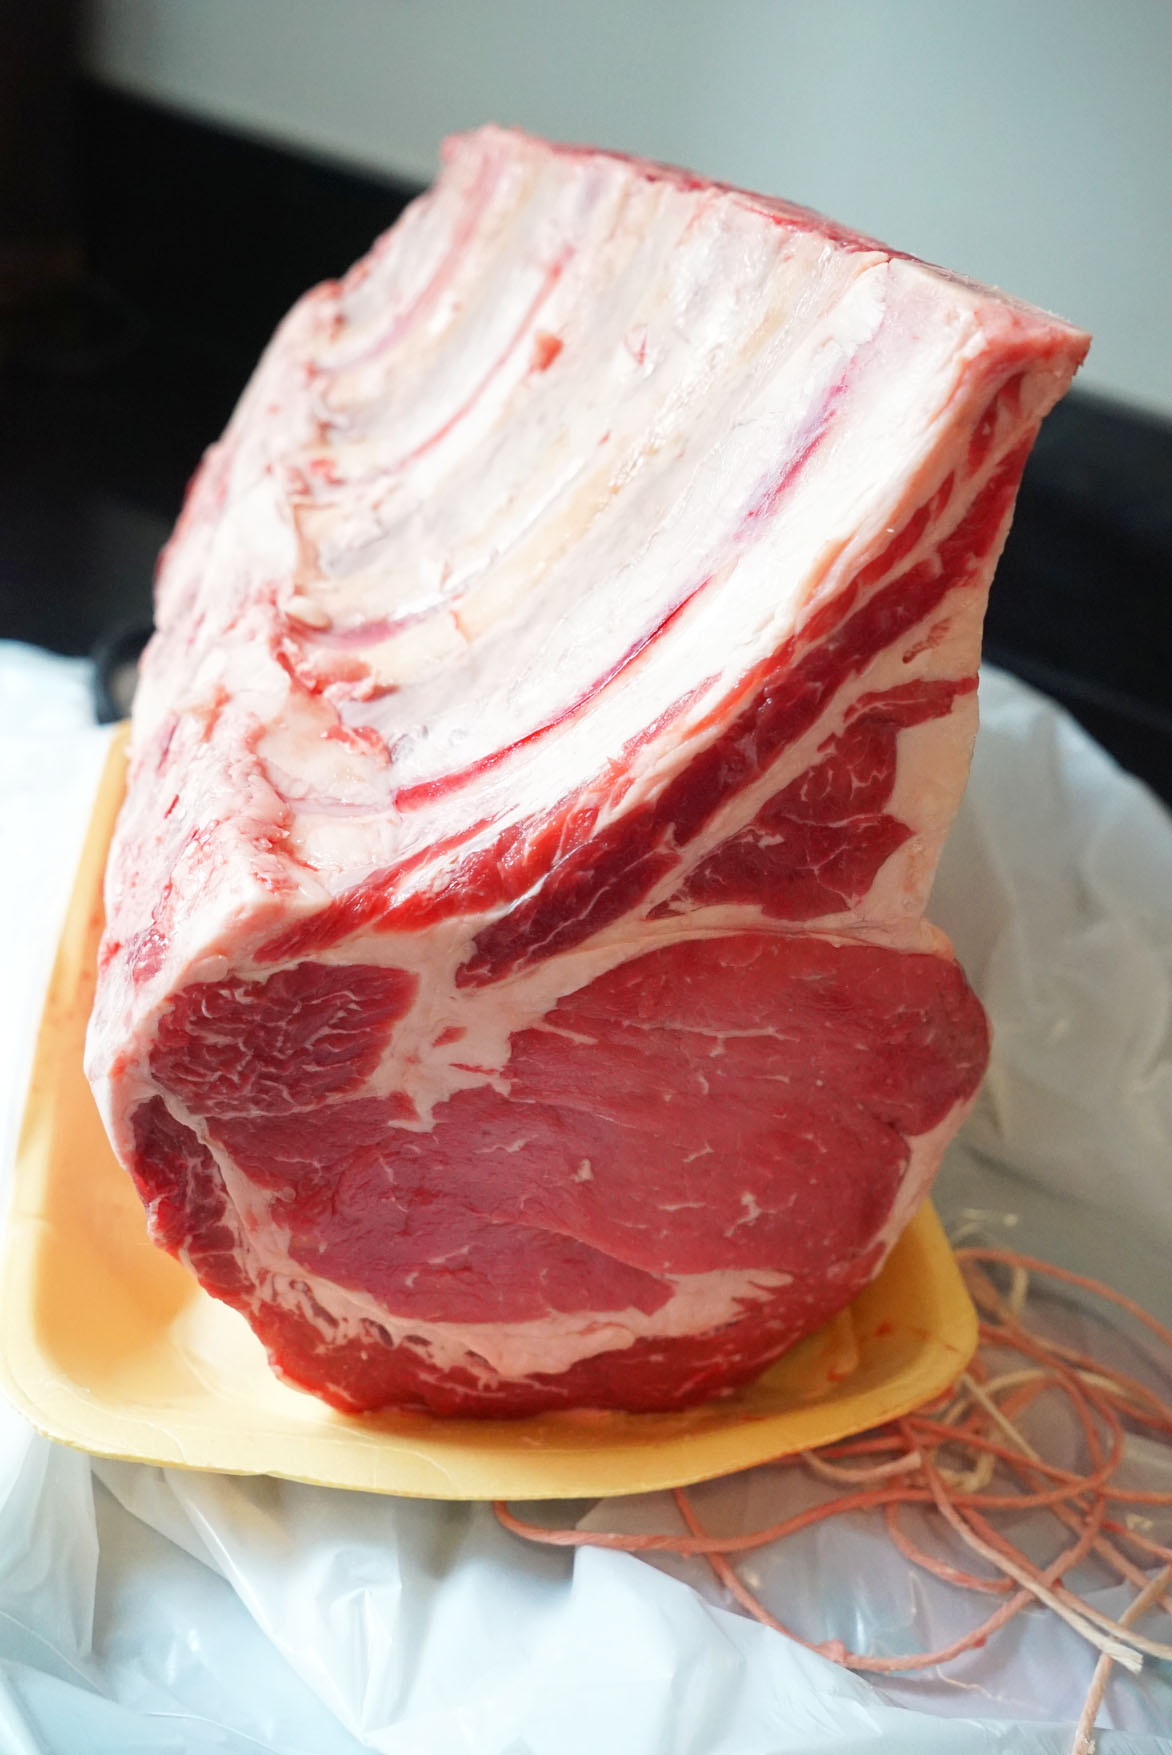
He also mentioned that he had some rib eyes in an outdoor walk-in that he converted into a dry-aging room. When he said how long they were in there, 106 days, I nearly lost my shit. I kindly asked him again. “How long did you say?” 106 days!

He went on to say that they would soon be breaking the rack down into portioned cuts and serving them as special menu items. Needless to say, I was all over it. I made sure to follow The Pines on Instagram and to keep my eye out for any news about that steak. Sure enough, just a few weeks later I saw the post announcing that they were going to be serving those rib eyes. The very next day my wife and I headed over.

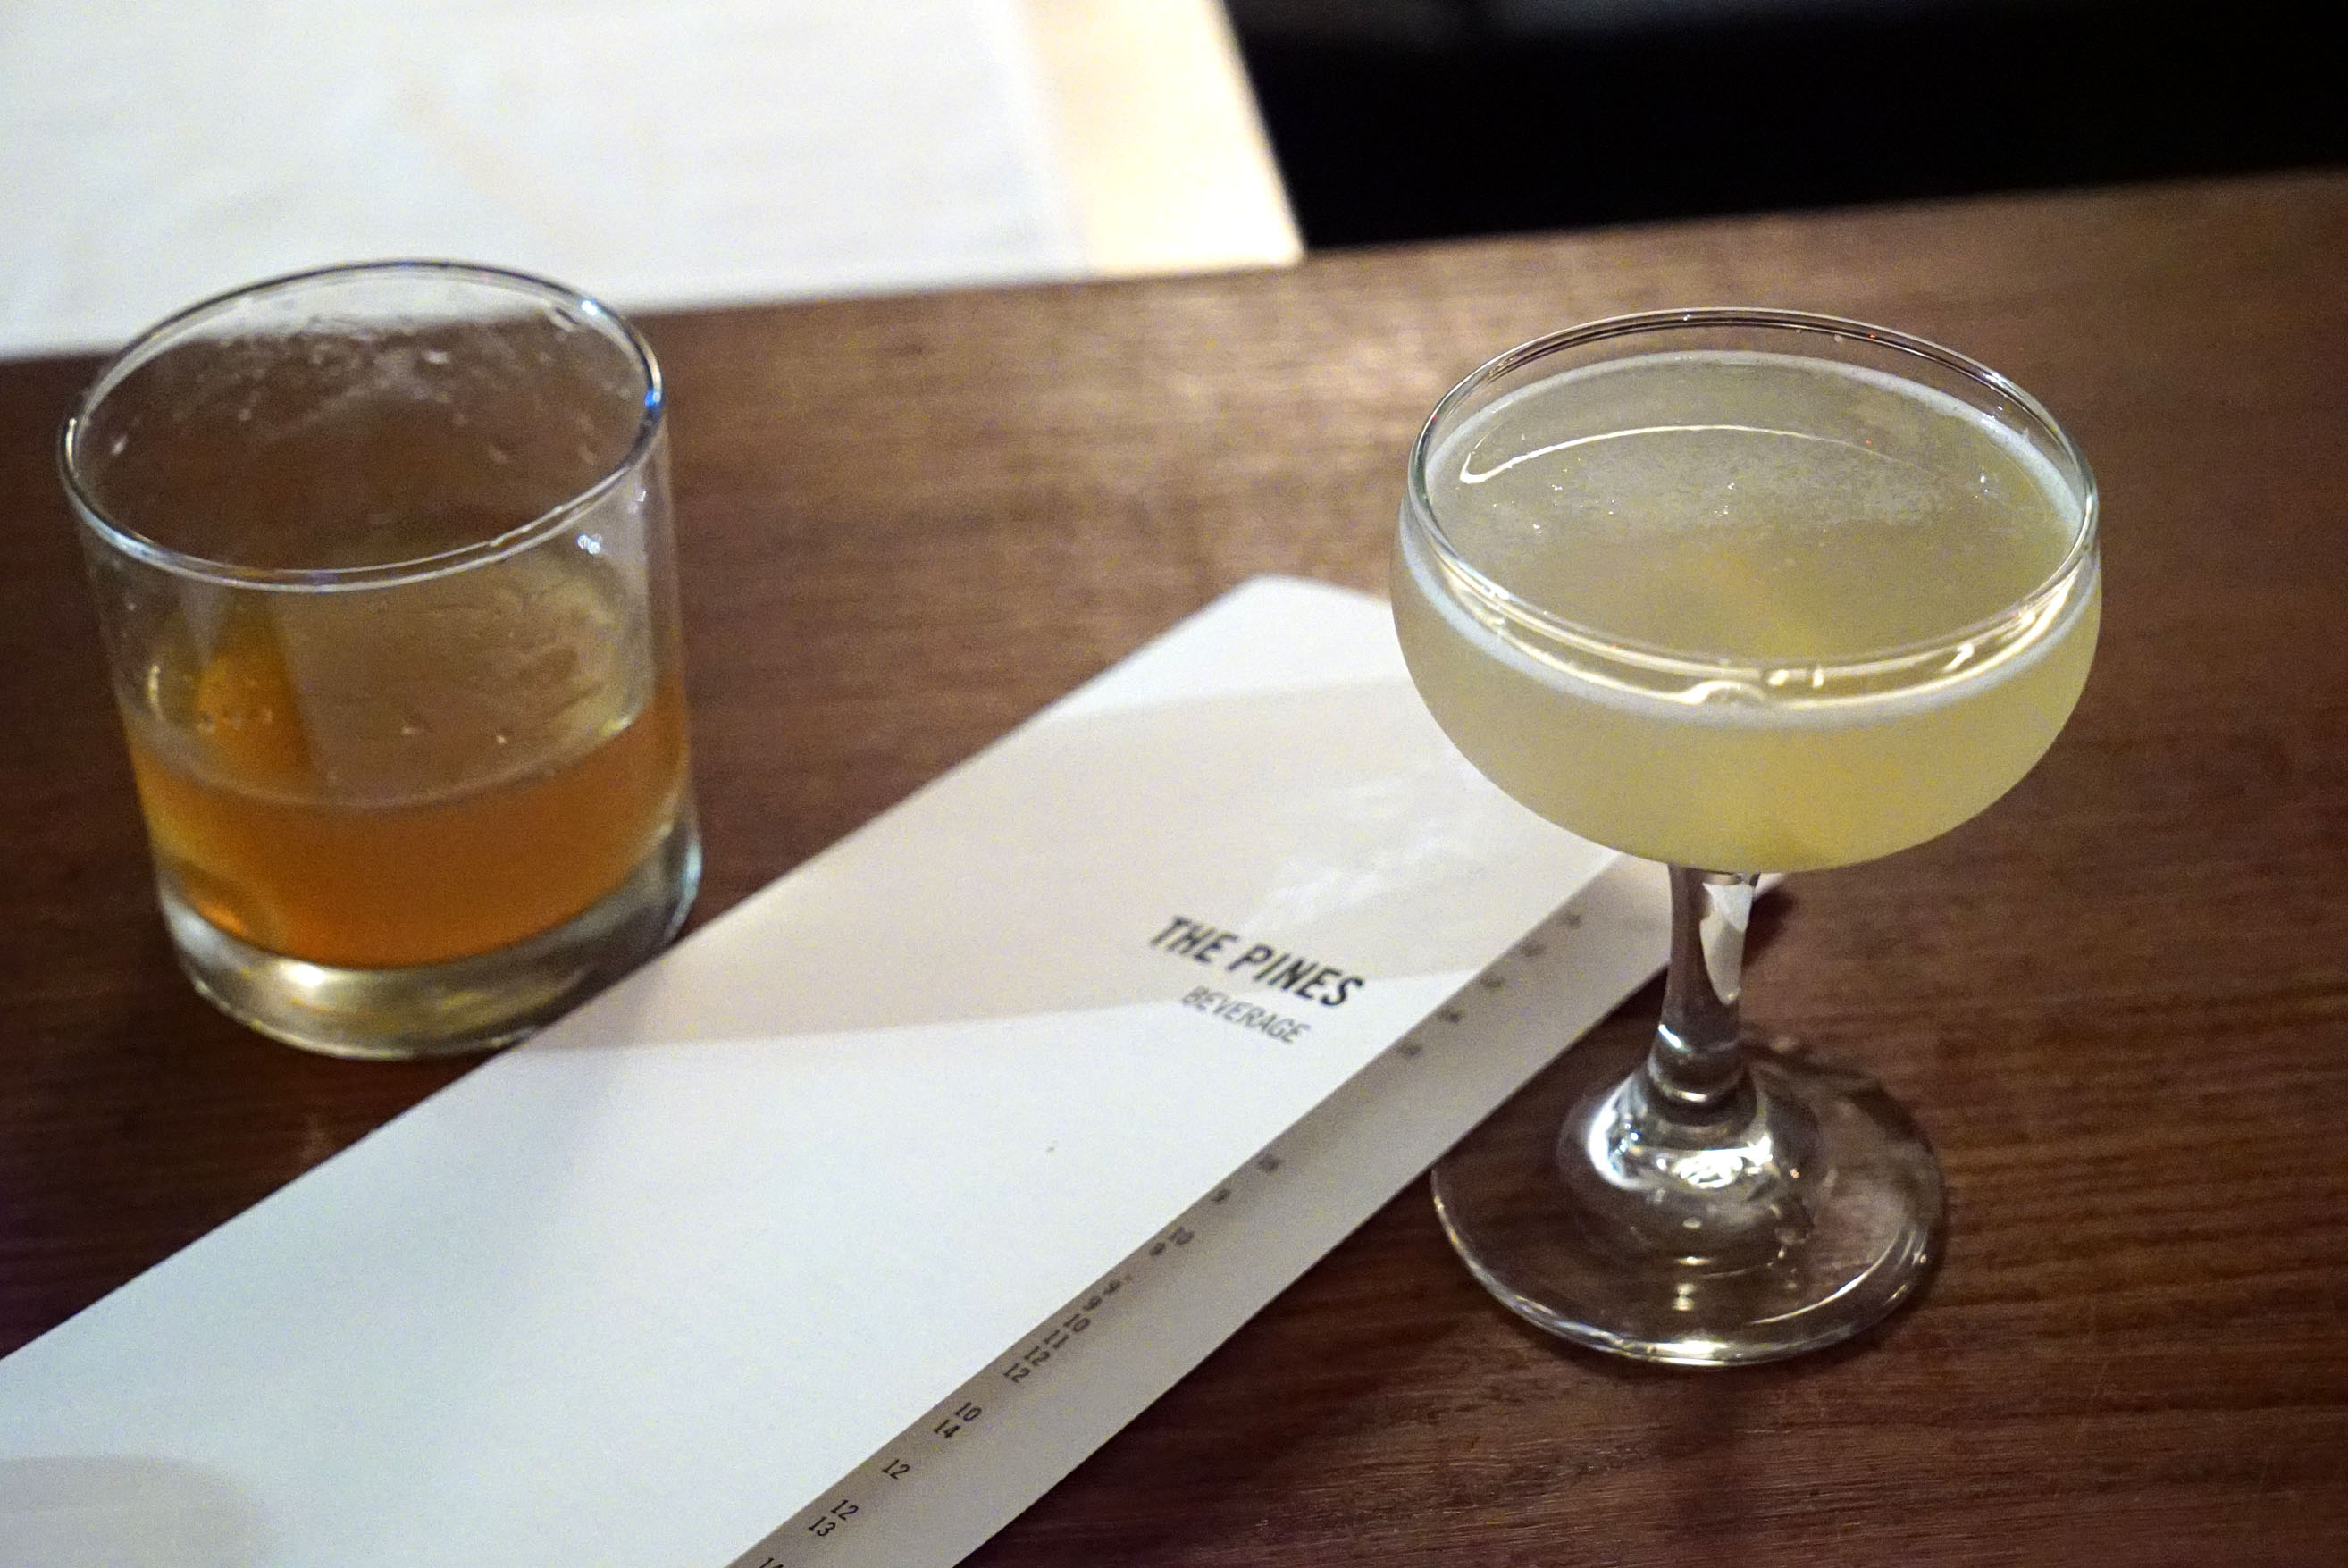
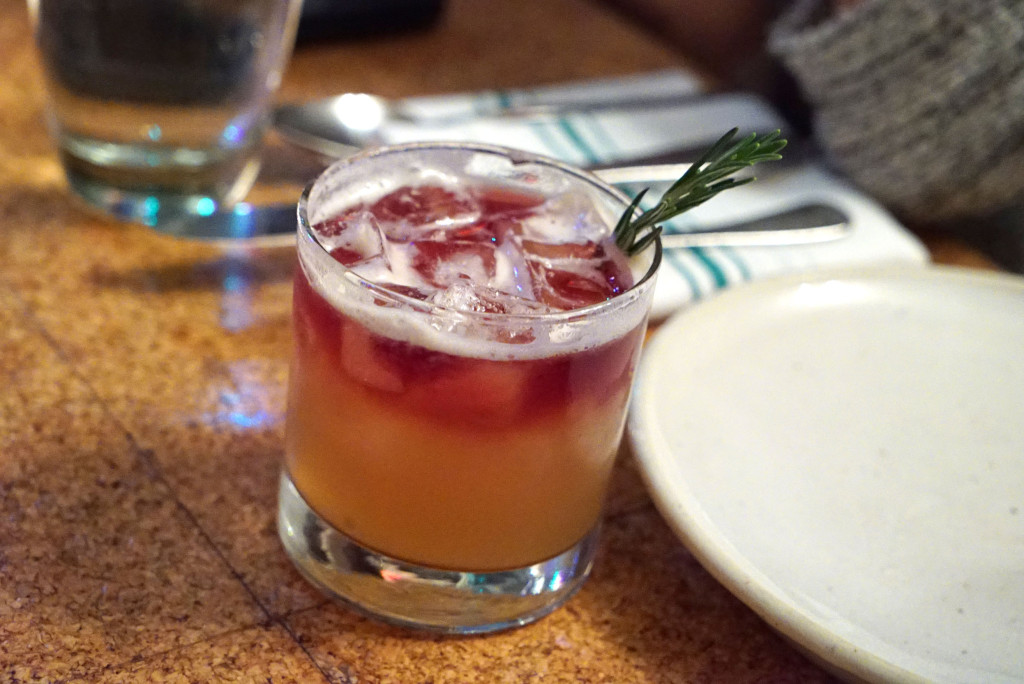
To my excitement, the menu was chock full of delicious looking meat goodies. We sipped on a pair of nice cocktails while we wrestled with what to order.

On the left is The Pines, a rye drink with douglas fir (burnt/smoked pine needles for a really nice woodsy, aromatic nose) and yuzu; on the right is the Air & Sea, a gin drink with dulse, lemon and violet.

DSC08619

We ended up going for three entrees instead of the traditional apps, sides and entrees routine. But before our first item came out, John sent over an order of duck rillettes. This is aged duck served terrine style with a pastrami sandwich theme: dill sauce (it tasted like pickles), a cabbage kraut, mustard and crunchy puffed rye grains.

DSC08629

This inventive dish threw us for a tasty loop, and it set the tone for what was one of the most fun, innovative and delicious meals we’ve had in a long time.

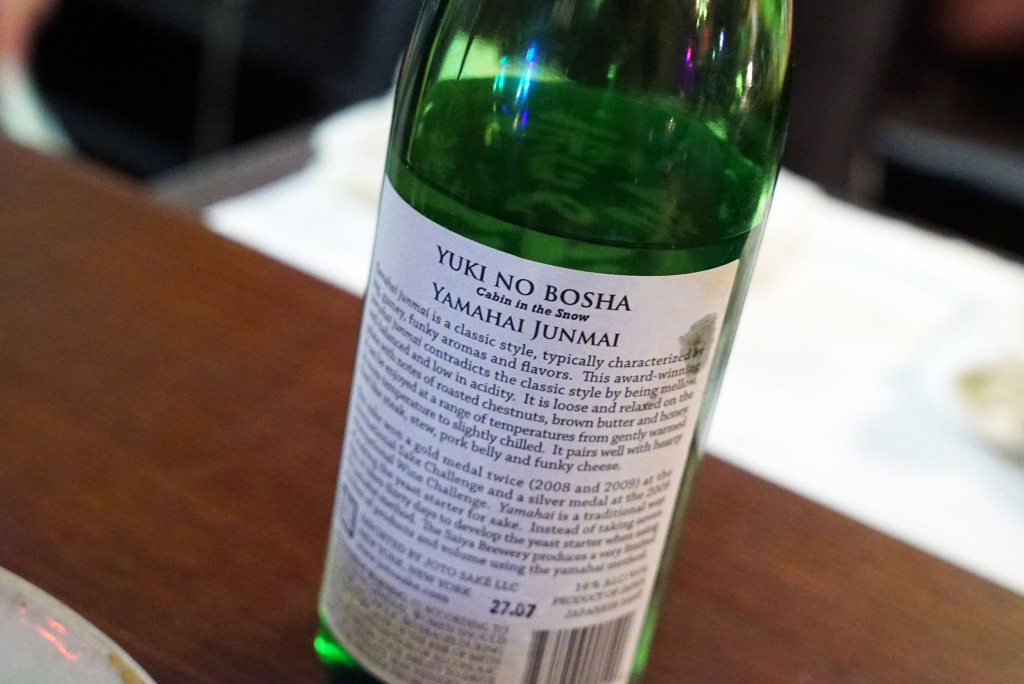
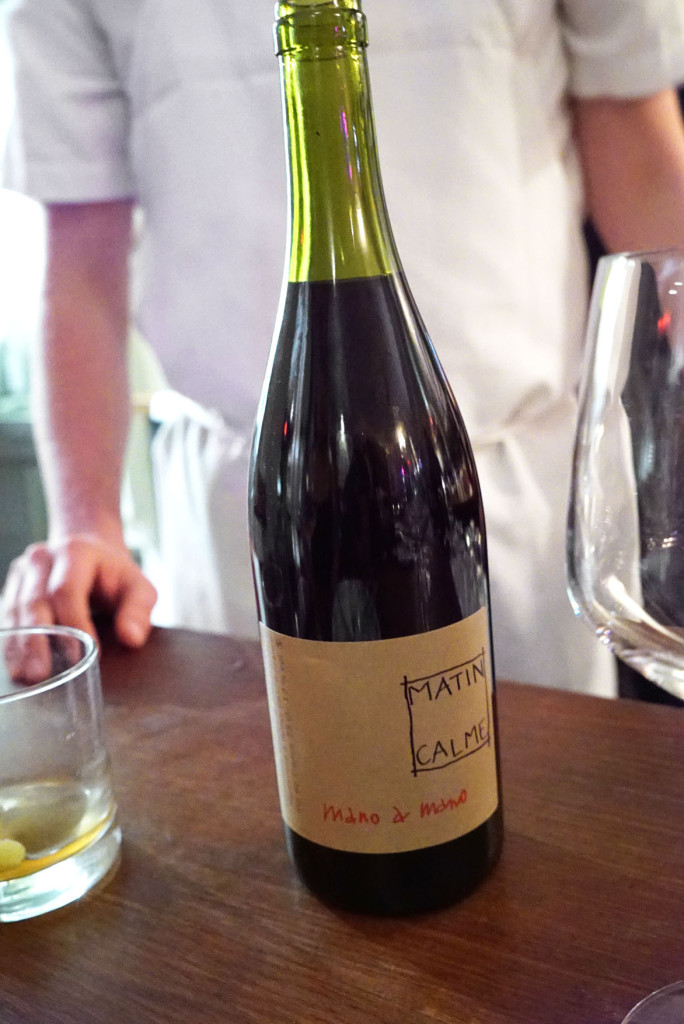
John paired the duck with this really smooth, clean sake:

DSC08643

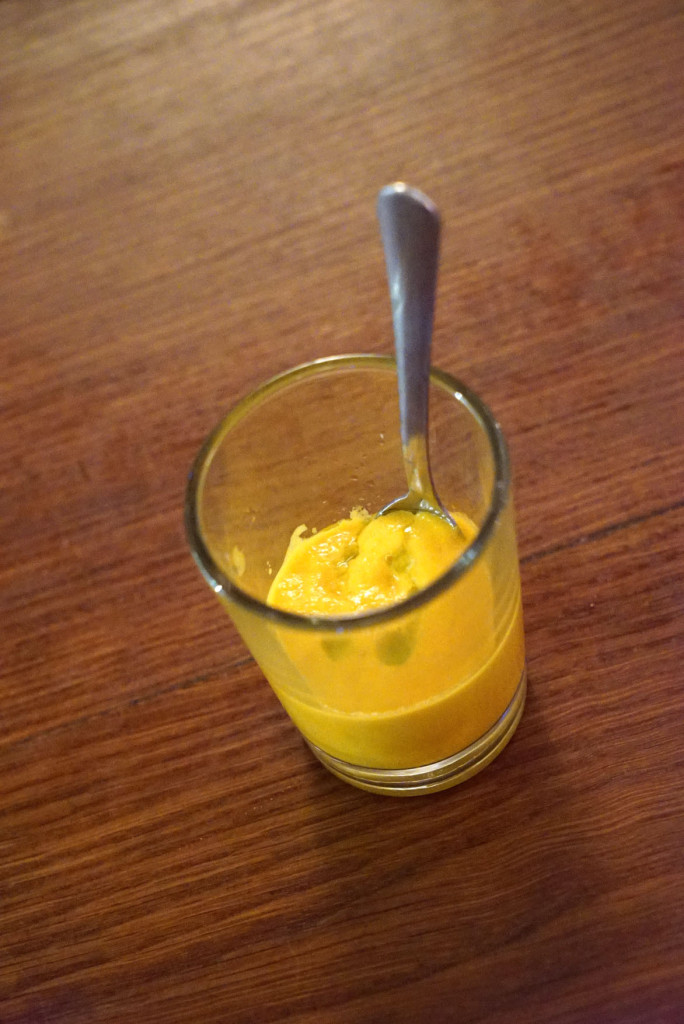
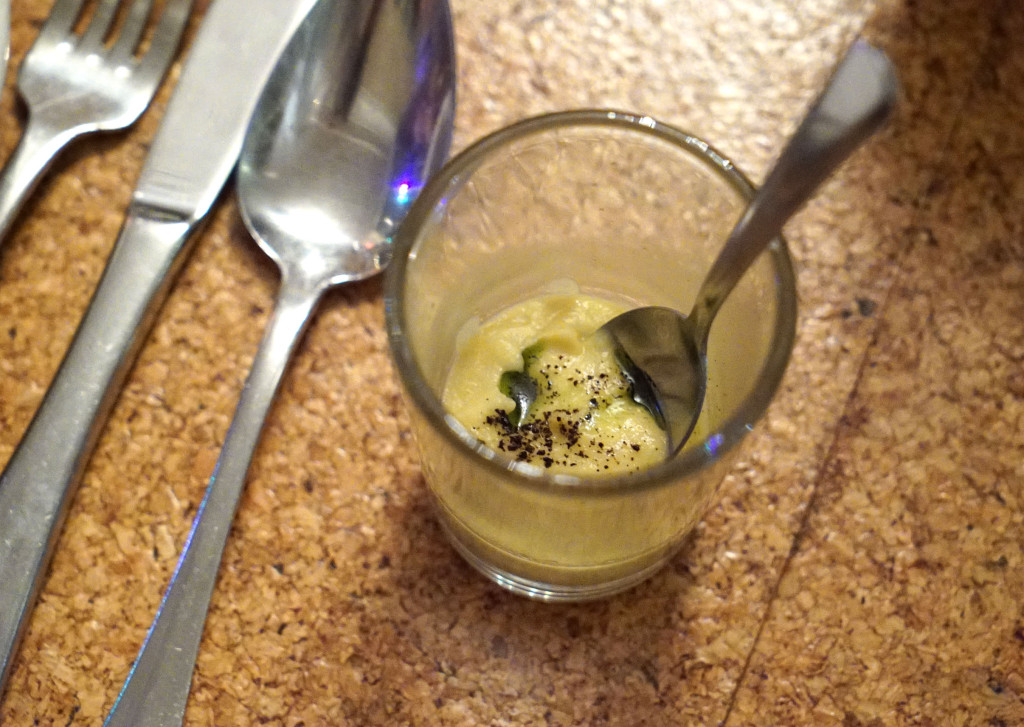
Oh and there was this nice little amuse of carrot soup/puree with sage oil. It had a spicy and smoky kick to it.

DSC08625

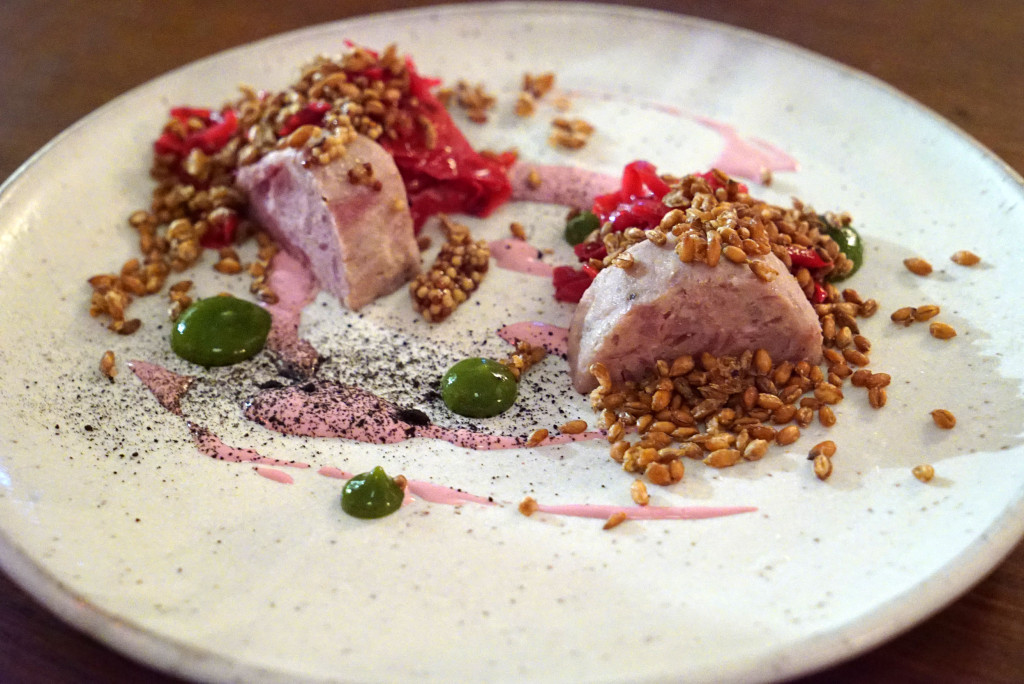
Our first entree was pork jowl. If you’ve never had this, it is essentially bacon from the face of a pig. It’s cured, smoked cheek meat. If you know anything about the cheek meat of an animal, you know that it is some of the most tender and sought after bits of goodness you can find. This tasted like really awesome smoked bacon. It was savory yet slightly sweet, and sat on a pumpkin and cabbage pancake that was somewhat reminiscent of corn bread.

DSC08631

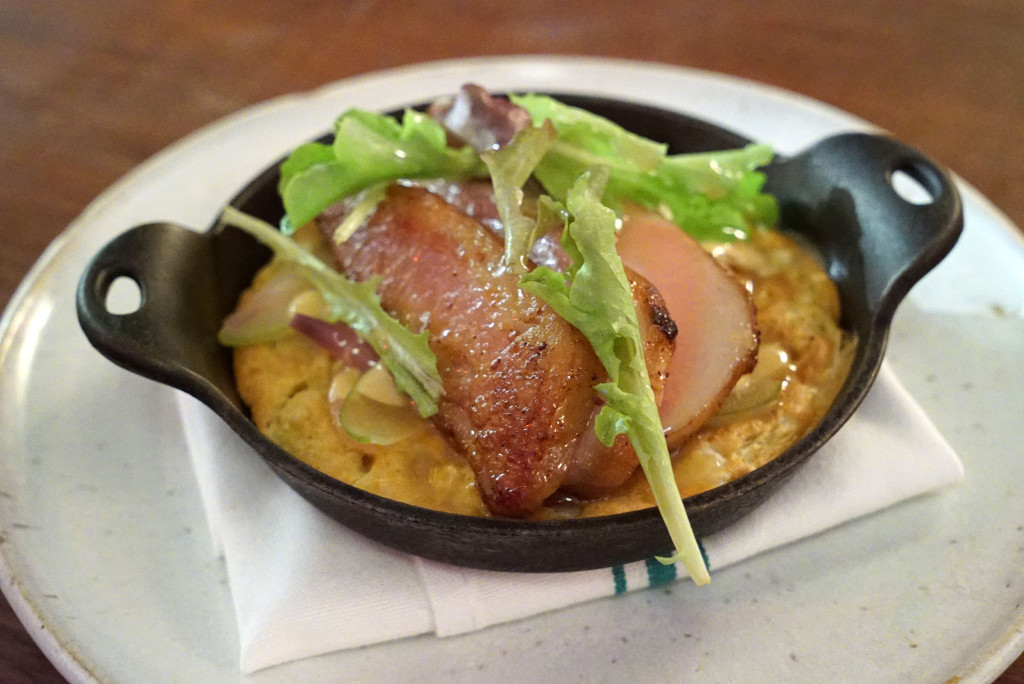
I could very happily eat that shit every morning for breakfast, though I may be tempted to throw a fried egg on top – you know – because breakfast is the perfect time to eat like a savage barbarian. Anyway this dish wasn’t heavy or greasy like you might expect from bacon. The curing and smoking helps in that respect.

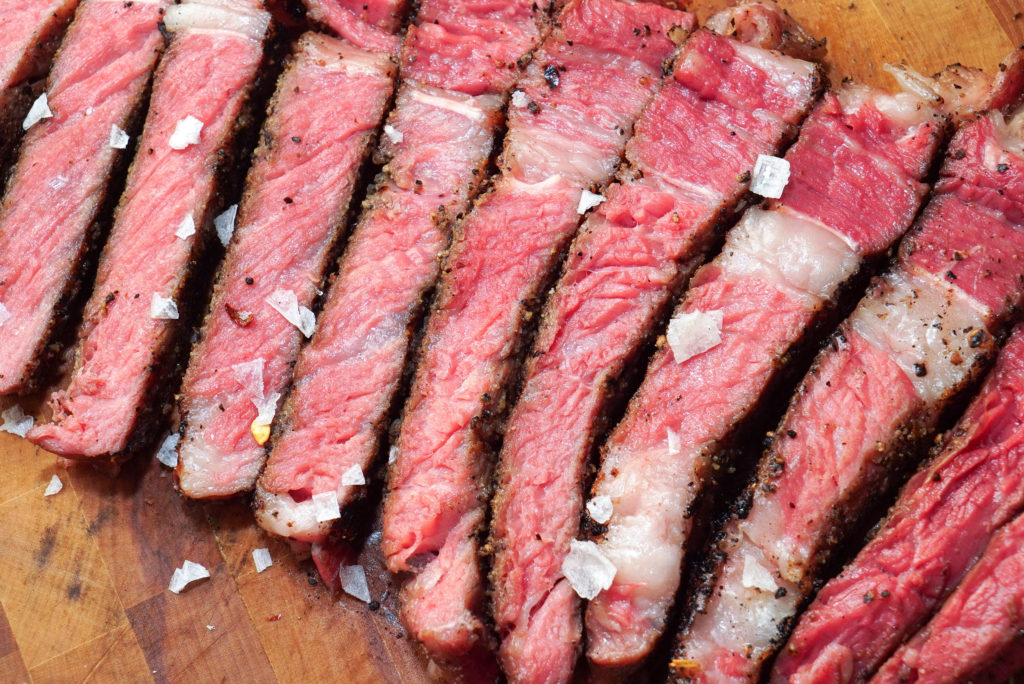
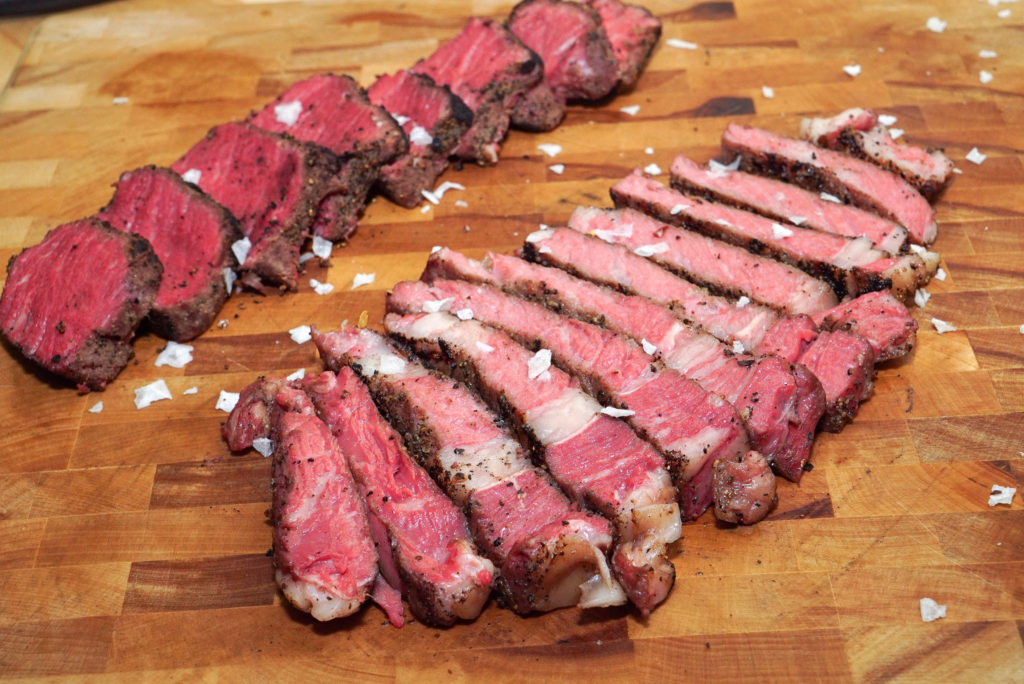
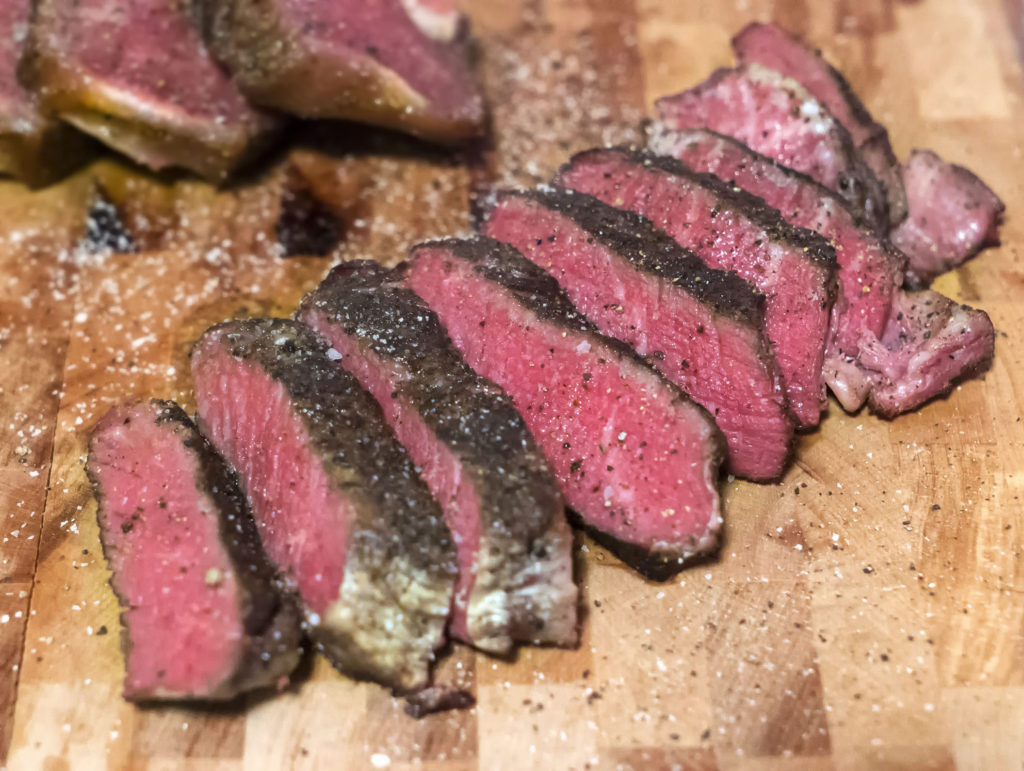
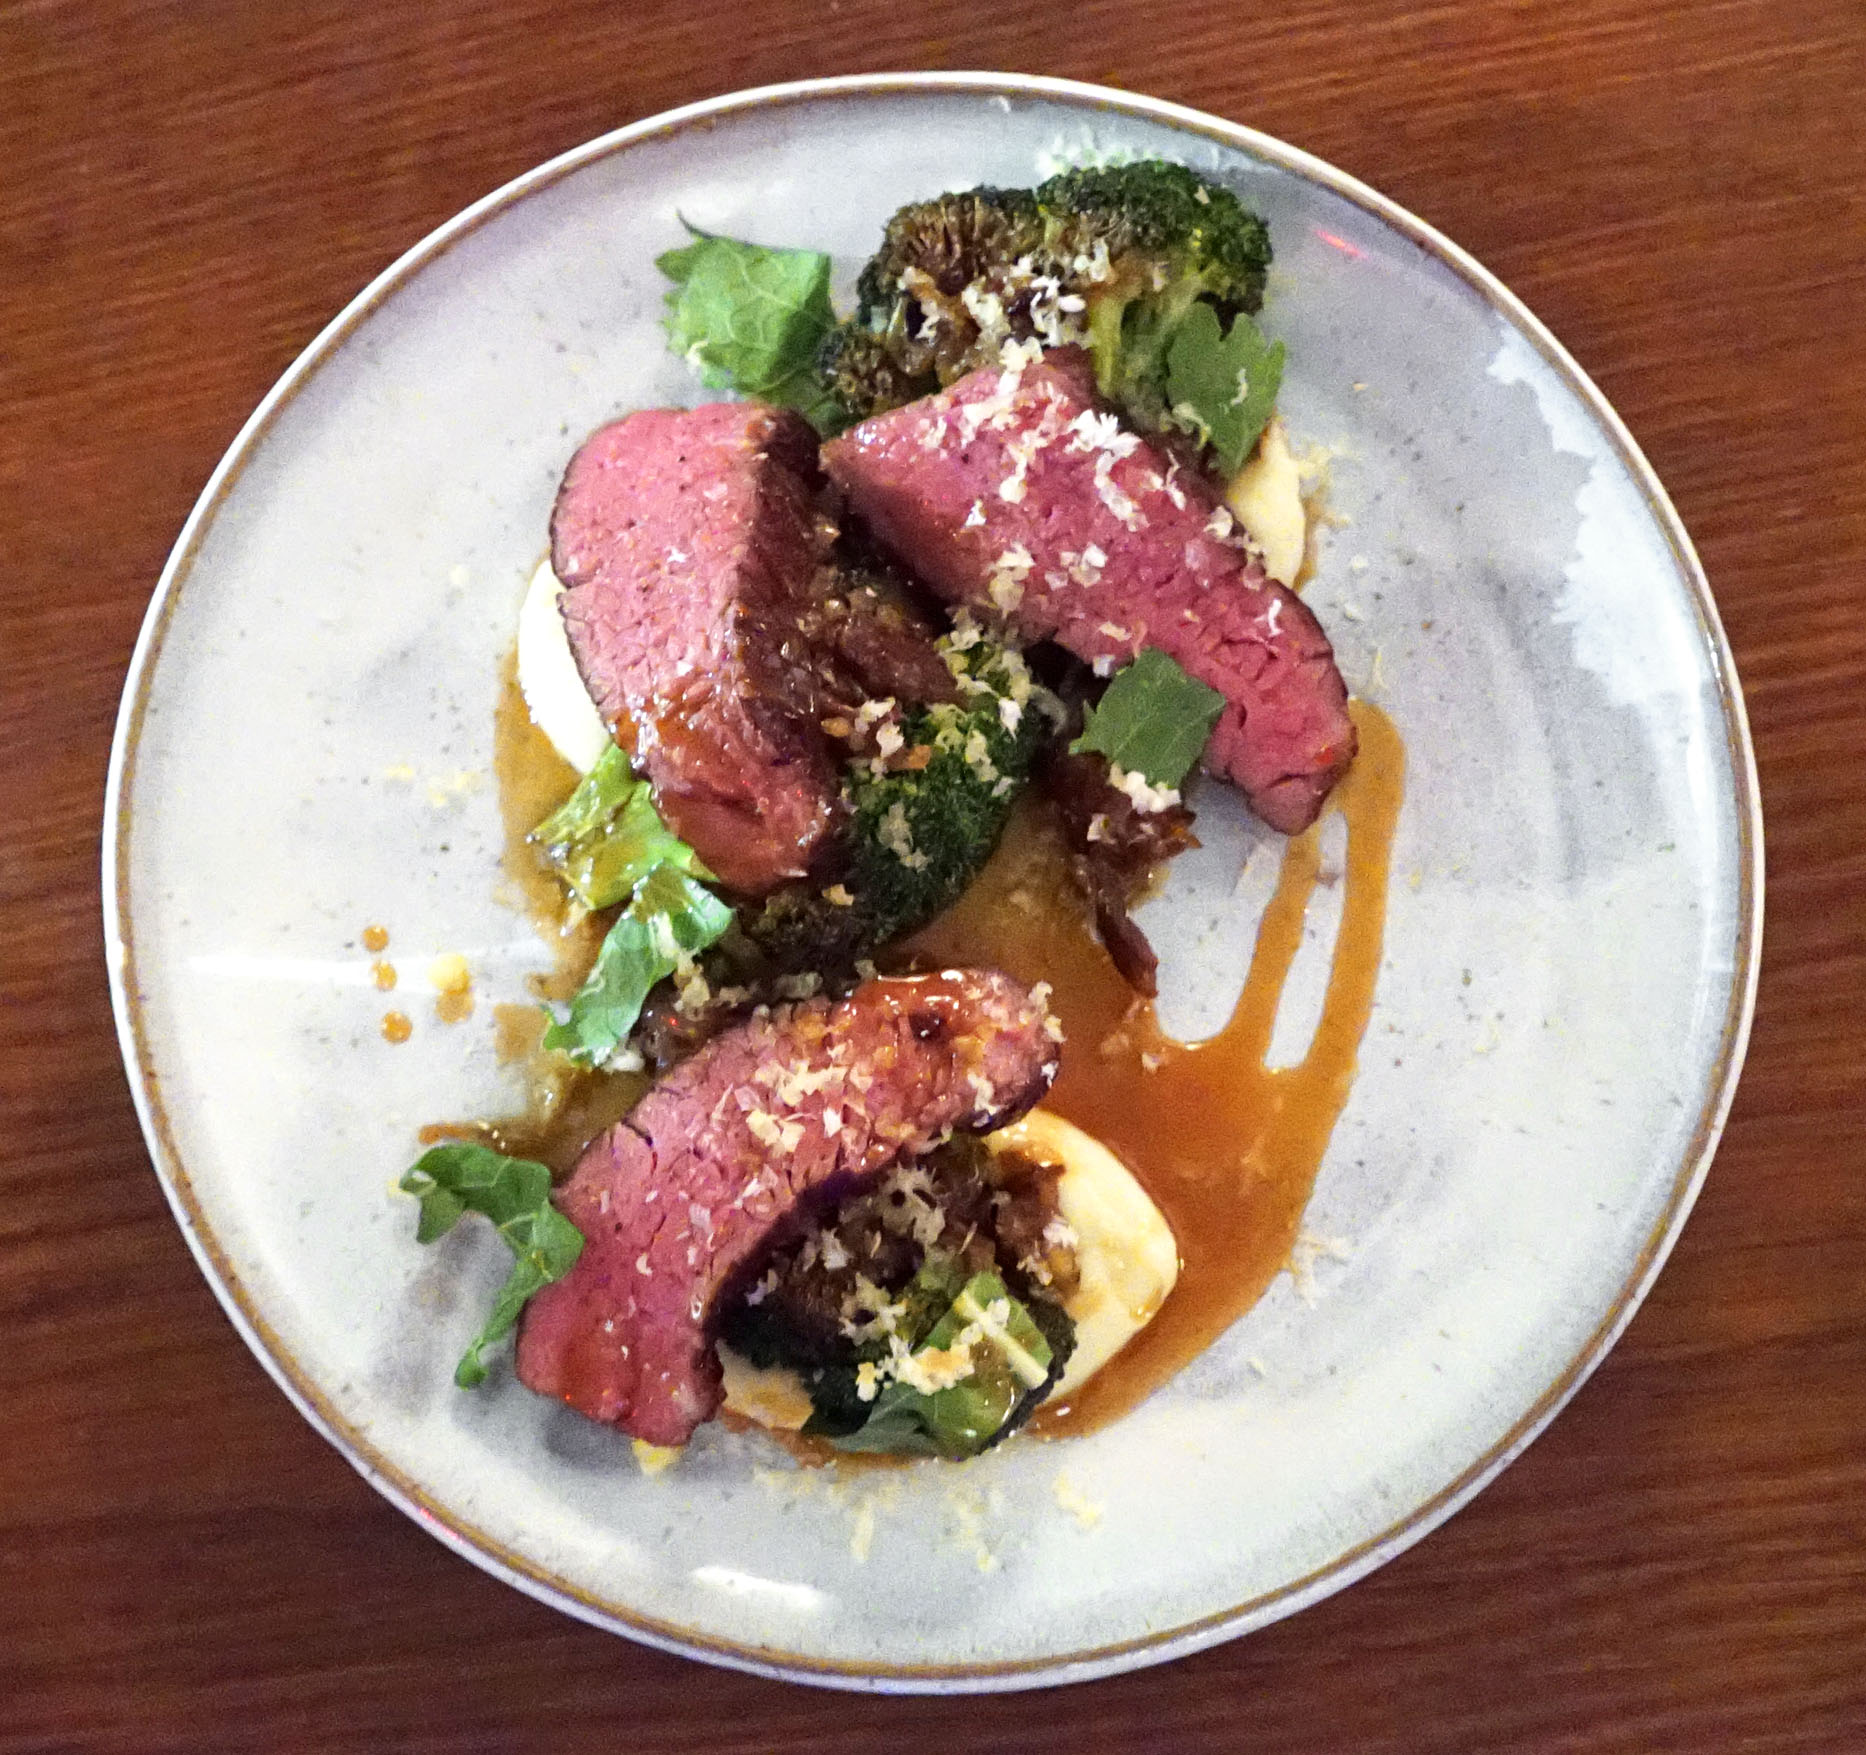
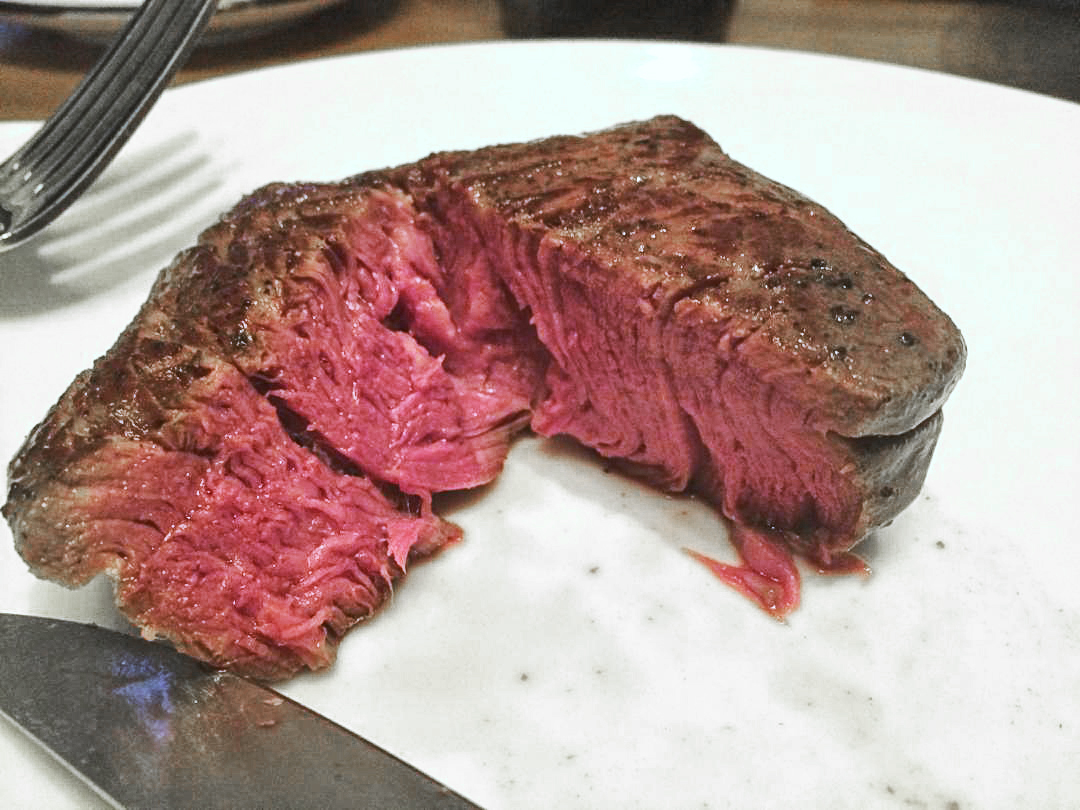
Our first steak dish came out next. After hearing about that blade steak, I couldn’t pass it up.

DSC08652

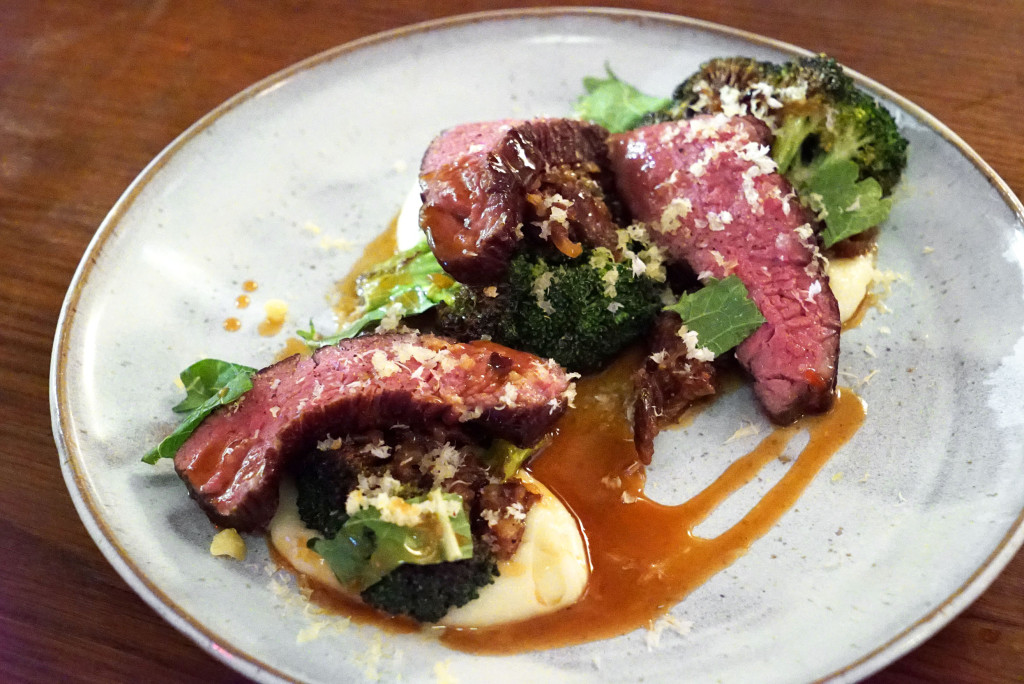
John mixed the normal blade steak plate up a bit and served it with some roasted broccoli, braised oxtail and cheesy potato puree.

DSC08655

As you can see, there’s even a bit of shaved horseradish over the top to punch up the salt and tie the meat in with the potato. Really nice.

DSC08653

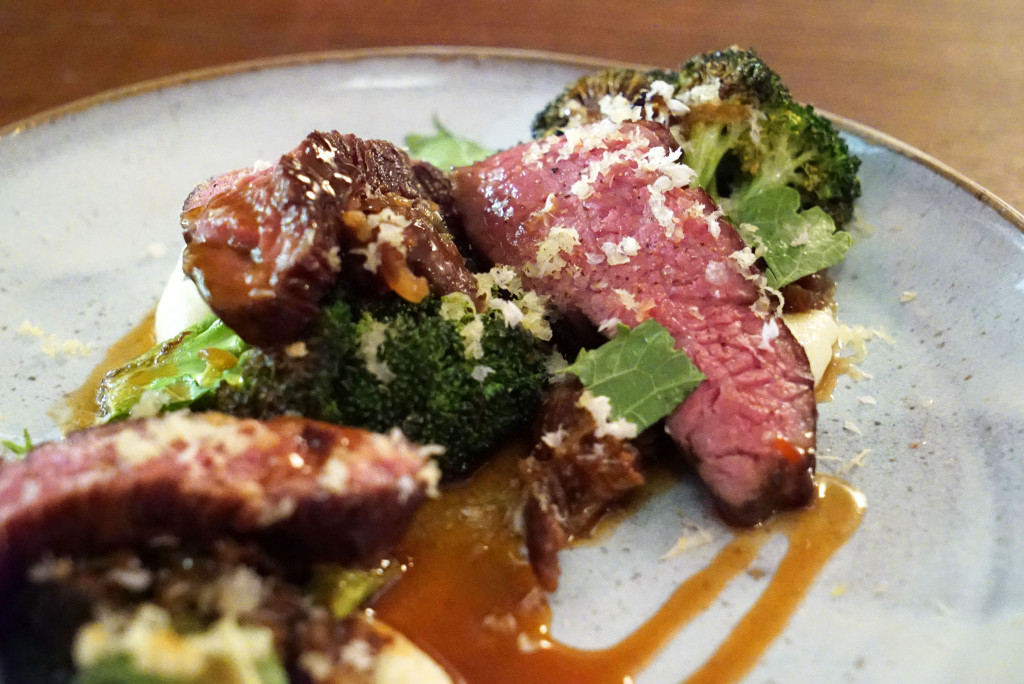
This steak is incredibly good. John has taken a lesser known, less desirable and rarely featured cut and showcased it in a way that will have you searching for it in every restaurant. It’s easily 10/10 for flavor. It was so juicy and tender inside. Perfectly cooked, as you can see, and the sear on the outside locked in all that flavor. It was super crispy on the outside without any part of the inside getting cooked beyond medium rare. Just awesome!

John paired this with a unique and unexpected rose, which had some tartness to it. The cool thing about The Pines is that, if you’re interested, you can learn a lot about the food you’re eating and the stuff you’re drinking. John gets to know all the people who provide his source material. The vintner of this wine, for example, or the farmers and ranchers who provide the meat and produce. He gets to know their stories, and he shares it with diners for a more rich, engaging experience. I dig and appreciate that, and it’s exactly what I was talking about on here recently – that I want to see more of it.

DSC08644

I should probably mention here that The Pines sources all of its beef from Happy Valley Meat Co., which is based out of Central PA. Both John and his sous chef Neel Patil (the creative force behind the duck rillettes dish, featured above) are extremely modest in that they attribute so much credit for the success of their menu to those farmers. While much credit is indeed deserved by the farmers, it is very easy to fuck up good meat if you don’t know what you’re doing. John and Neel clearly deserve as much credit as the farmers, because they knocked the beef dishes out of the park!

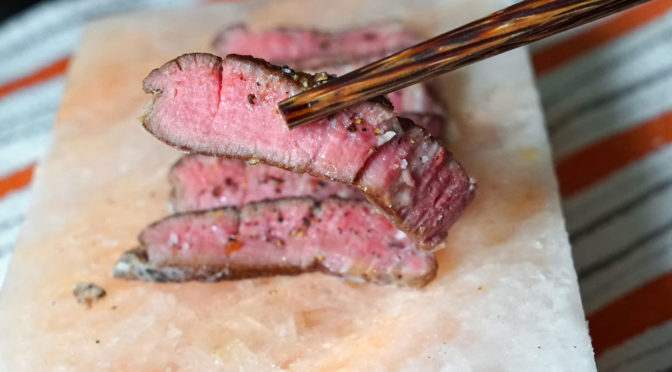
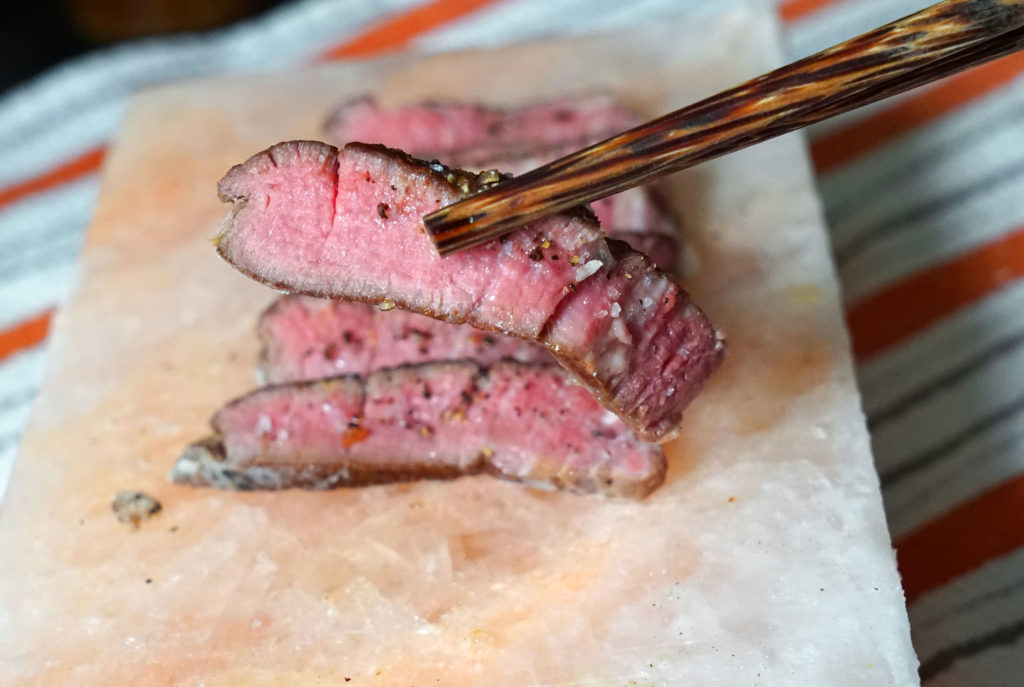
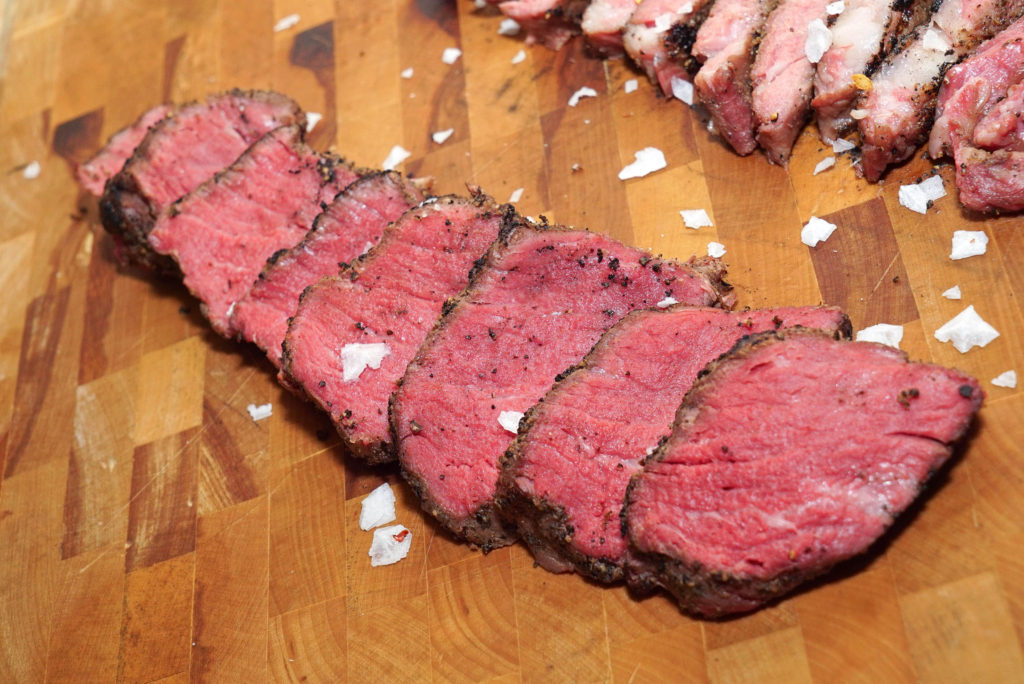
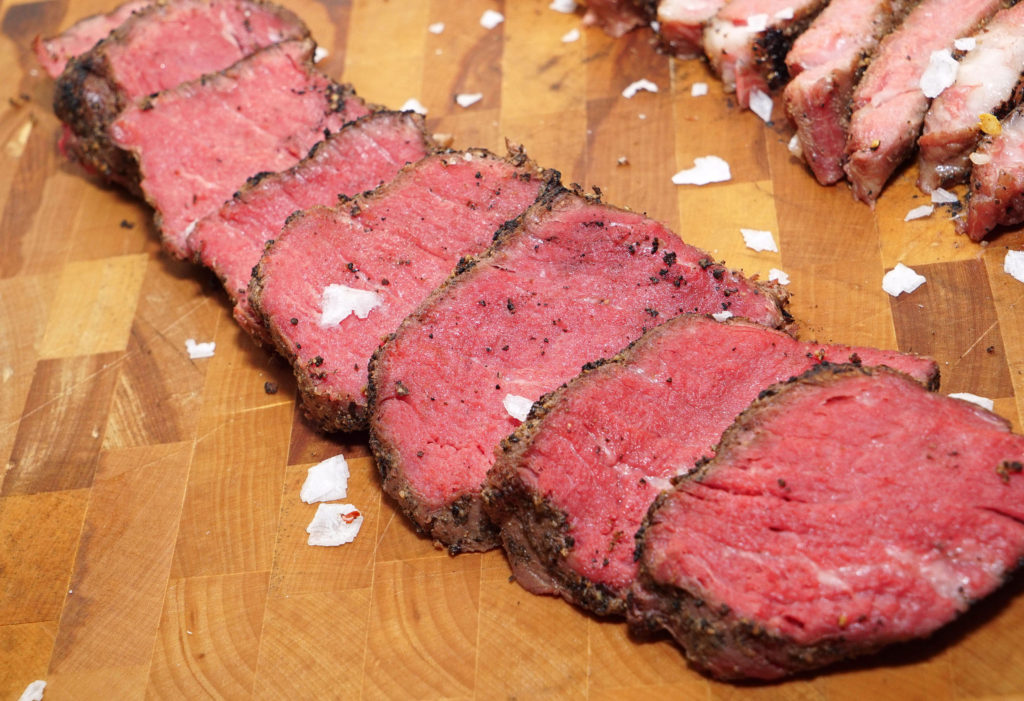
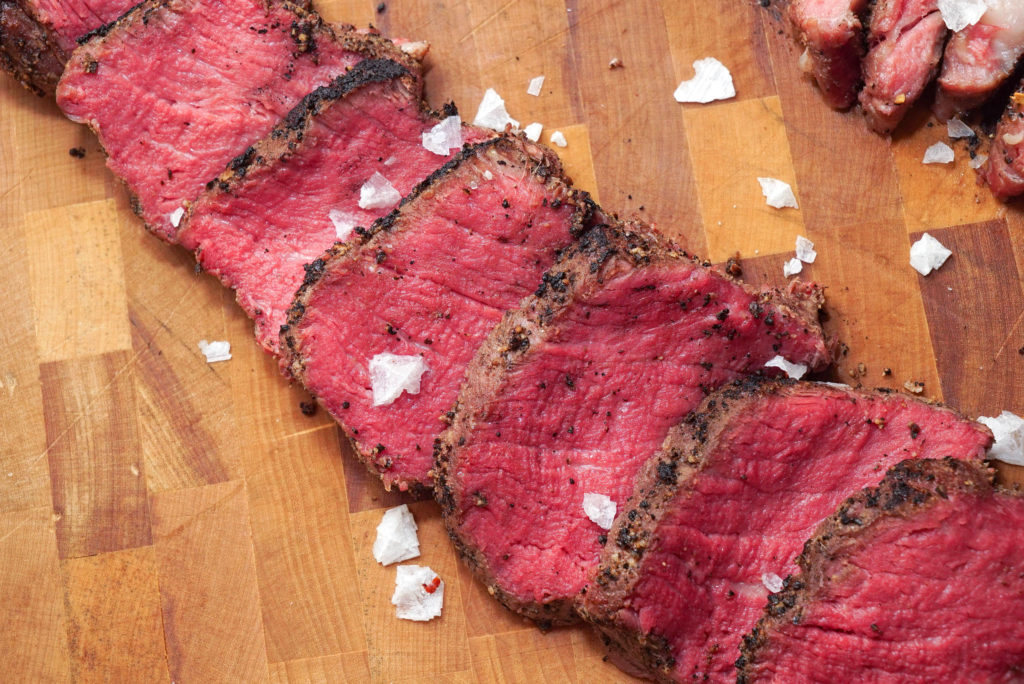
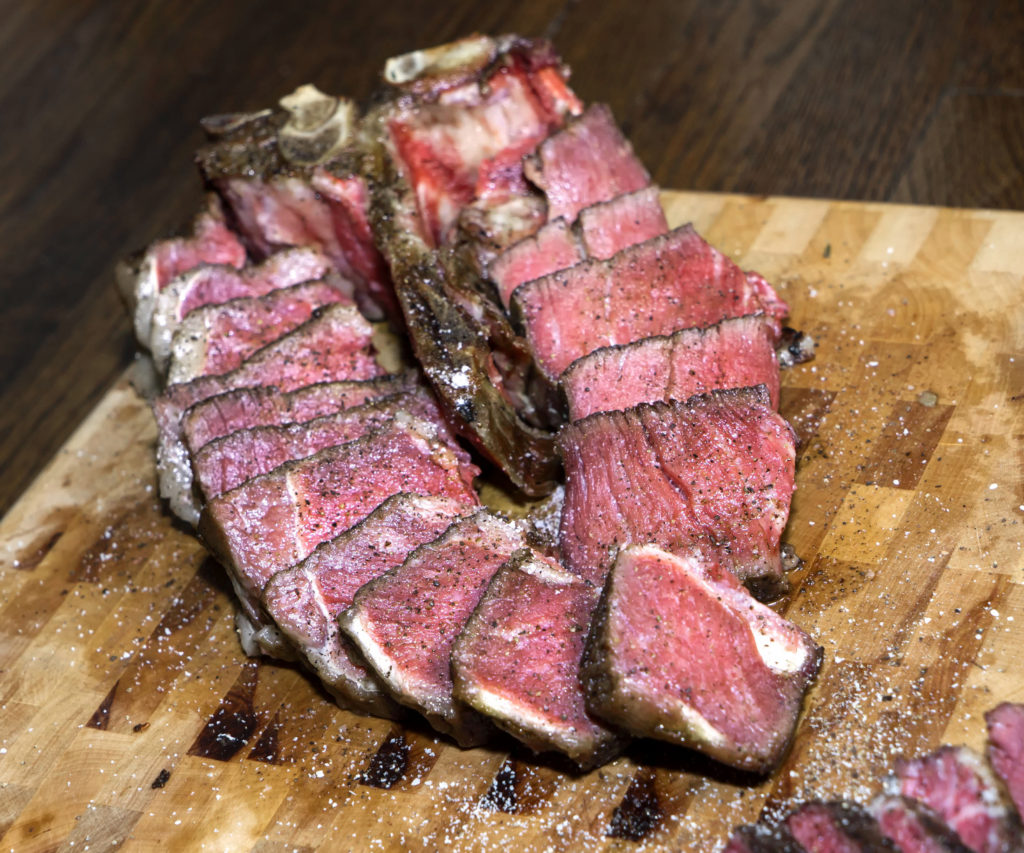
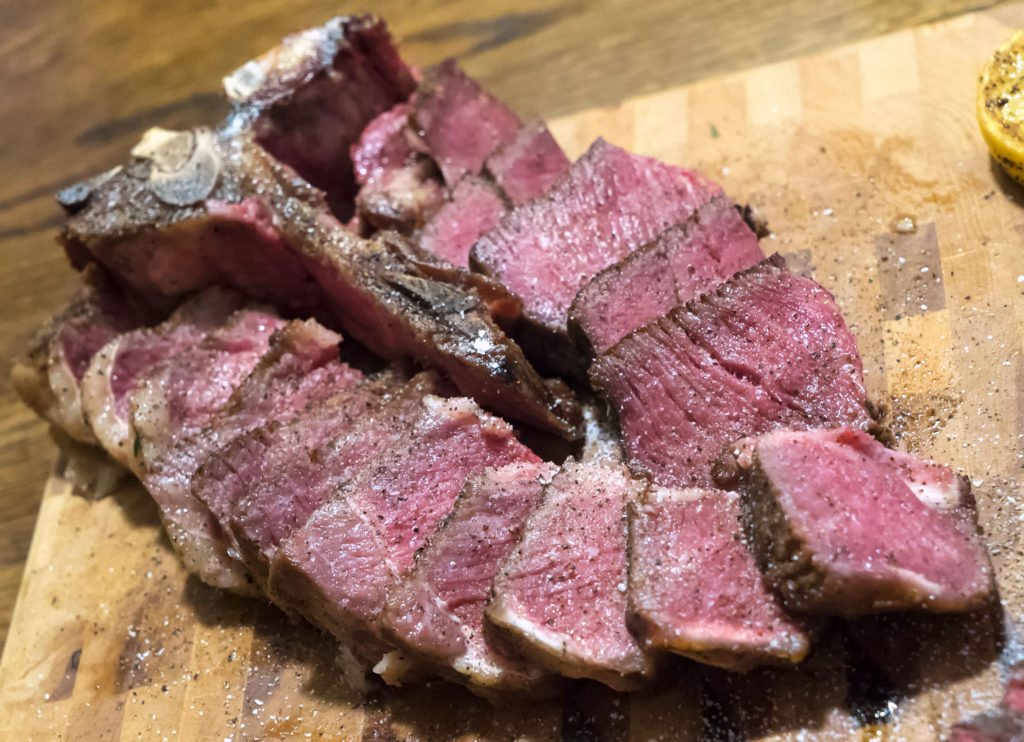
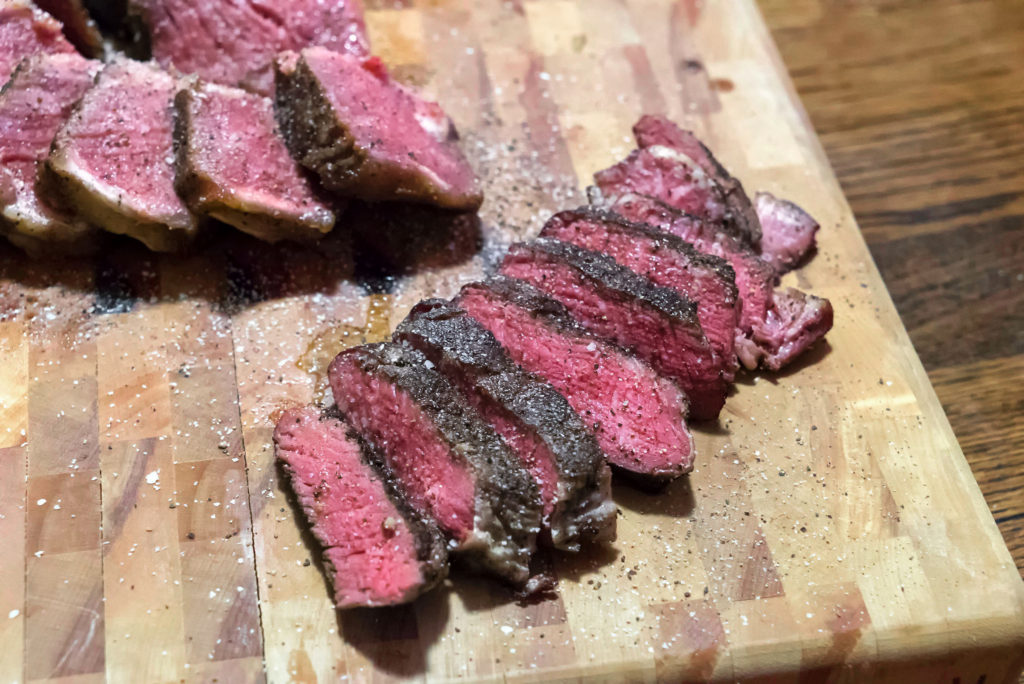
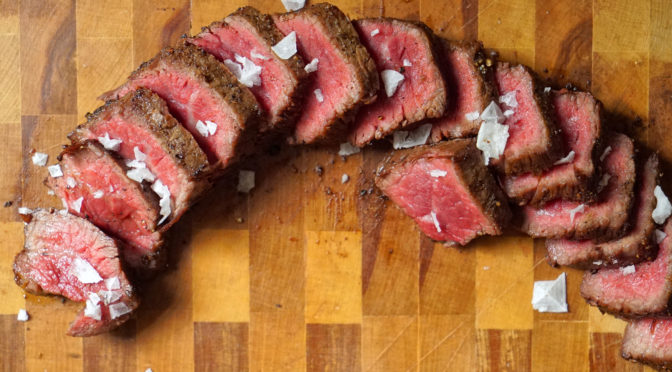
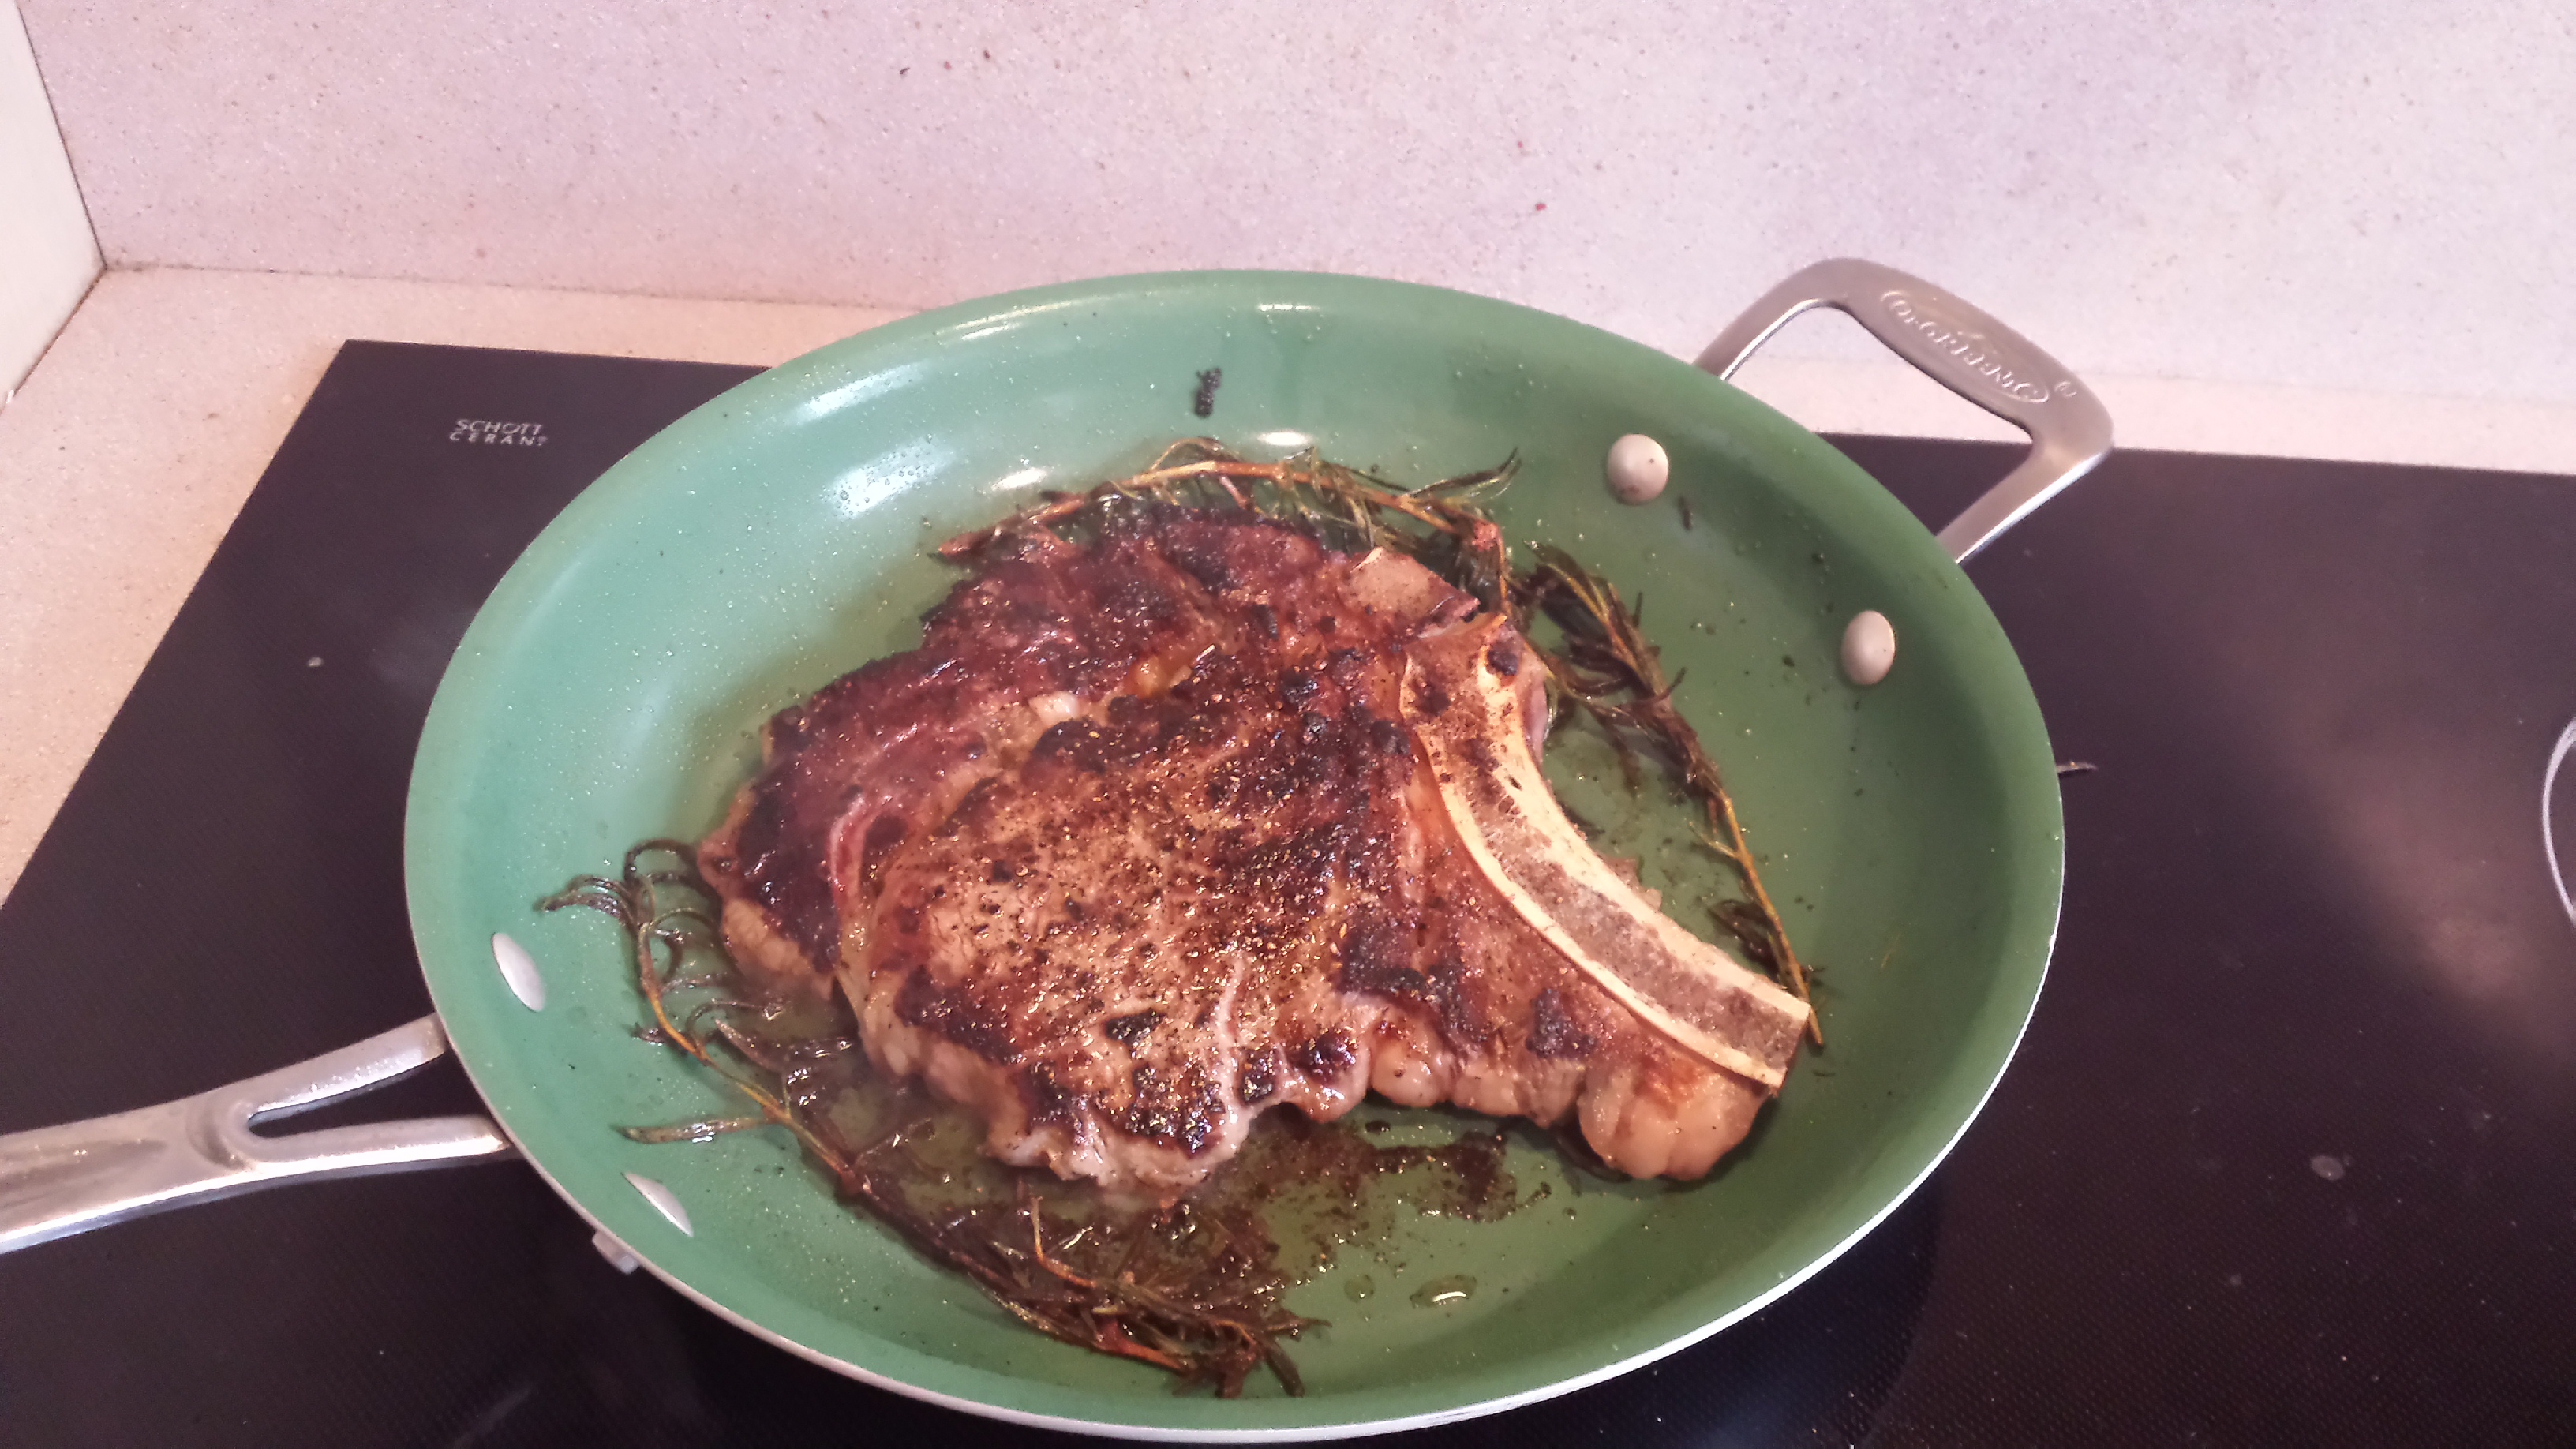
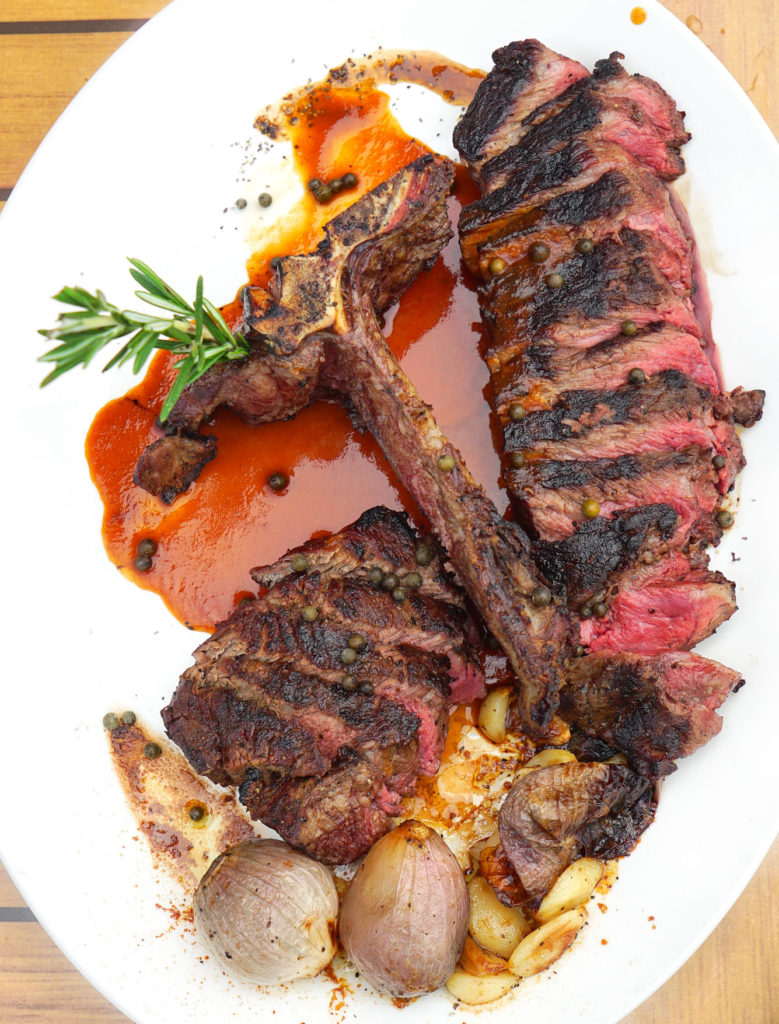
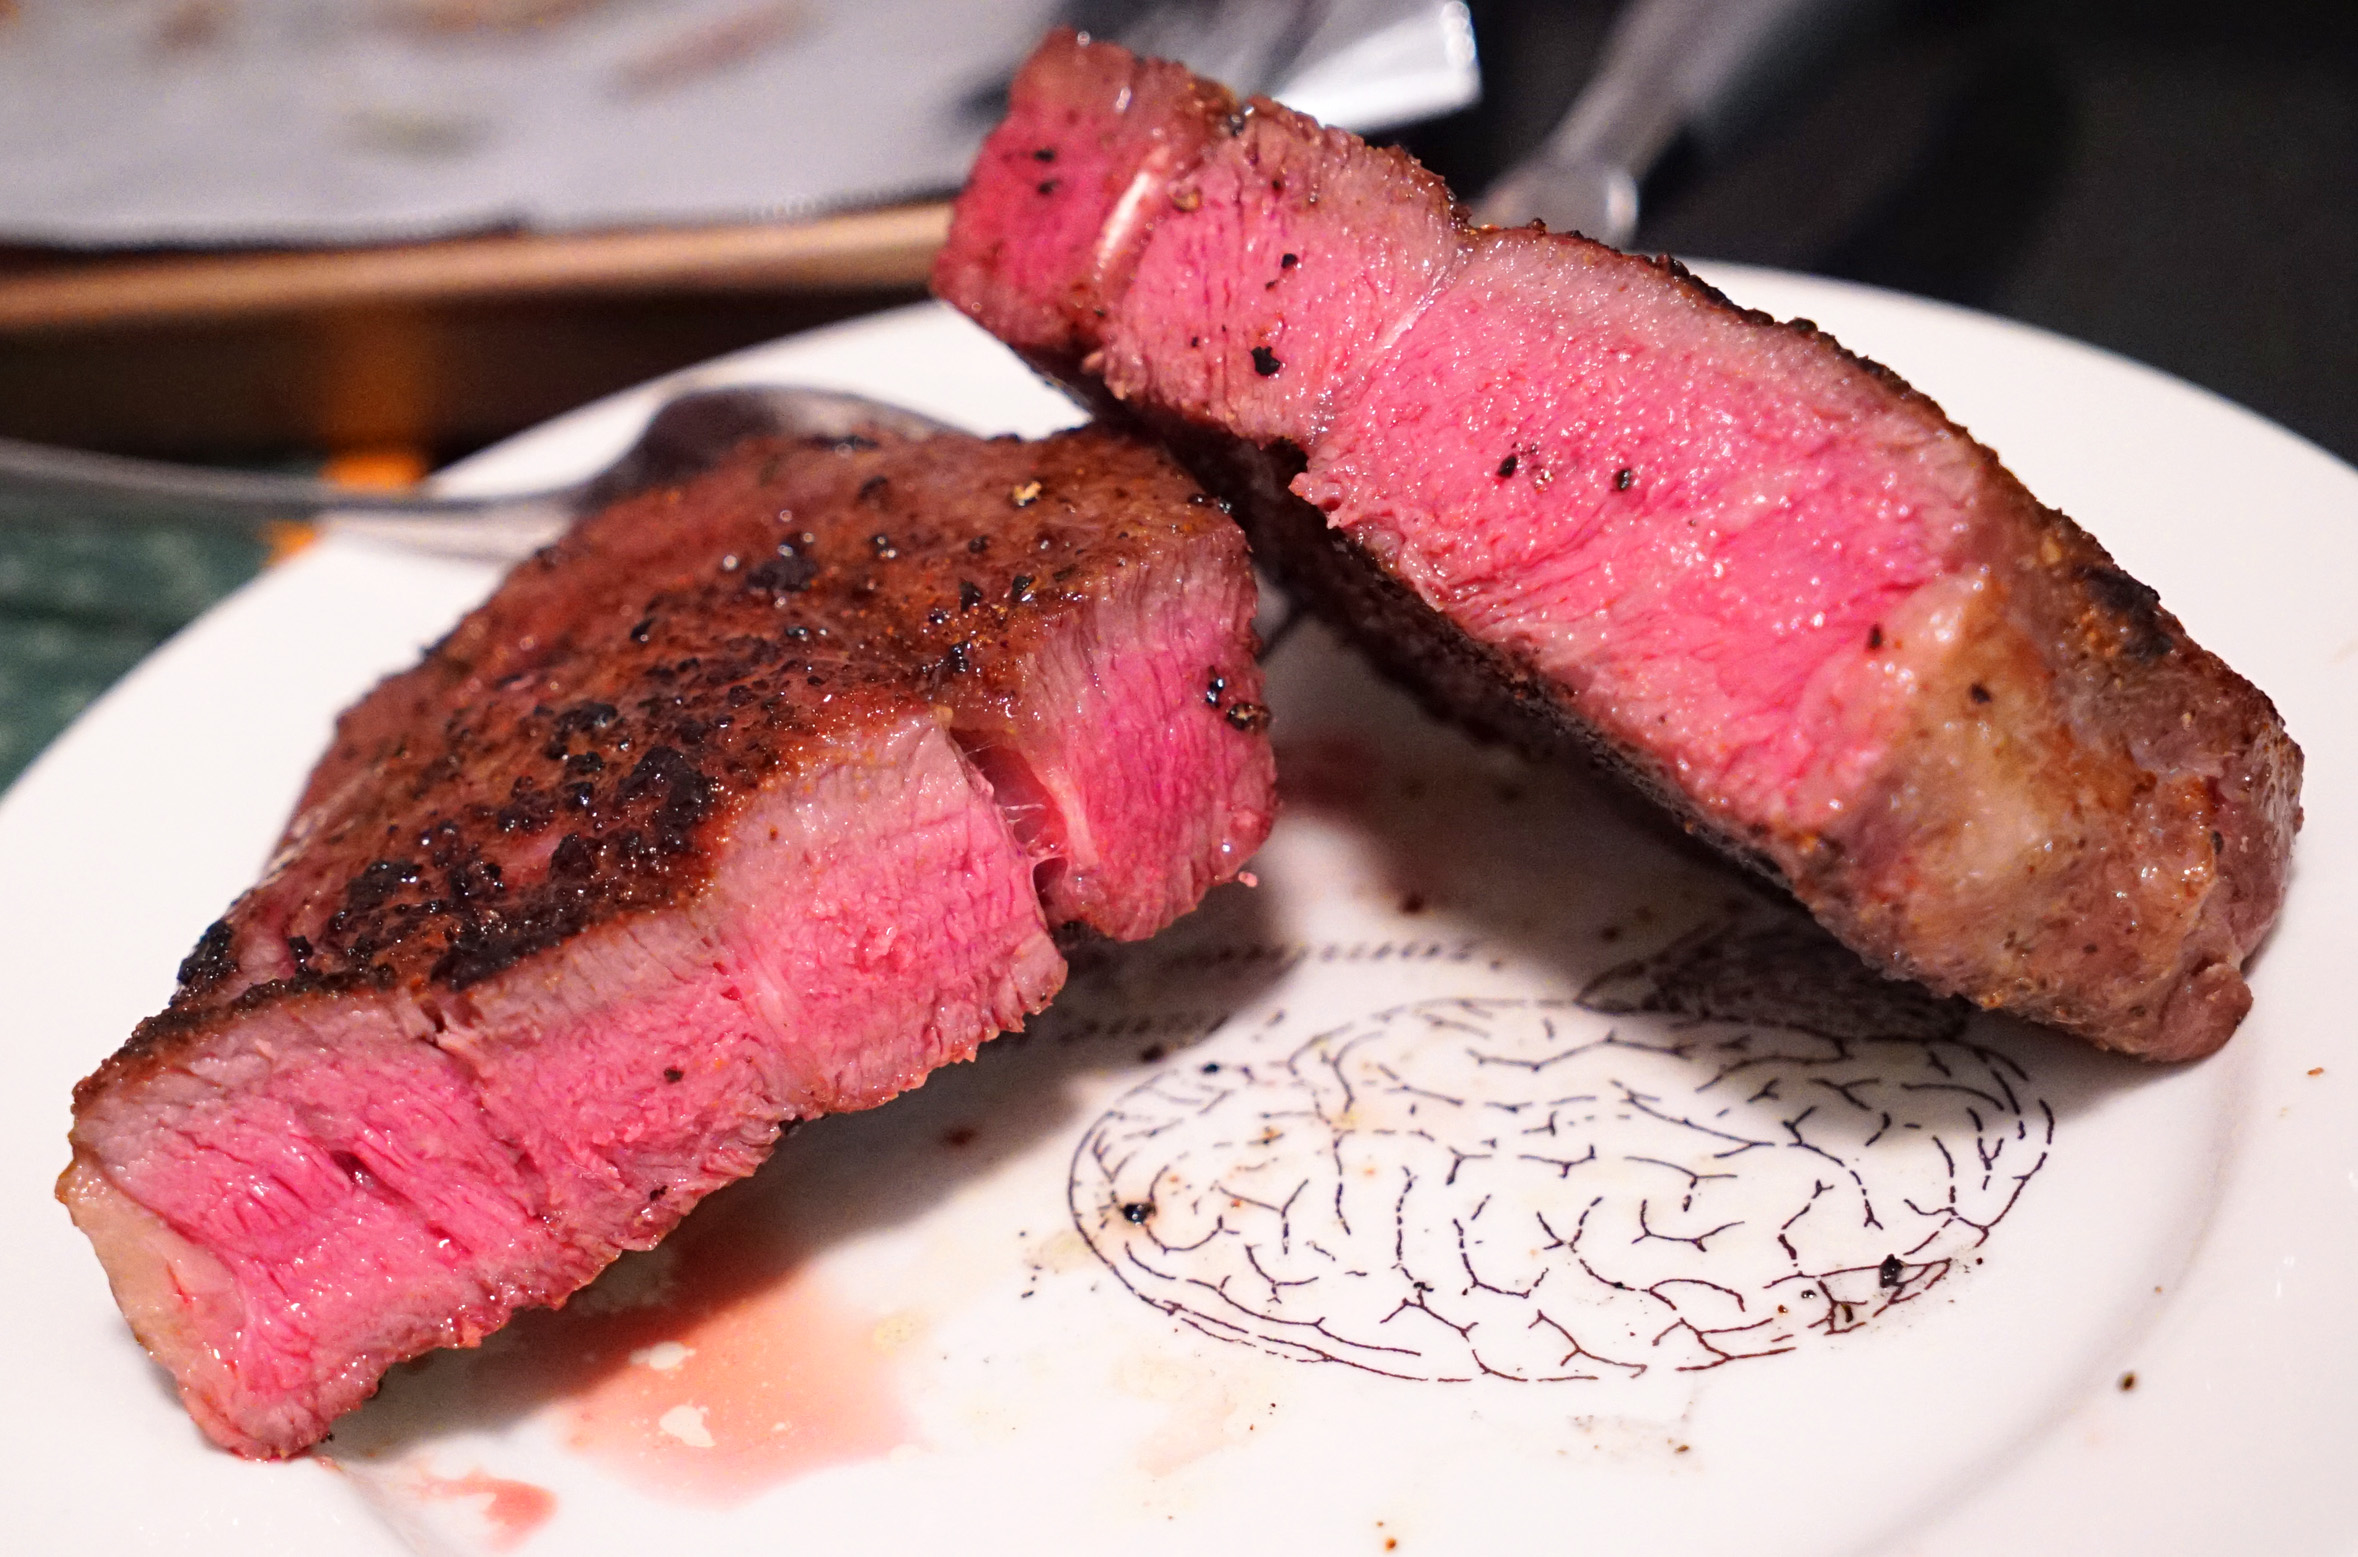
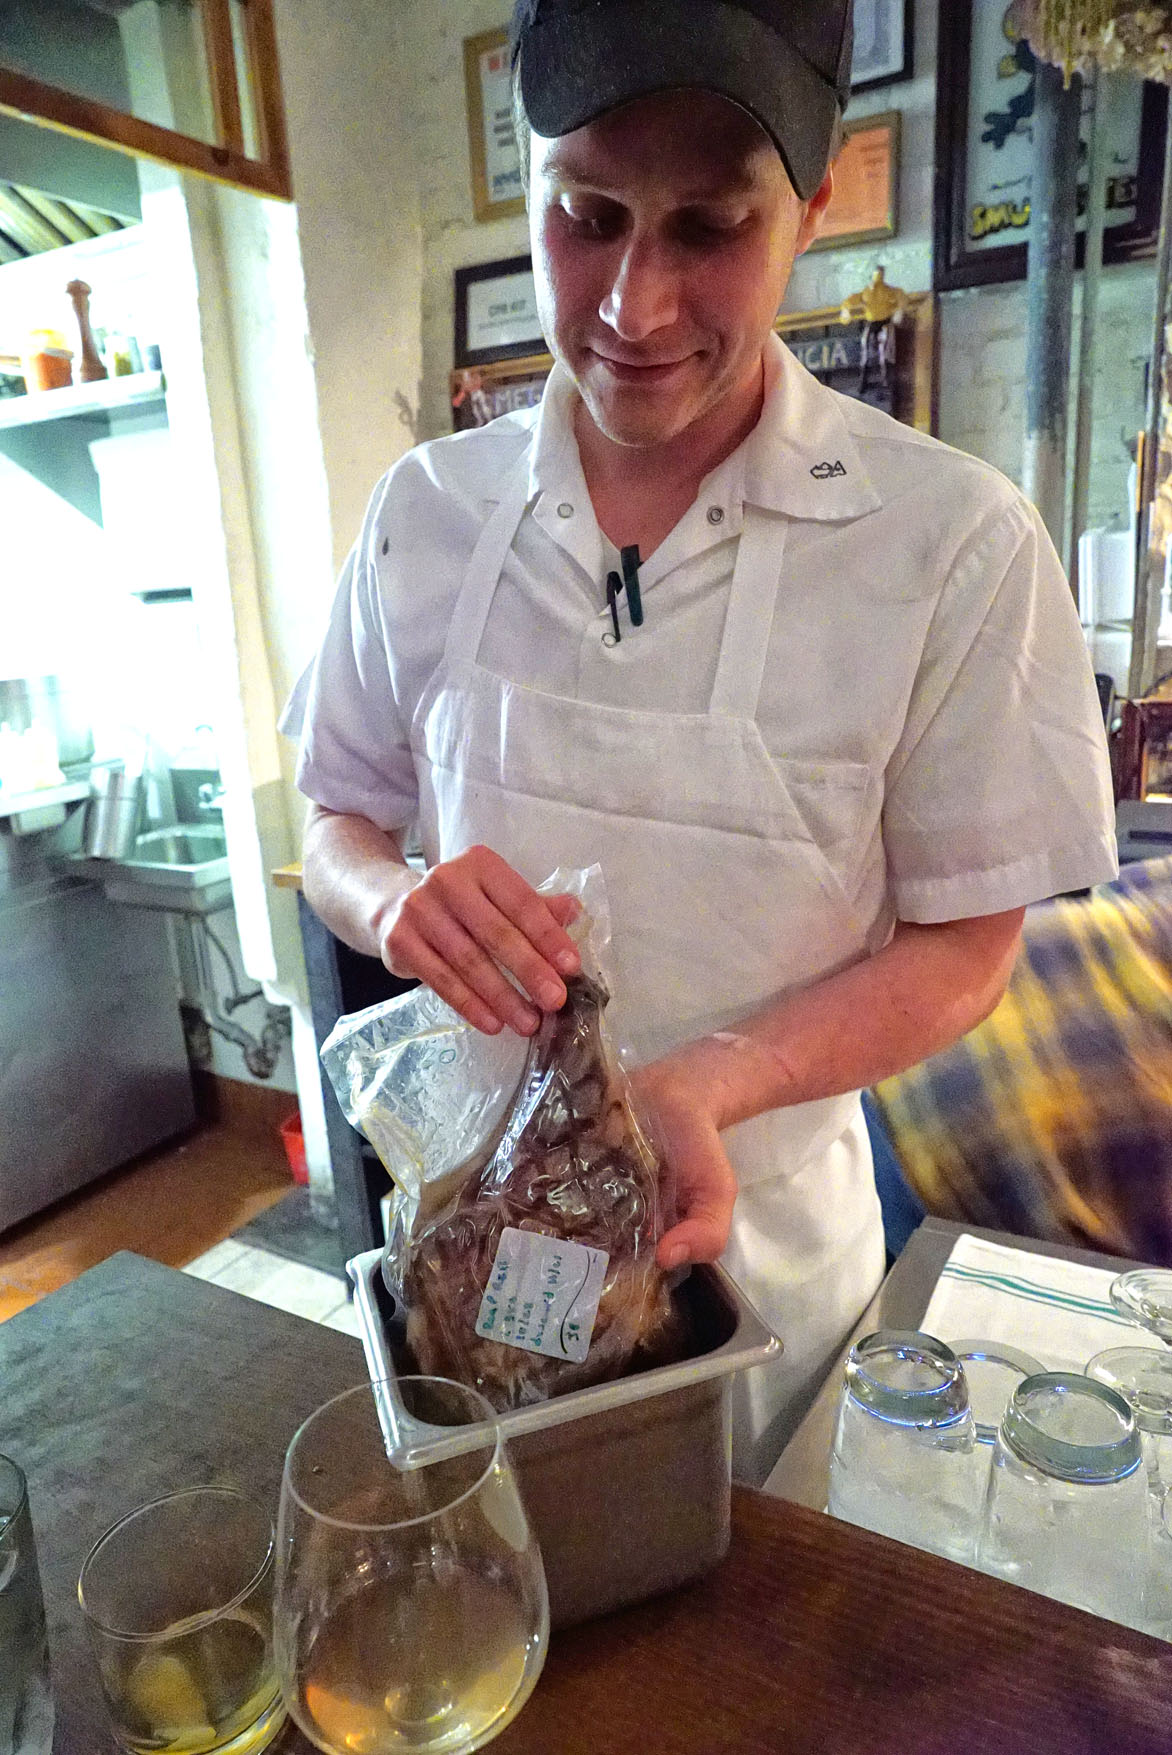
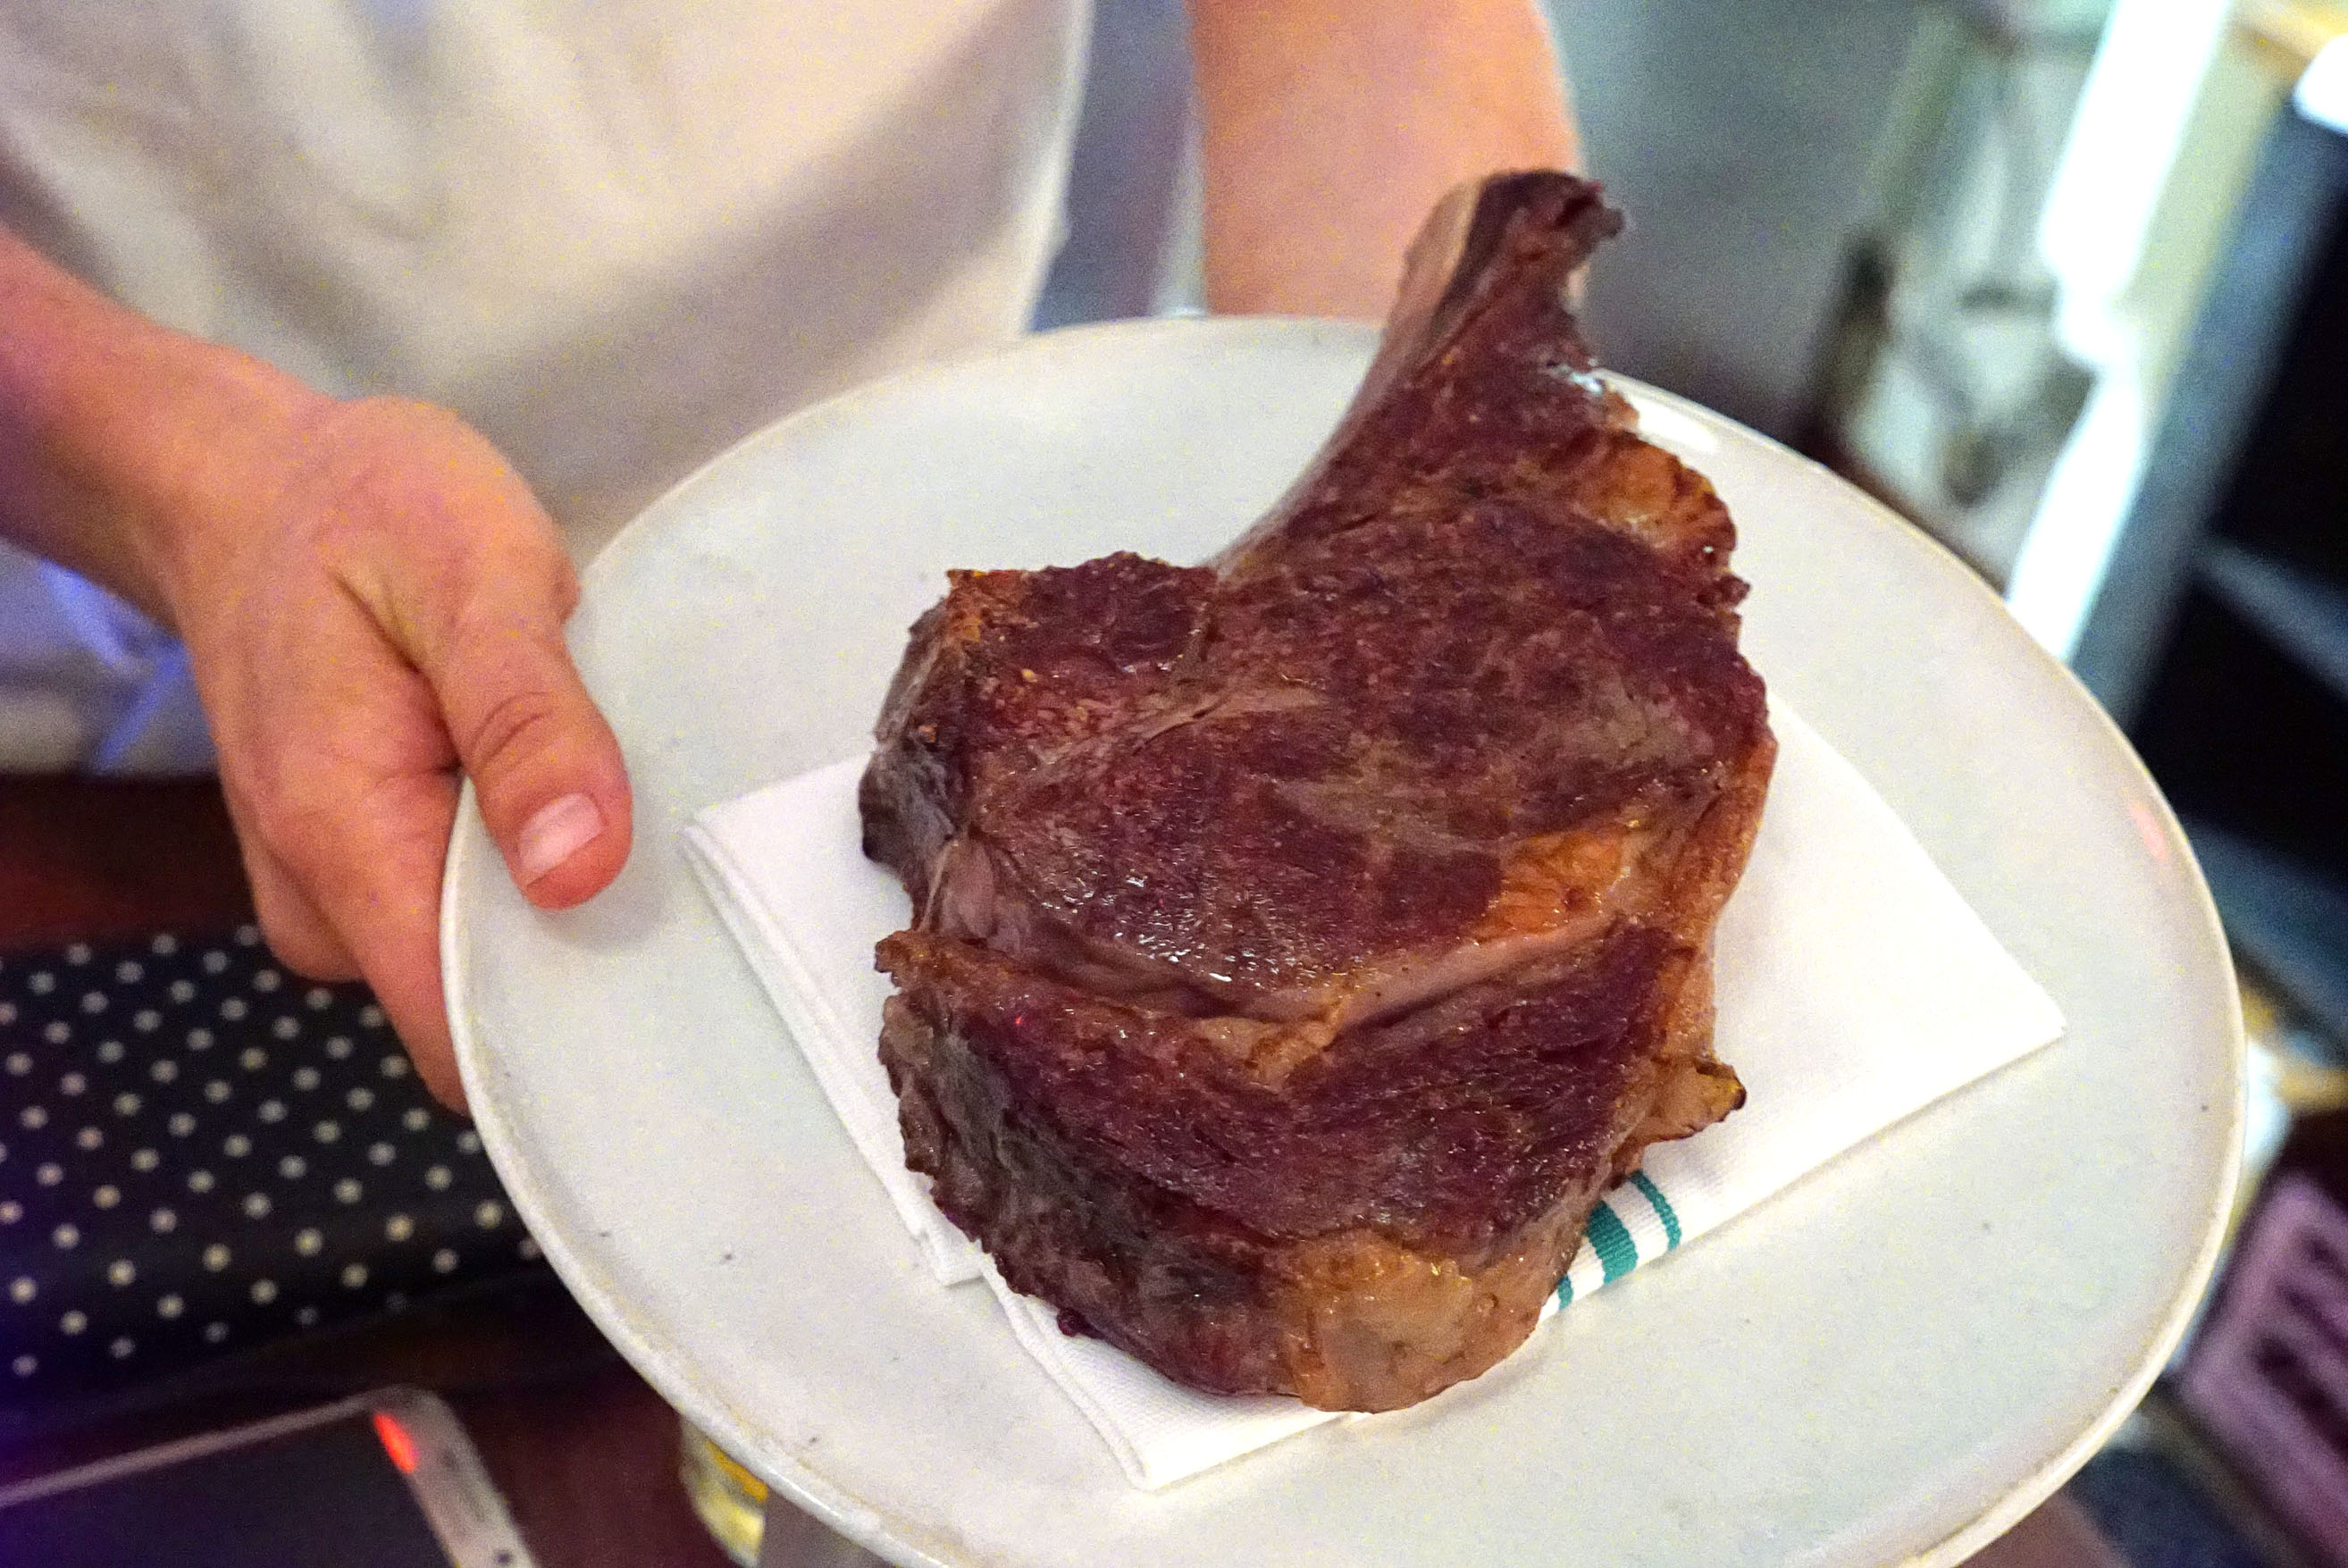
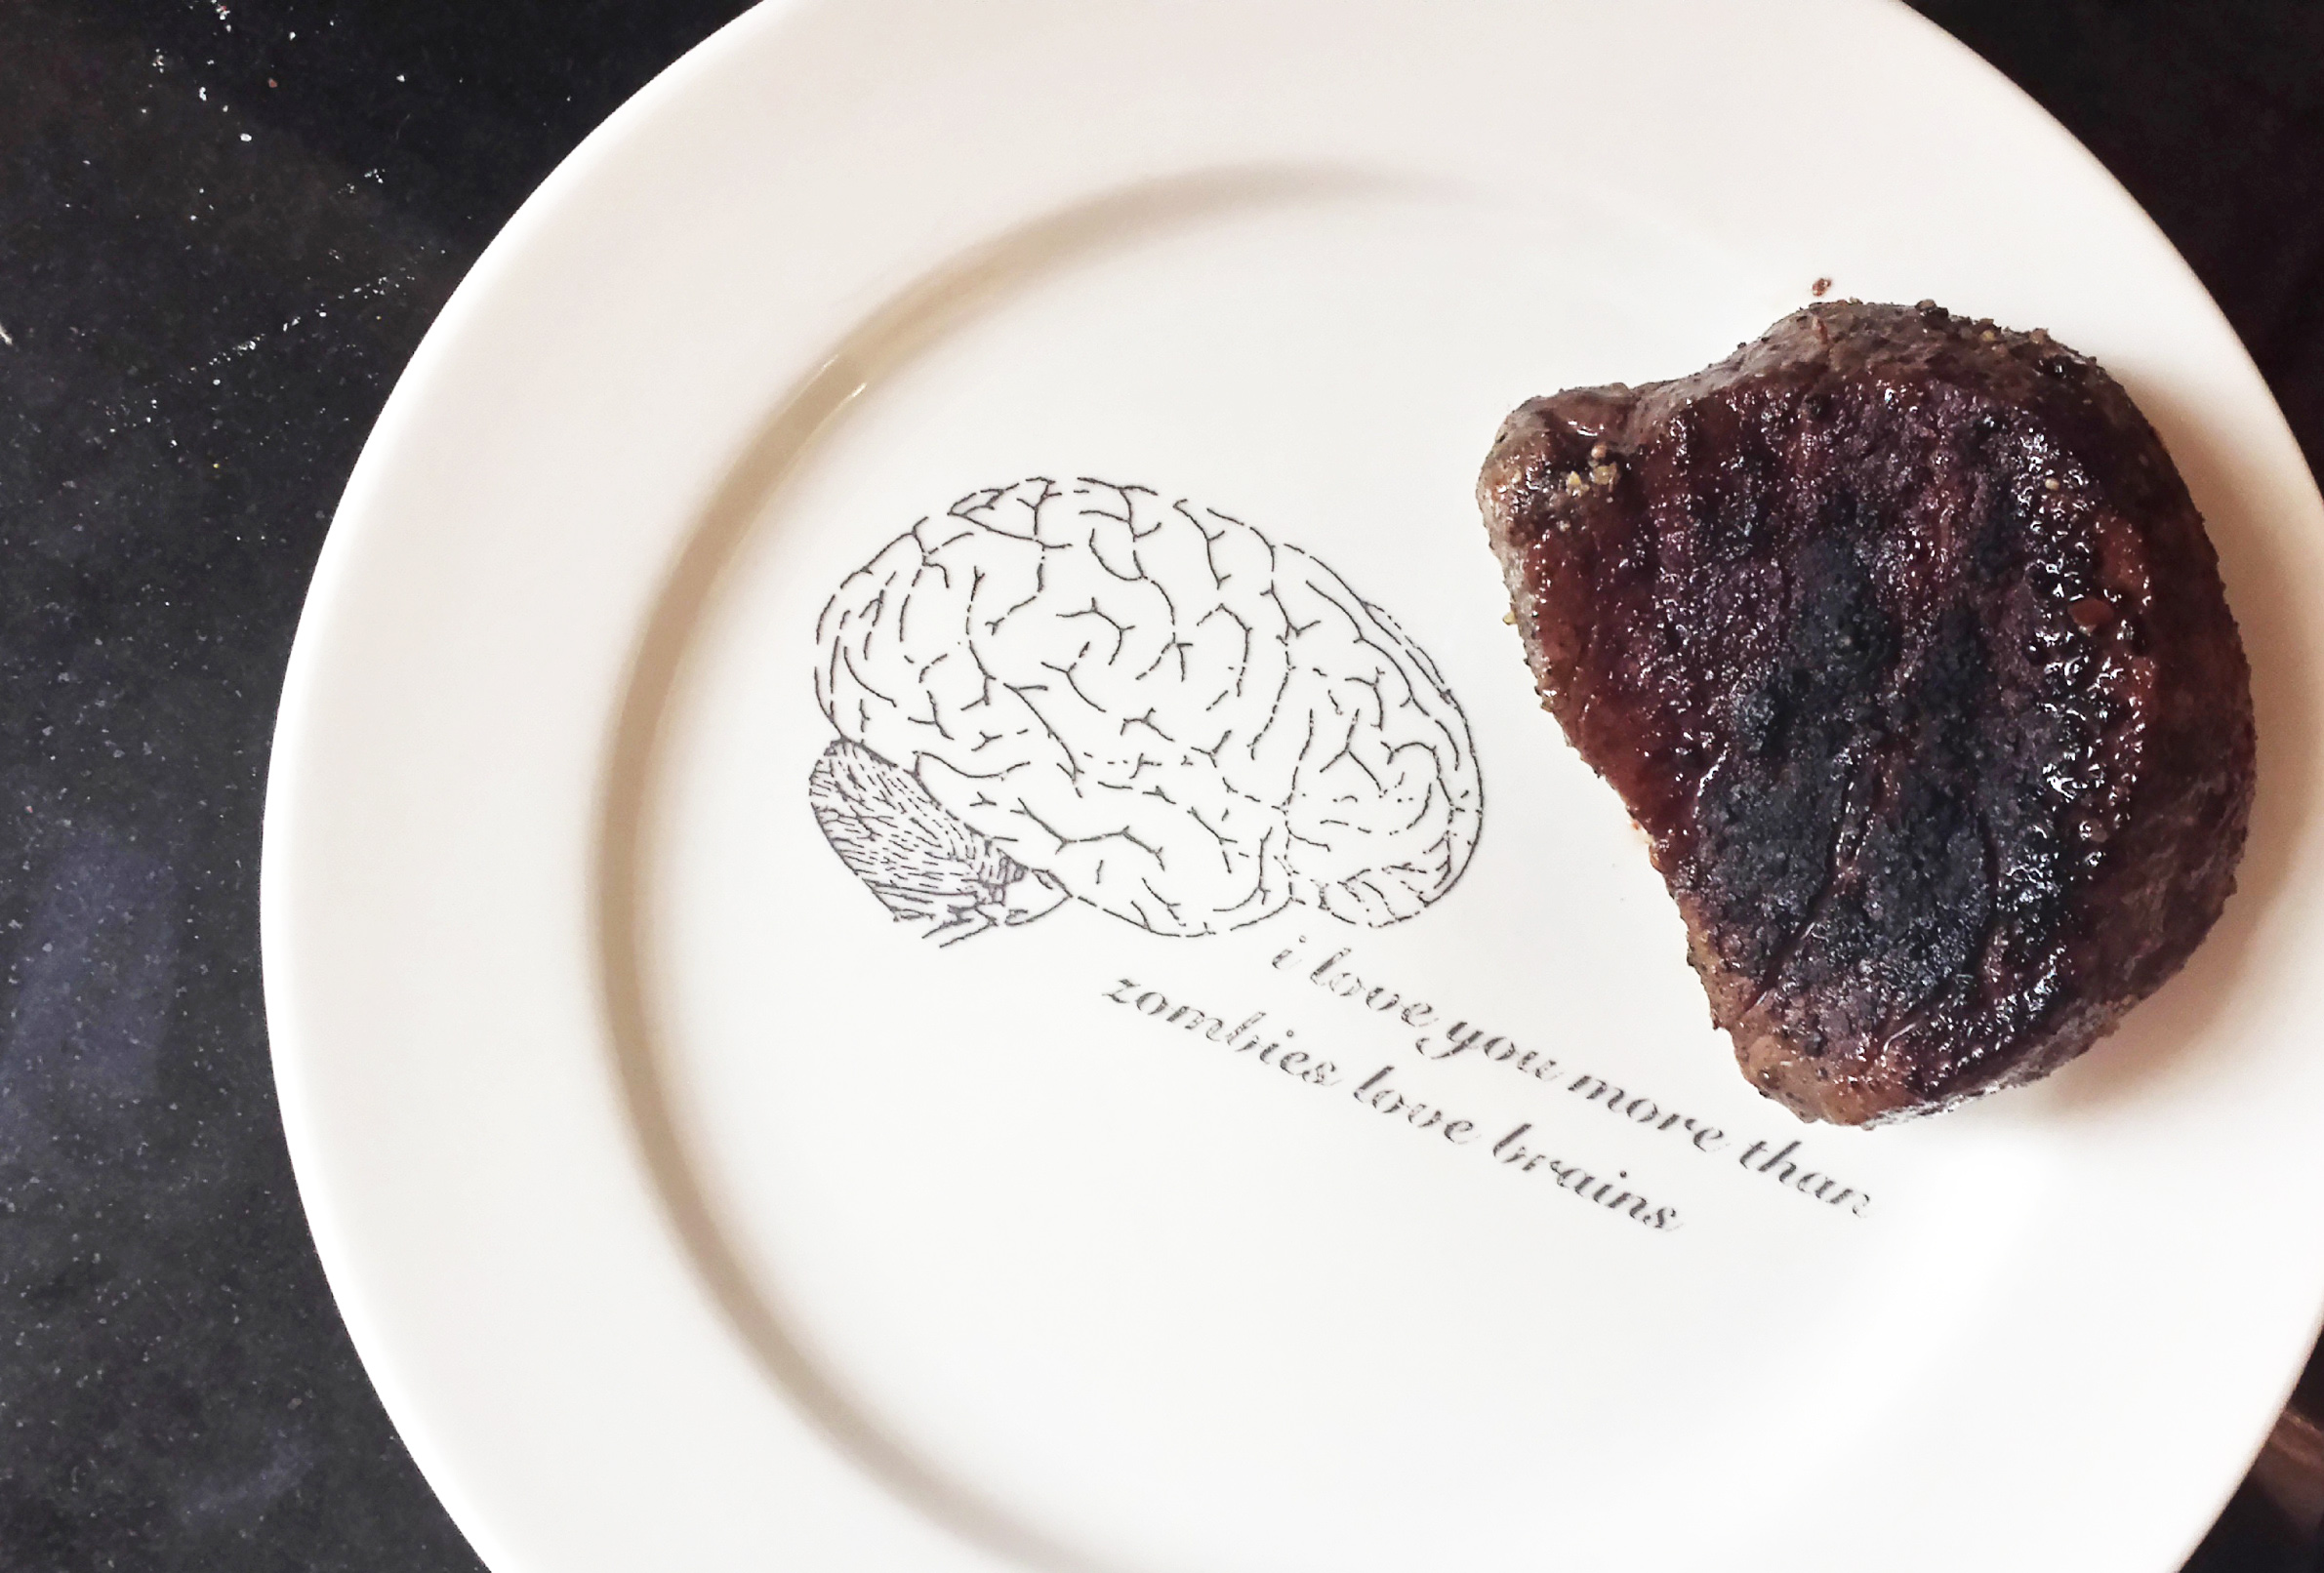
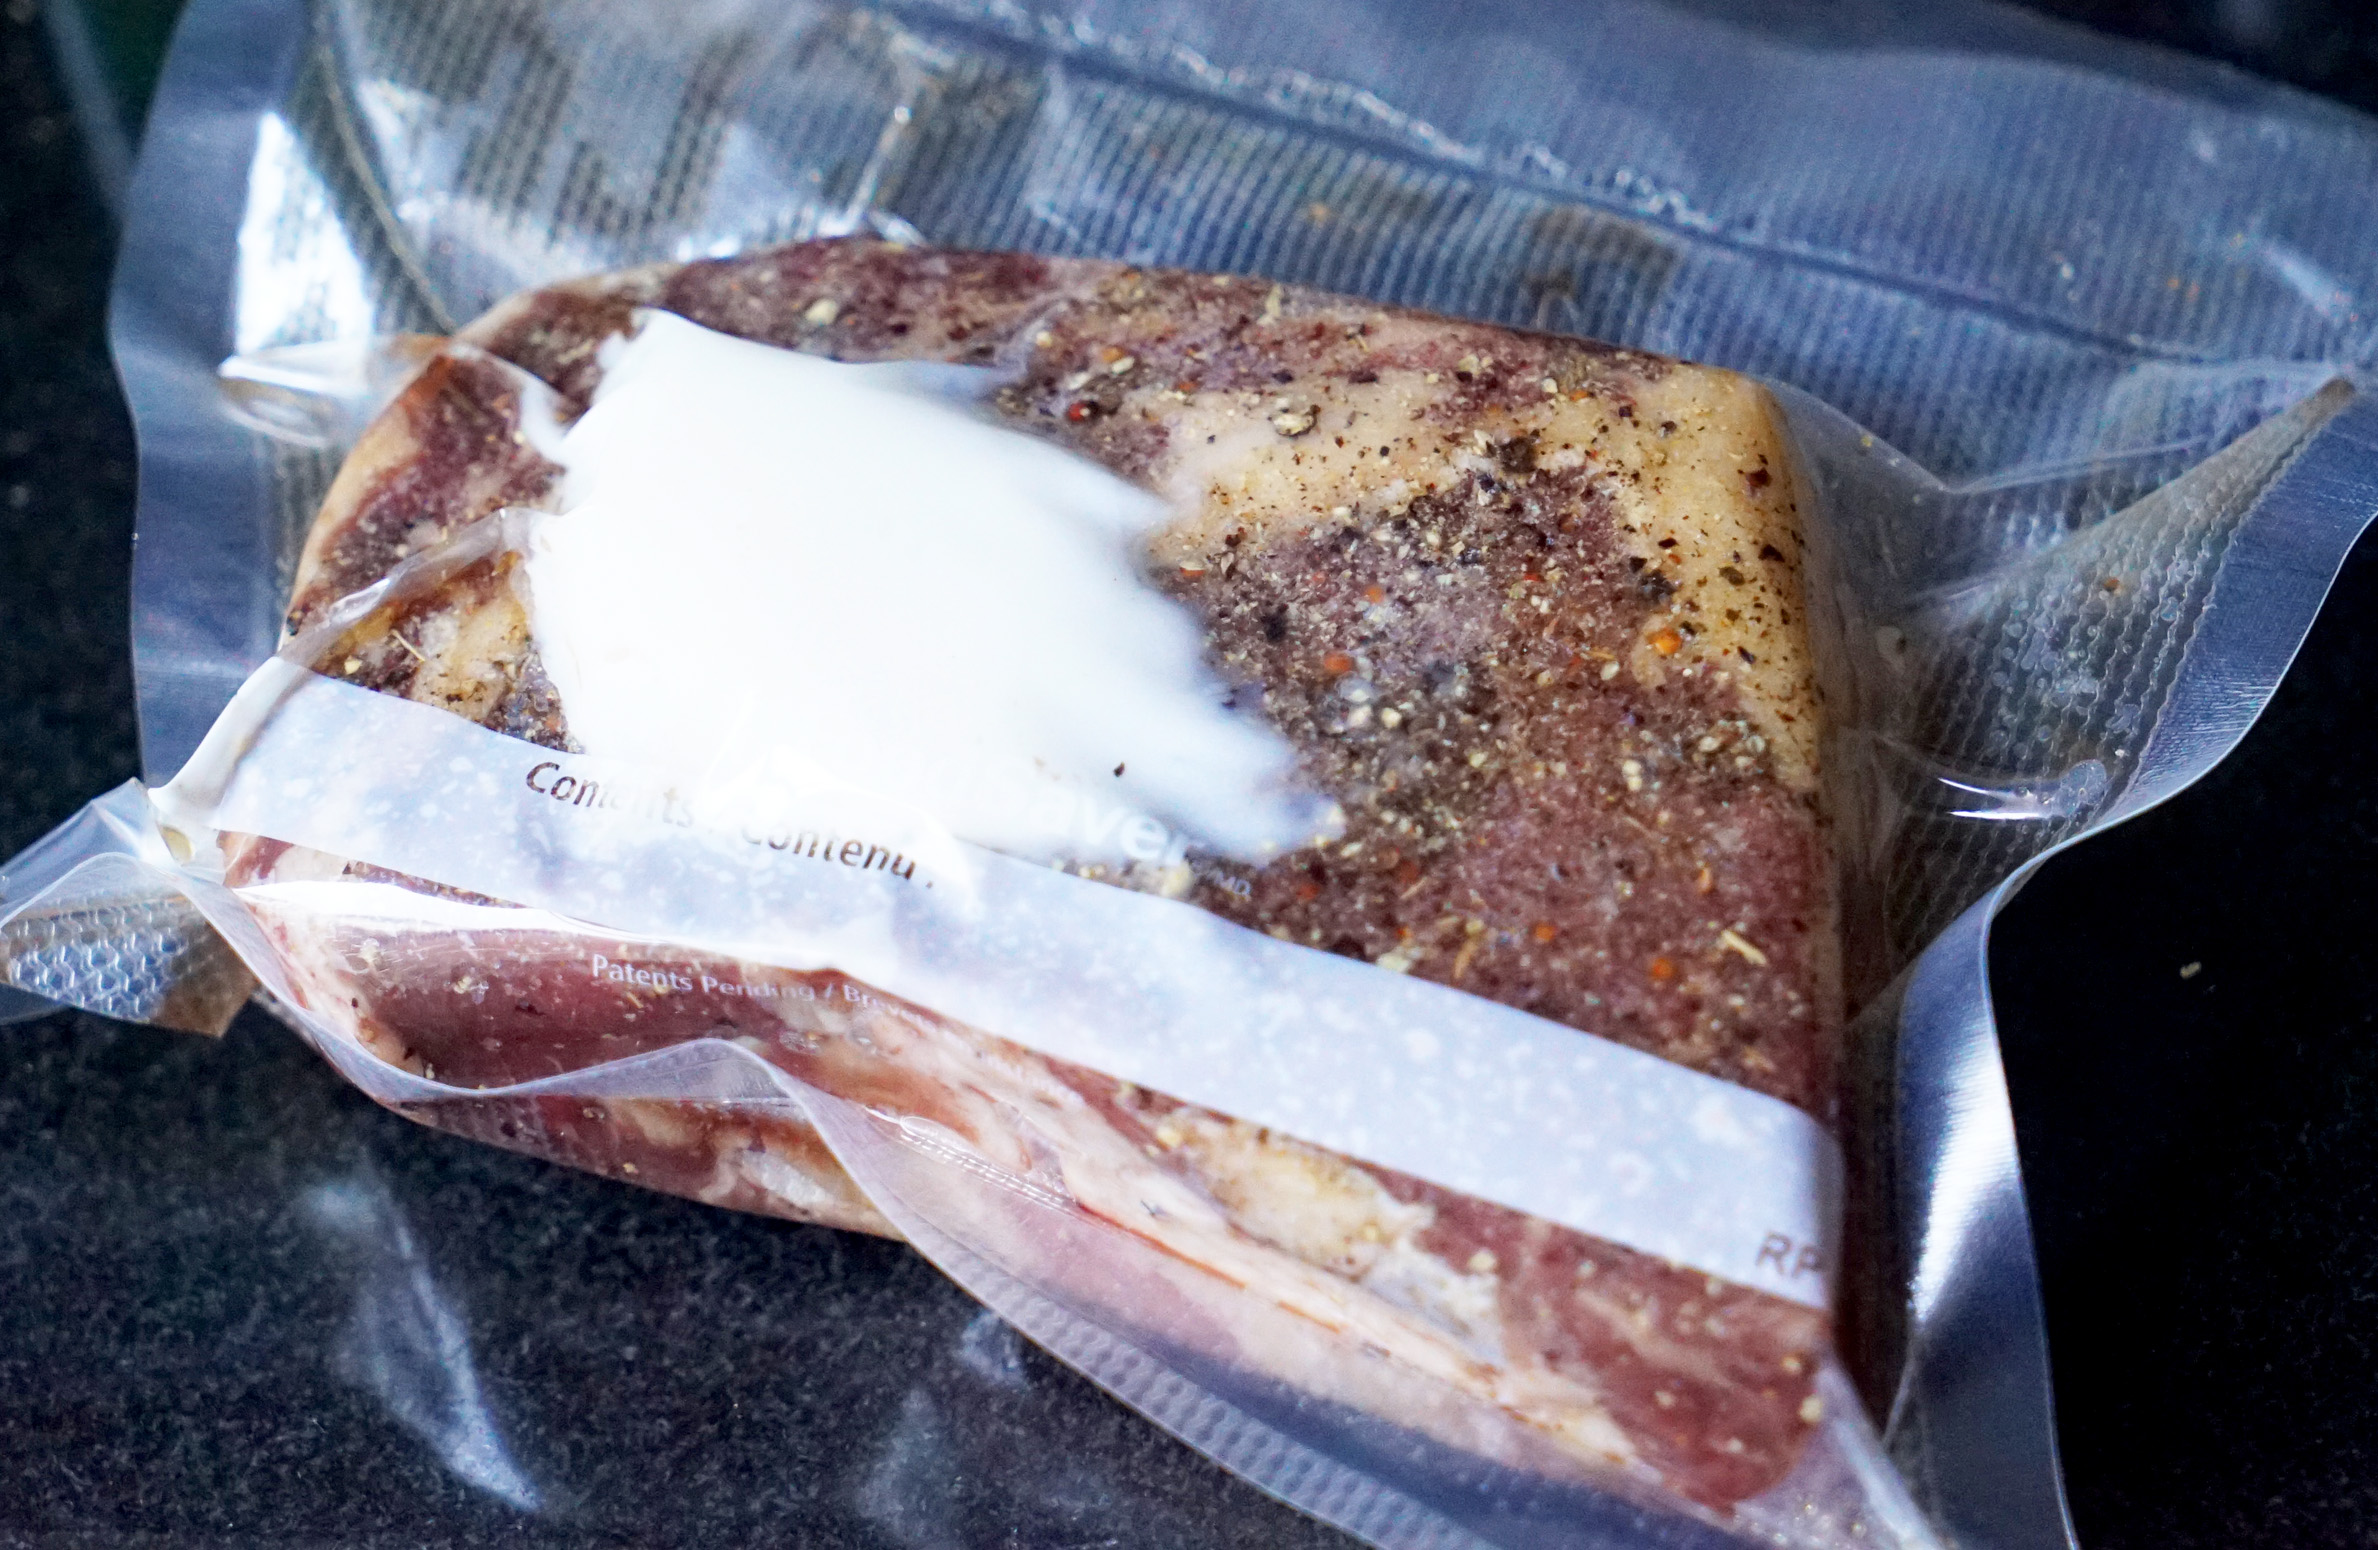
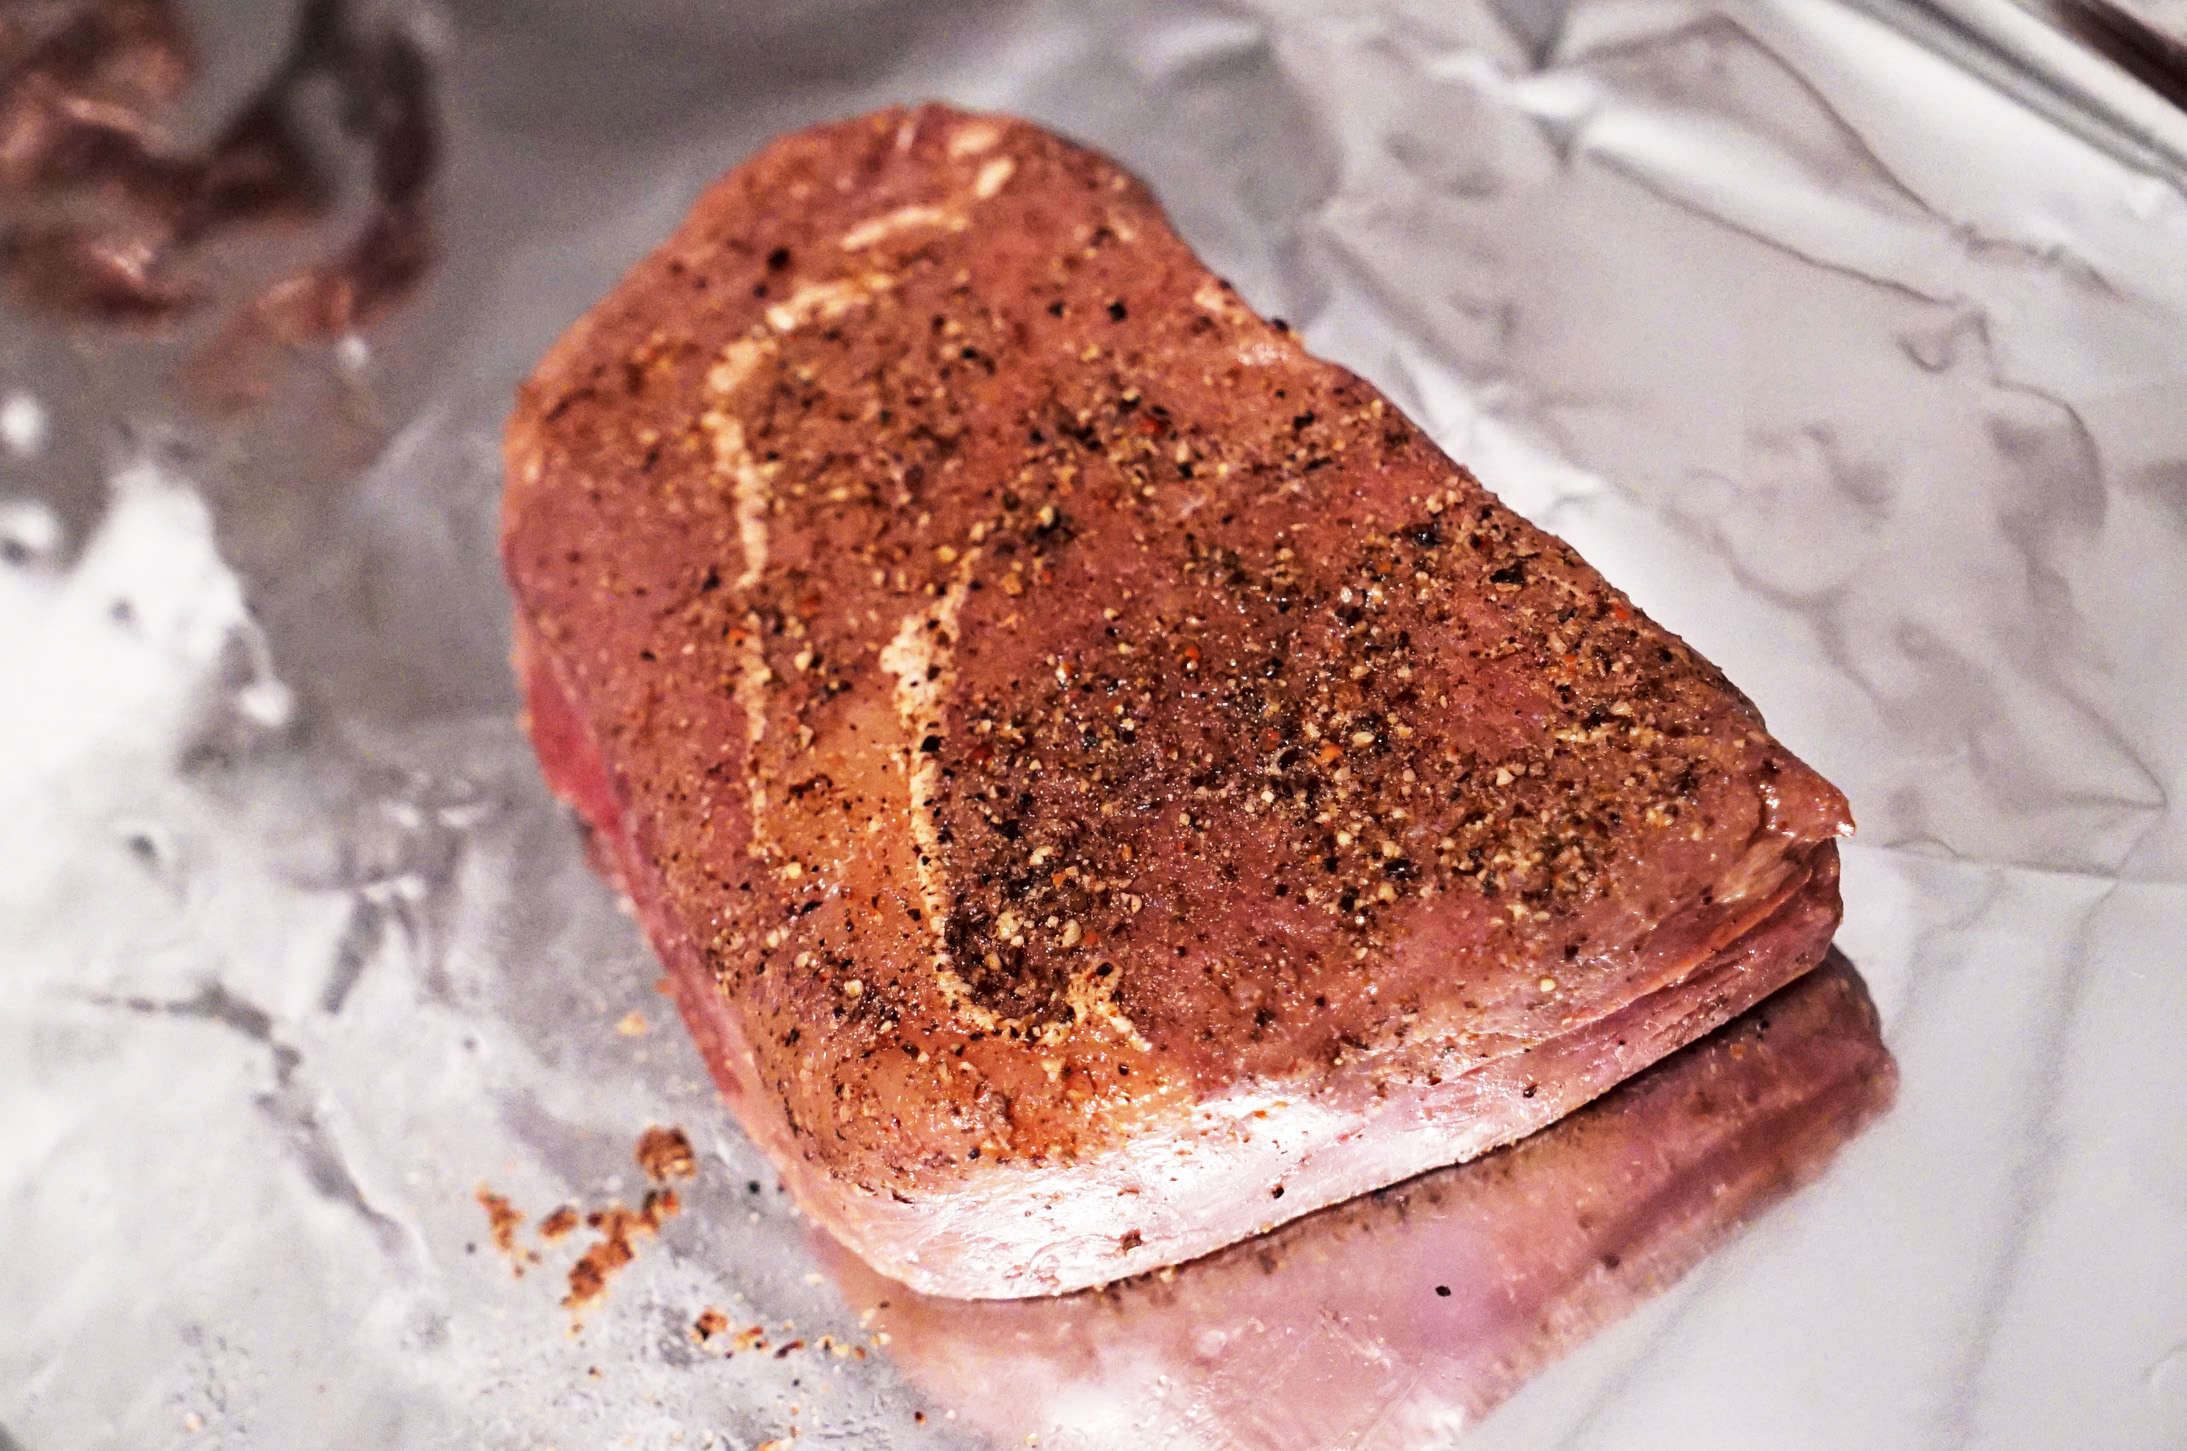
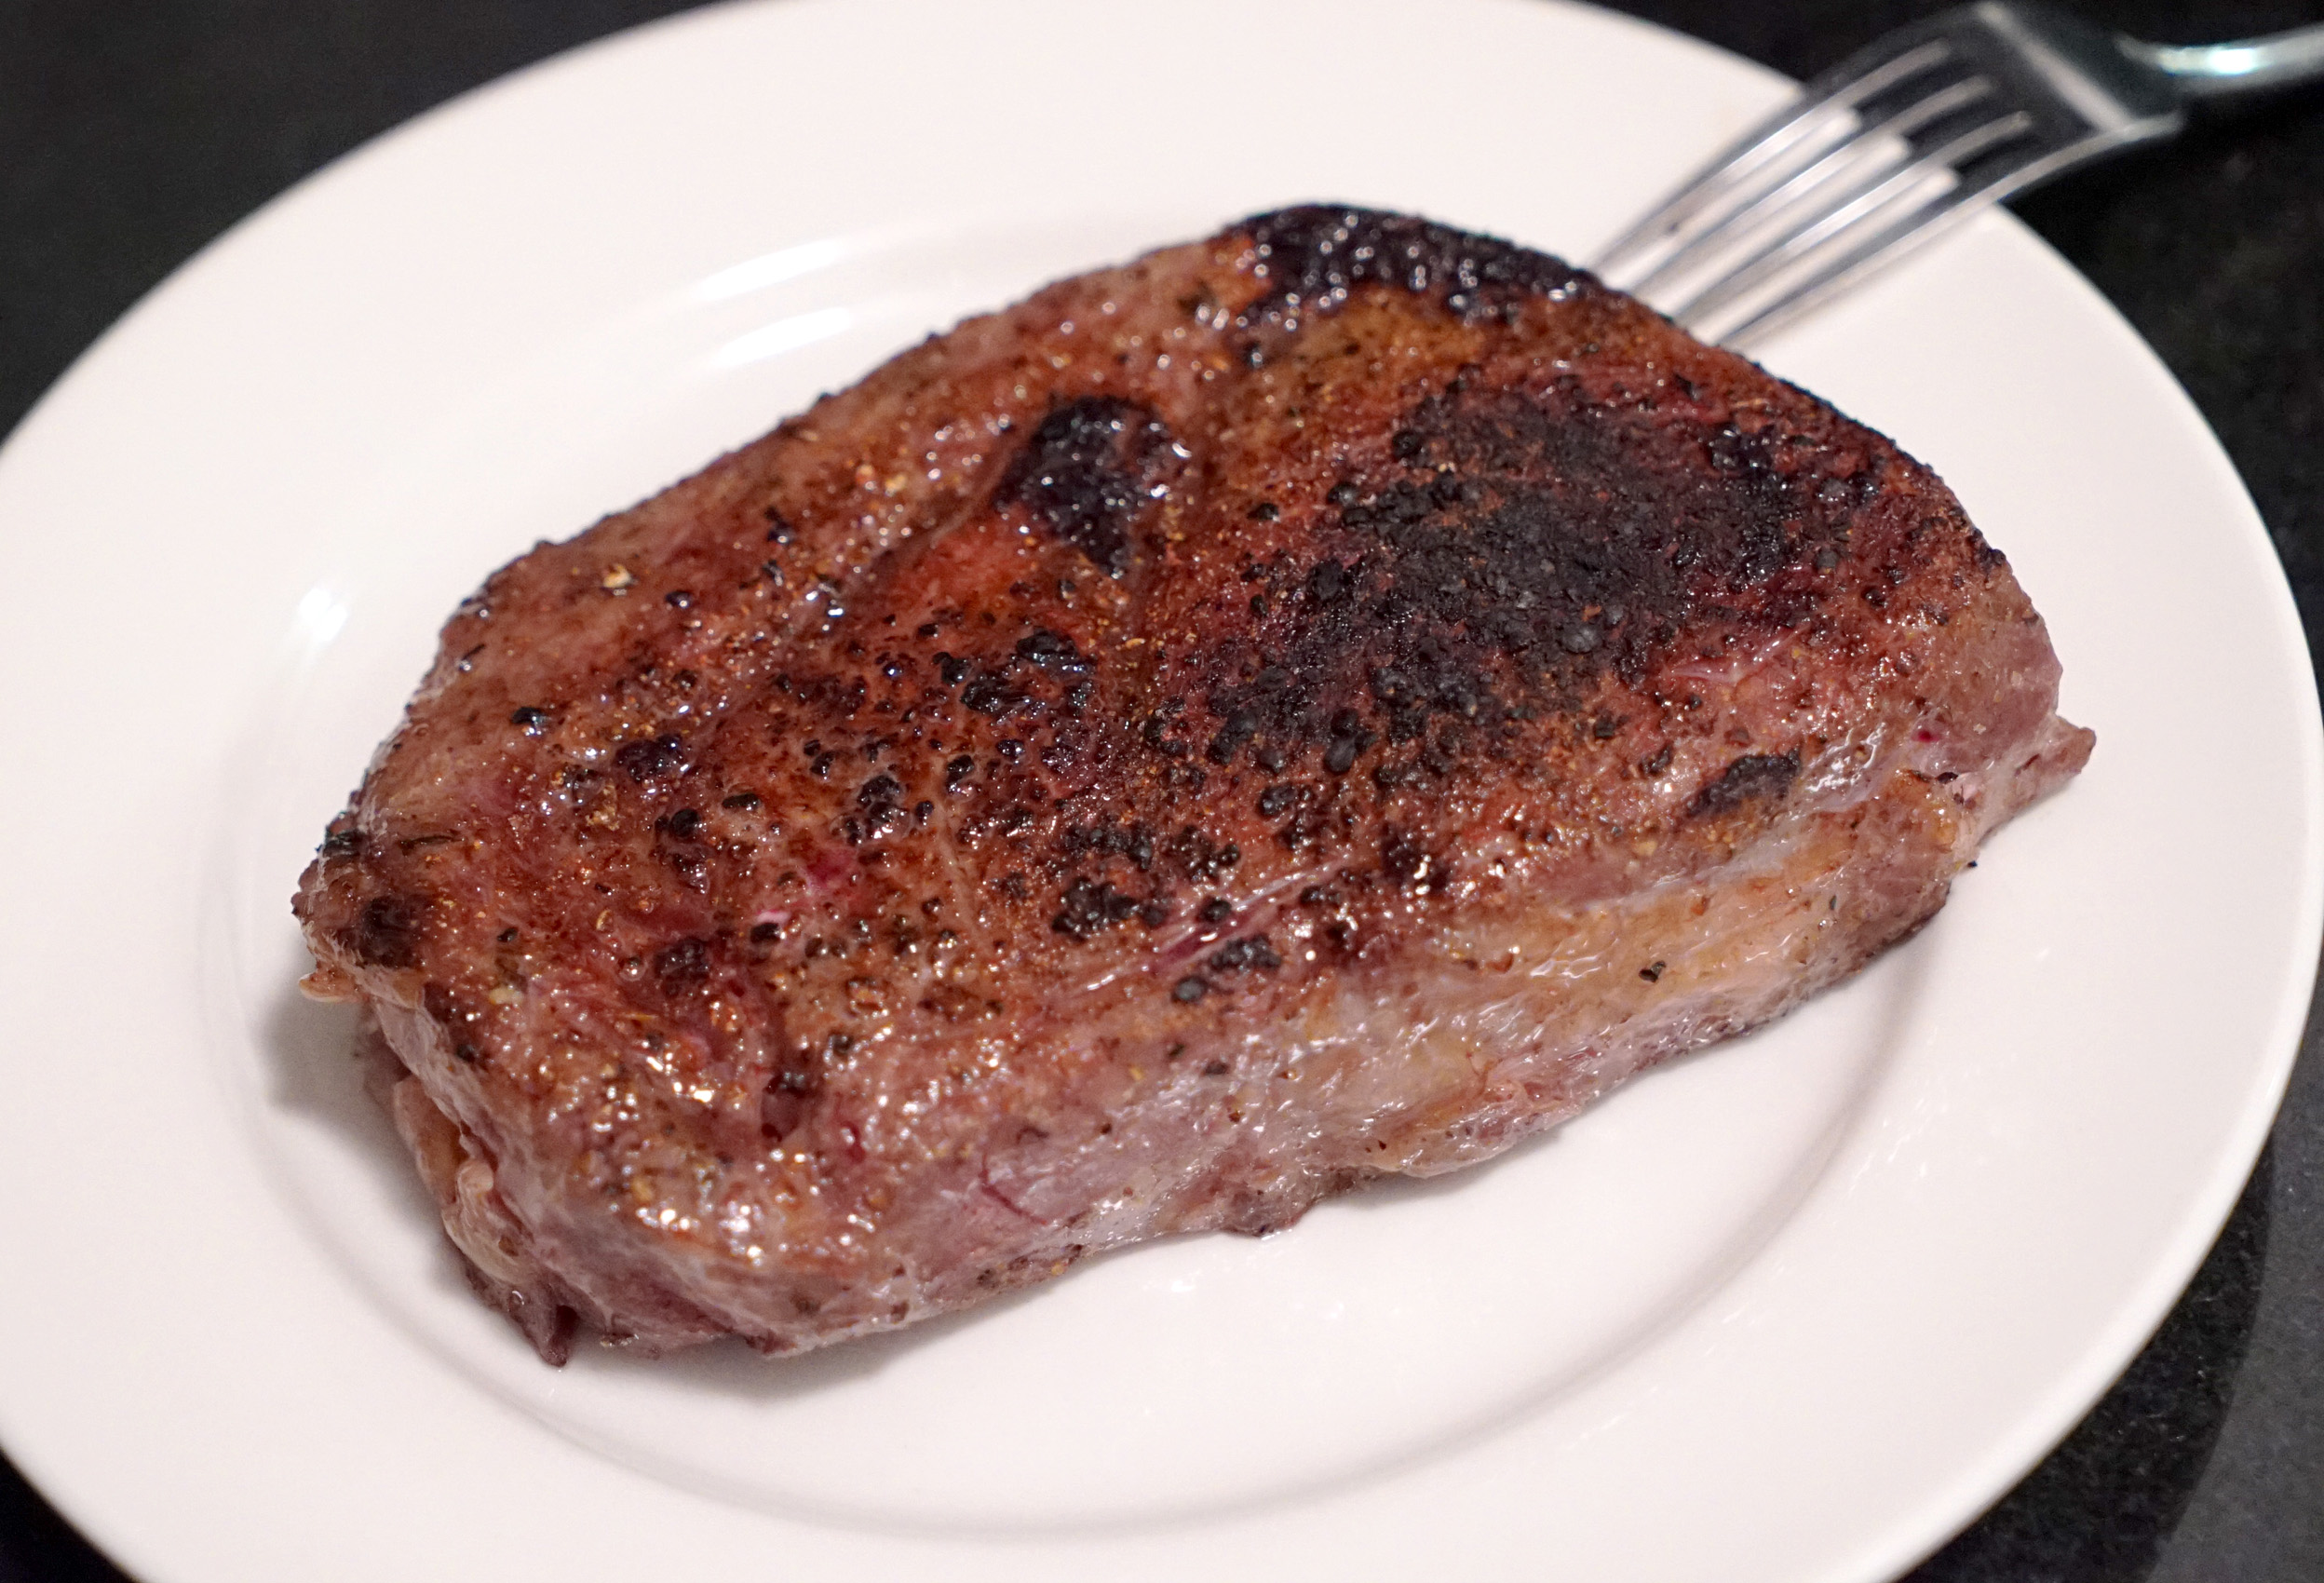
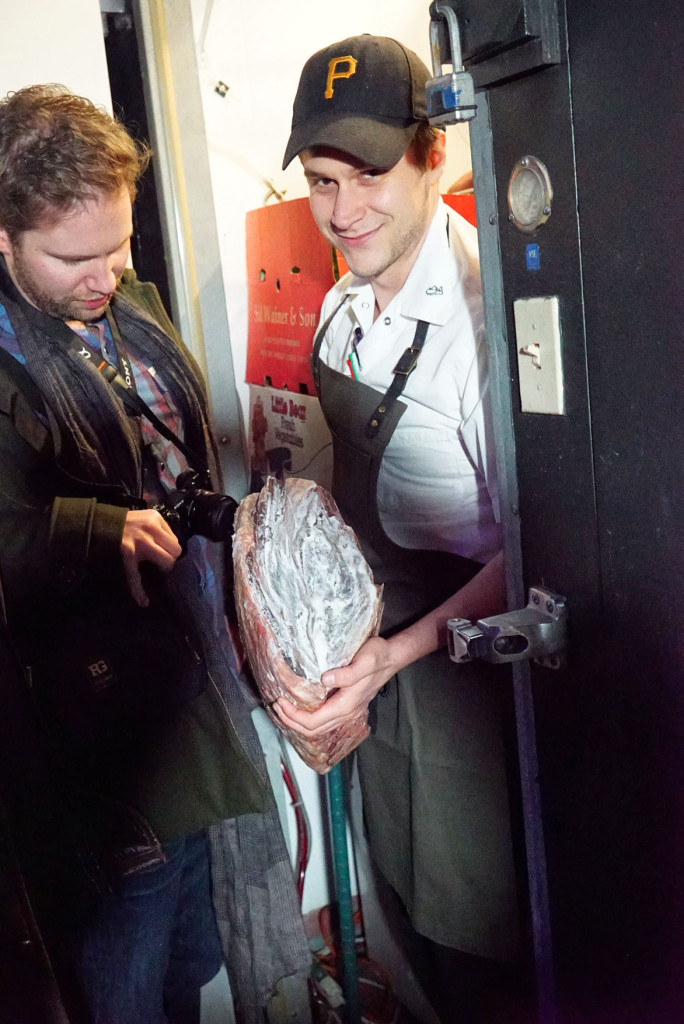
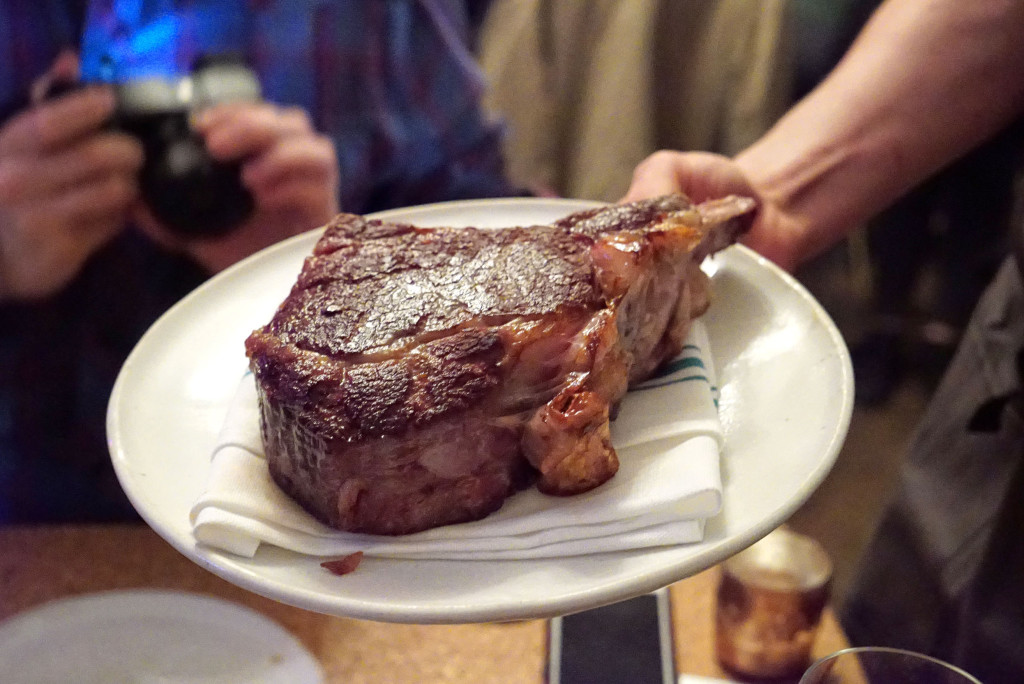
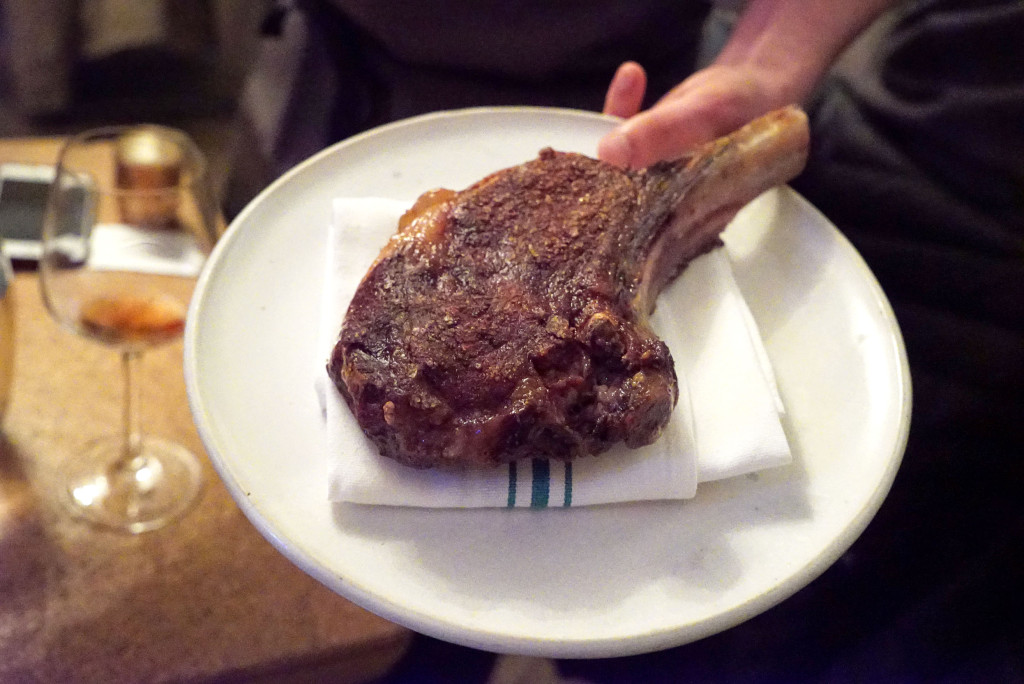
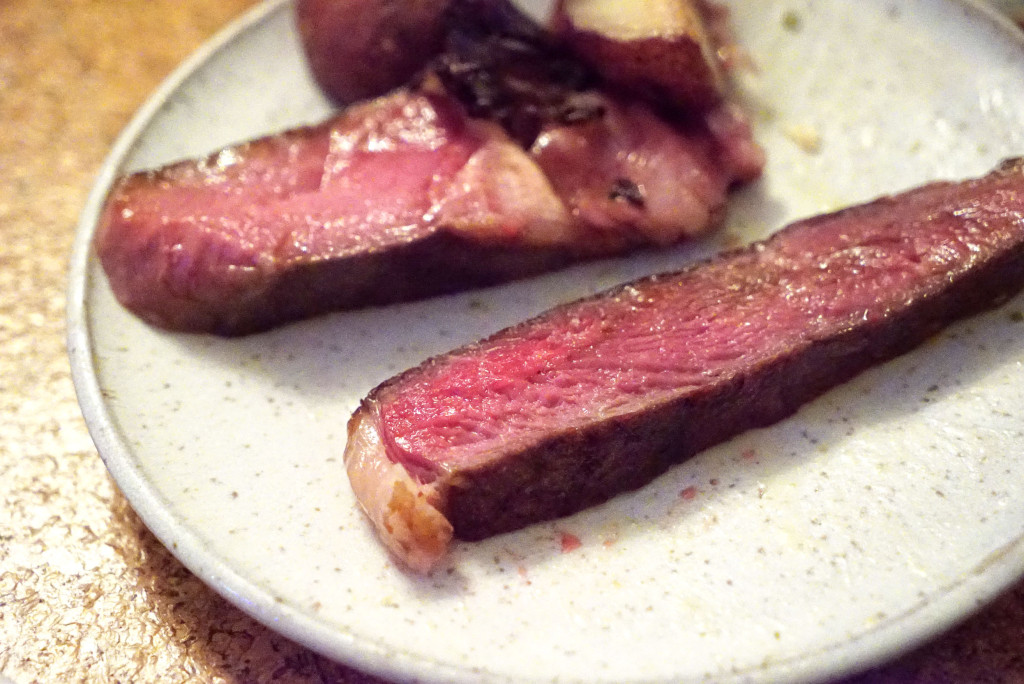
So now comes the big boy – the 106-day, dry-aged rib eye. John explained that the process for these is as follows: First it hits a hot grill for a little smoke and sear, and those lovely grill marks. Then it gets a nice warm sous vide bath. Last, it hits a hot pan to lock in all the juices and get a crispy sear. Thrice cooked rib eye! Here’s a shot of John holding our cut before it hits the pan:

DSC08656

And here it is after the pan, resting, but before serving. Just look at that gorgeous sear!!!

DSC08660

While we waited for it to be sliced and plated, John rolled out another pairing for us.

DSC08657

This wine was truly incredible. He poured us a taste from two different bottles: one that was just opened 30 minutes prior, an another that was already opened for two days.

DSC08658

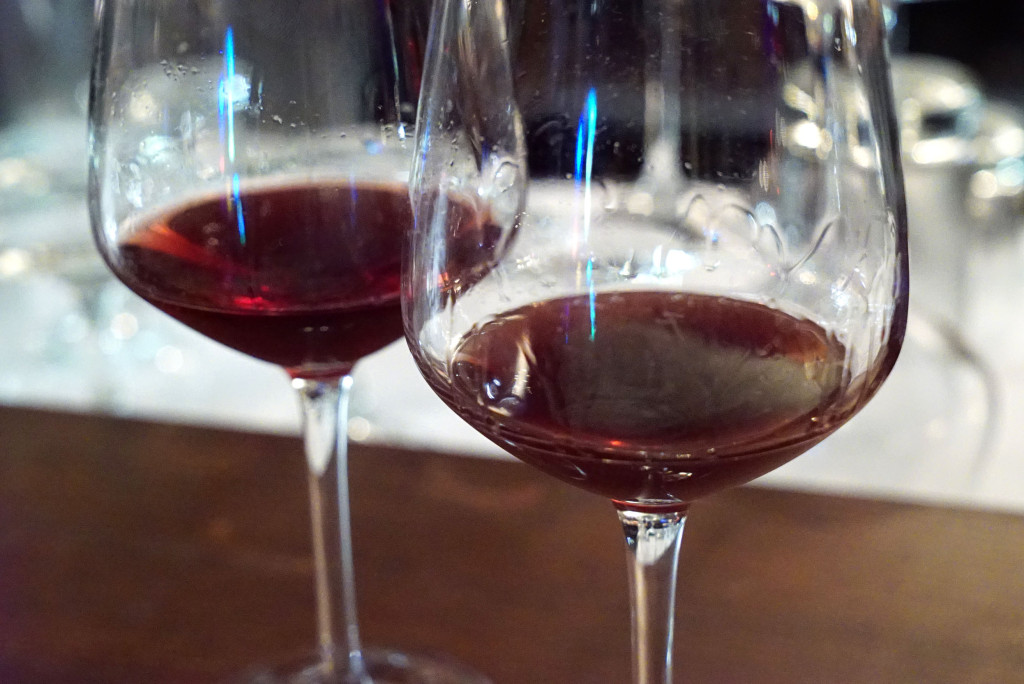
The difference was astounding. The freshly opened wine was really nice and flavorful, full bodied and robust without being overpowering. It had a nice round, smooth finish. The wine that was opened for two days had all the same characteristics, but the after taste was of dry aged beef or truffled charcuterie. It was incredible! I kept going at it. It was like having a delicious meat snack with each sip, and it reminded me of the awesome Trufa Seca sausage I had with my latest Carnivore Club box. It paired perfectly with the steak.

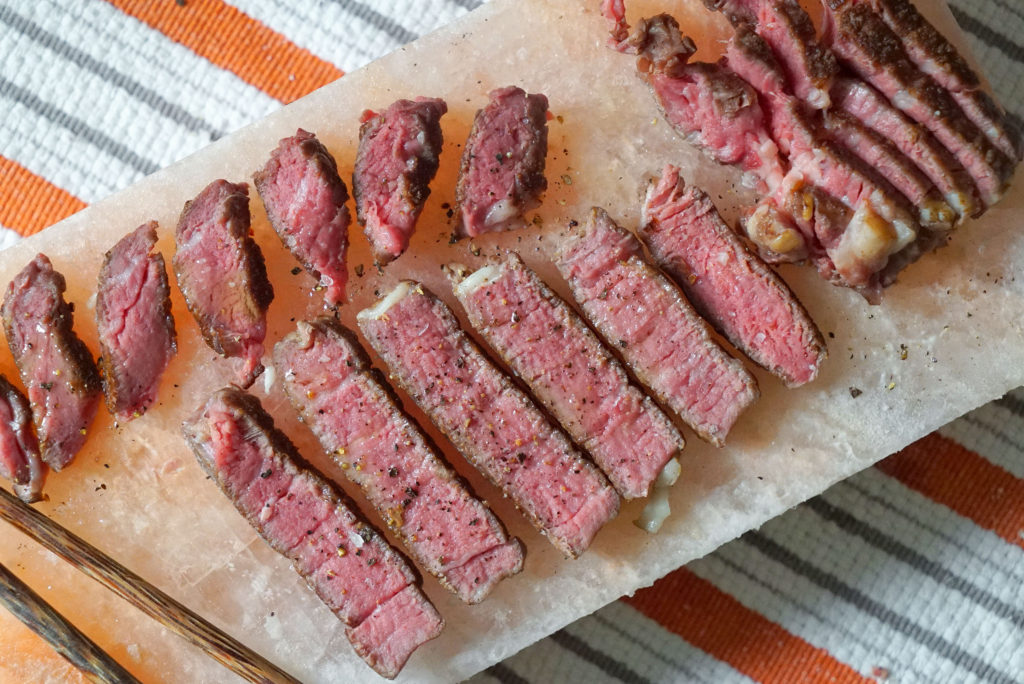
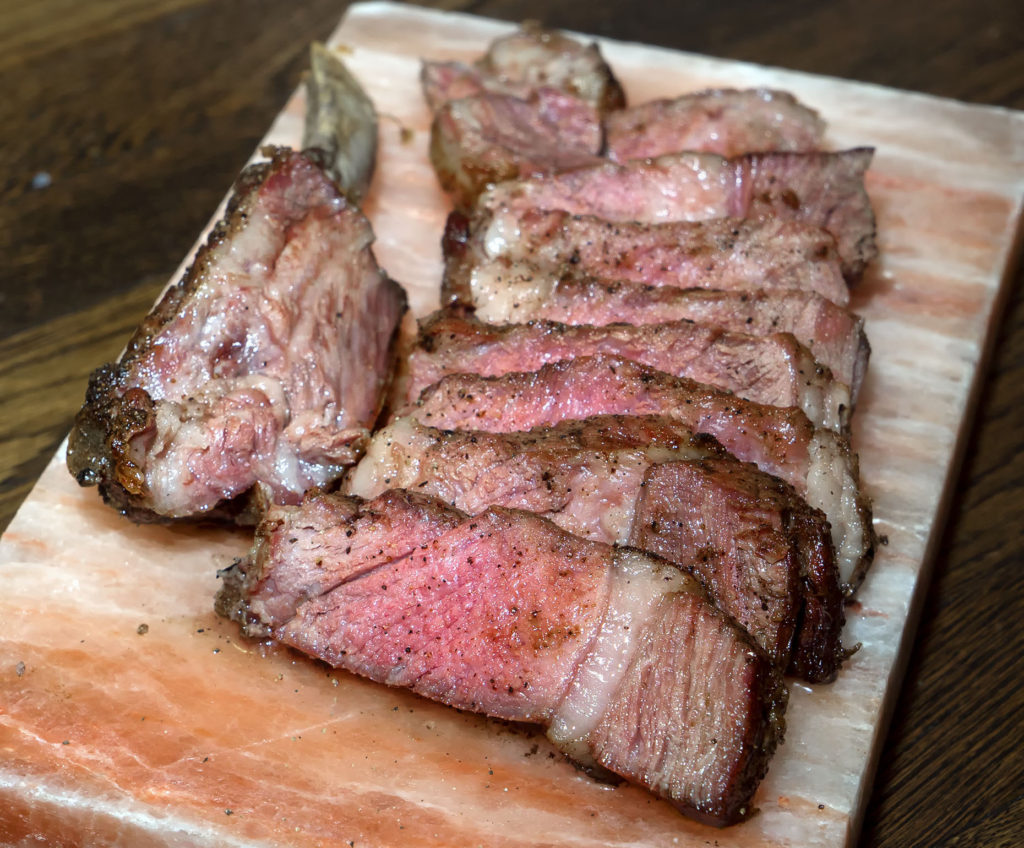
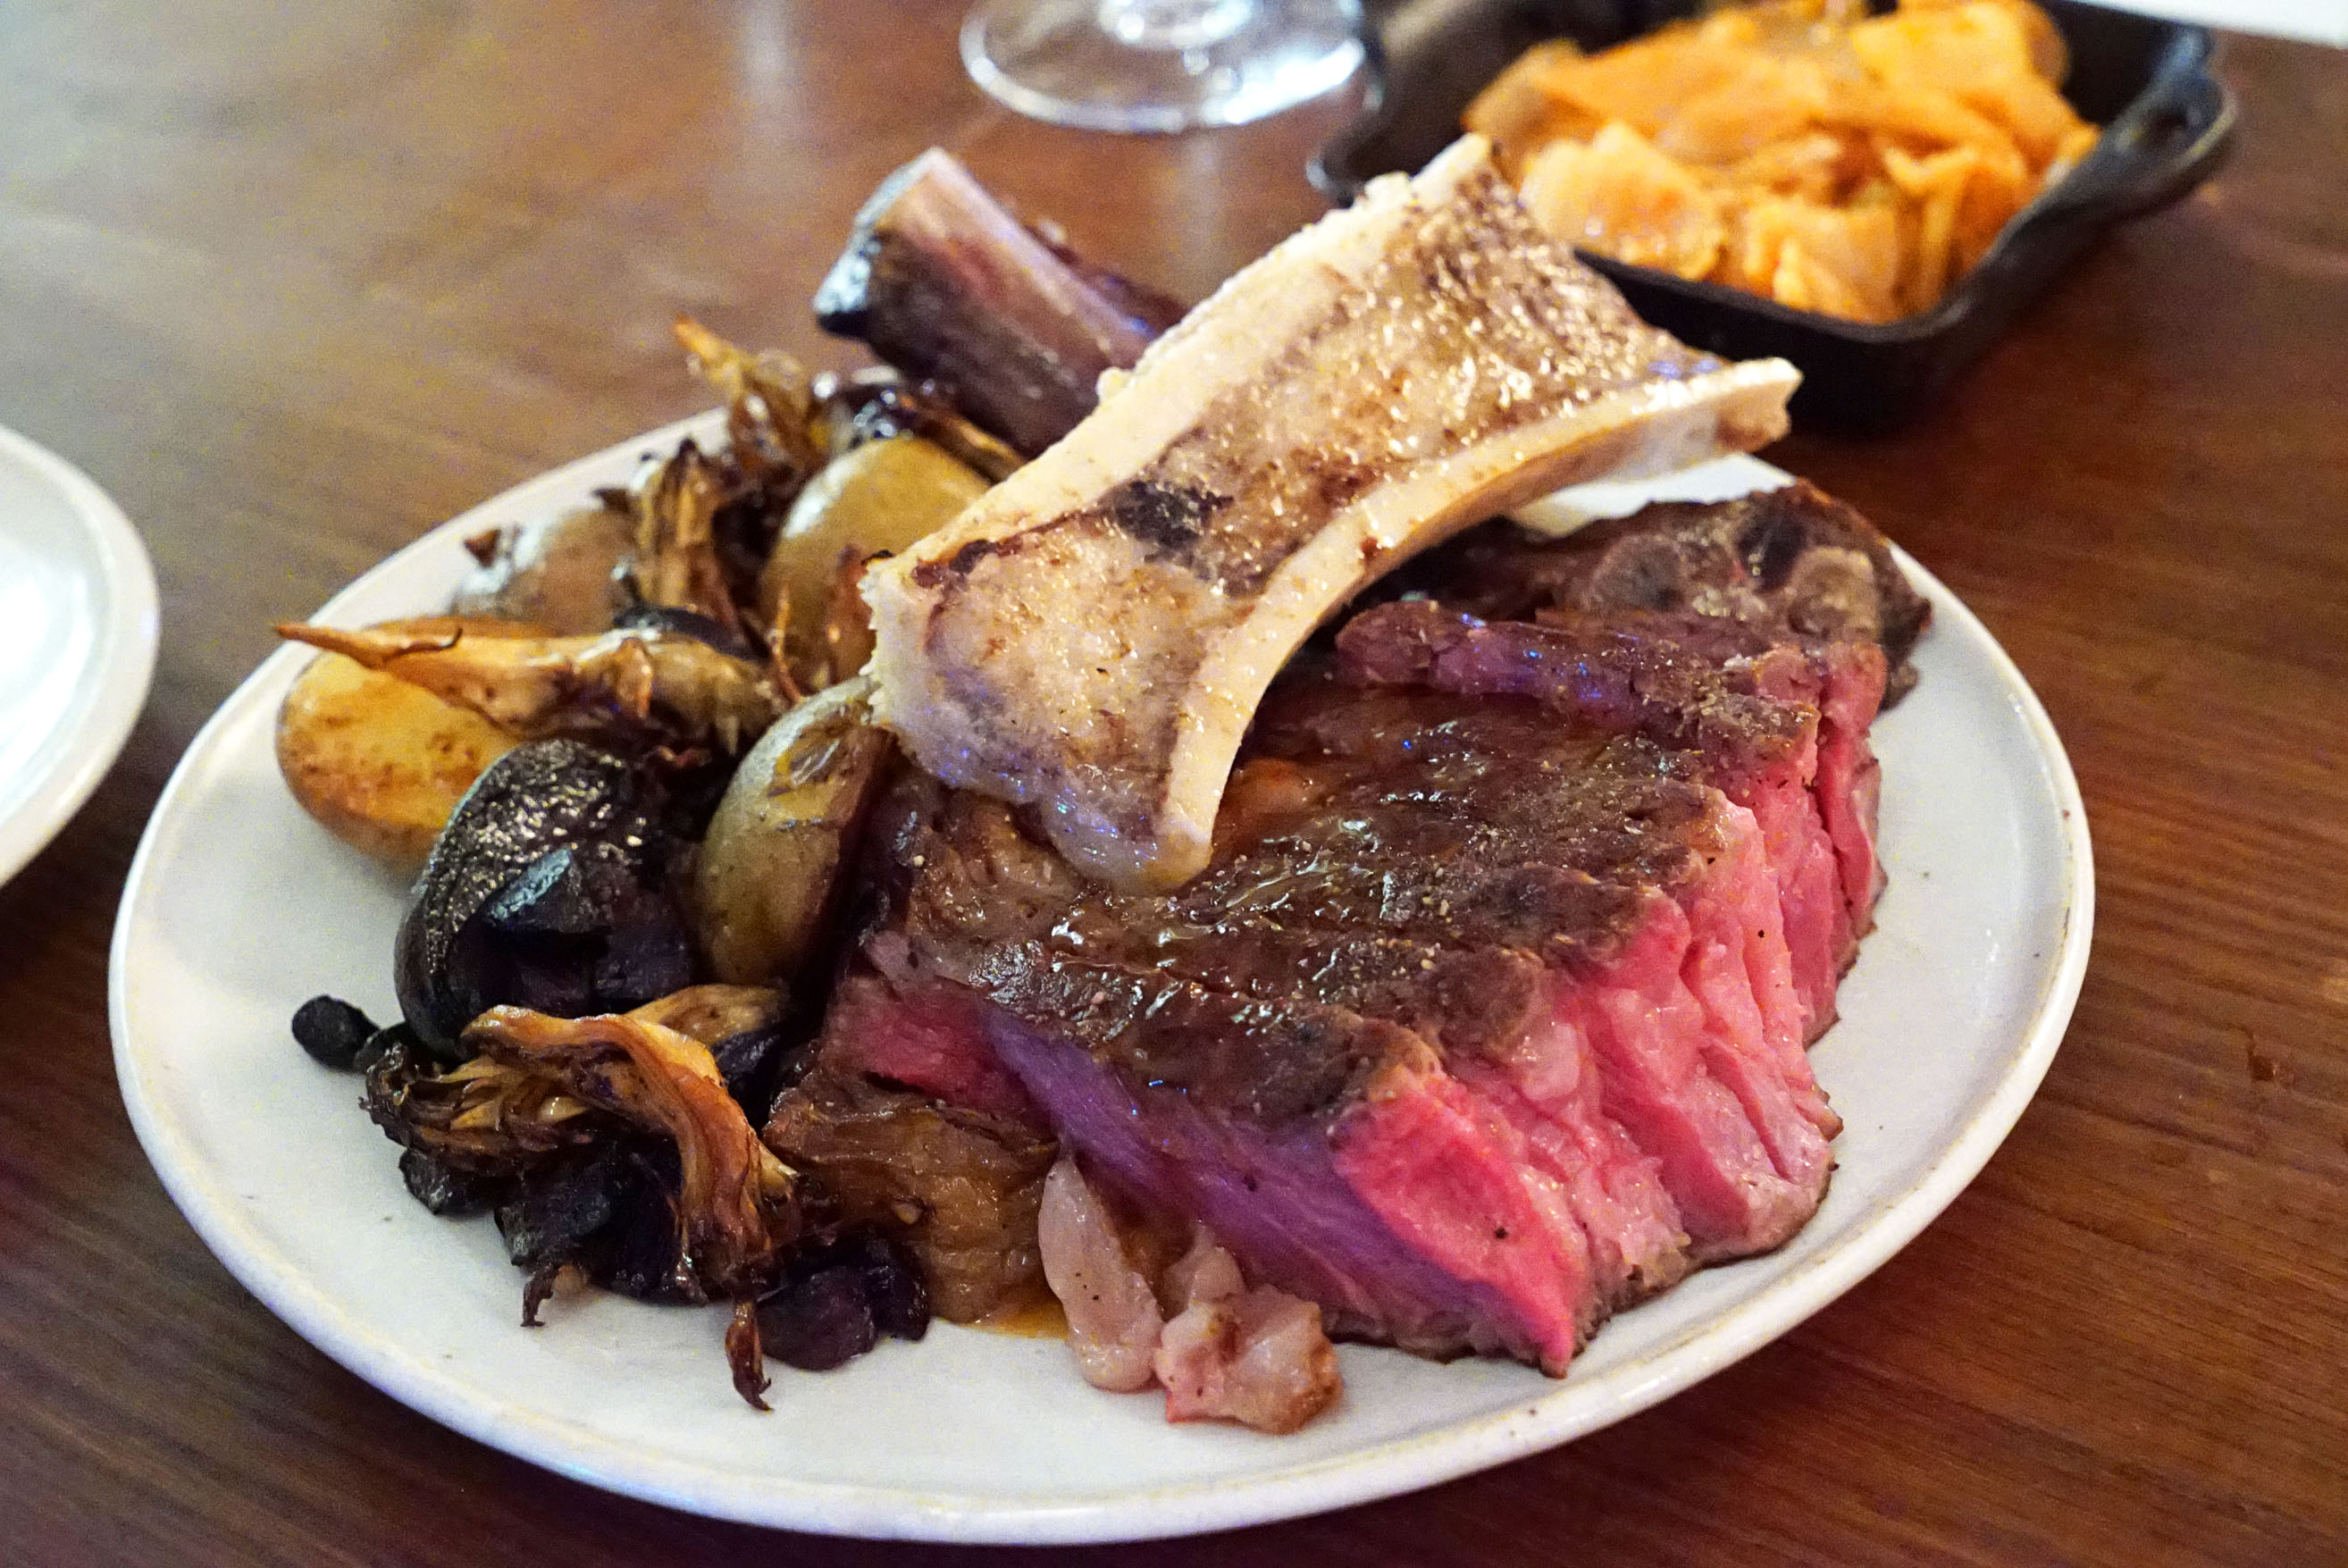
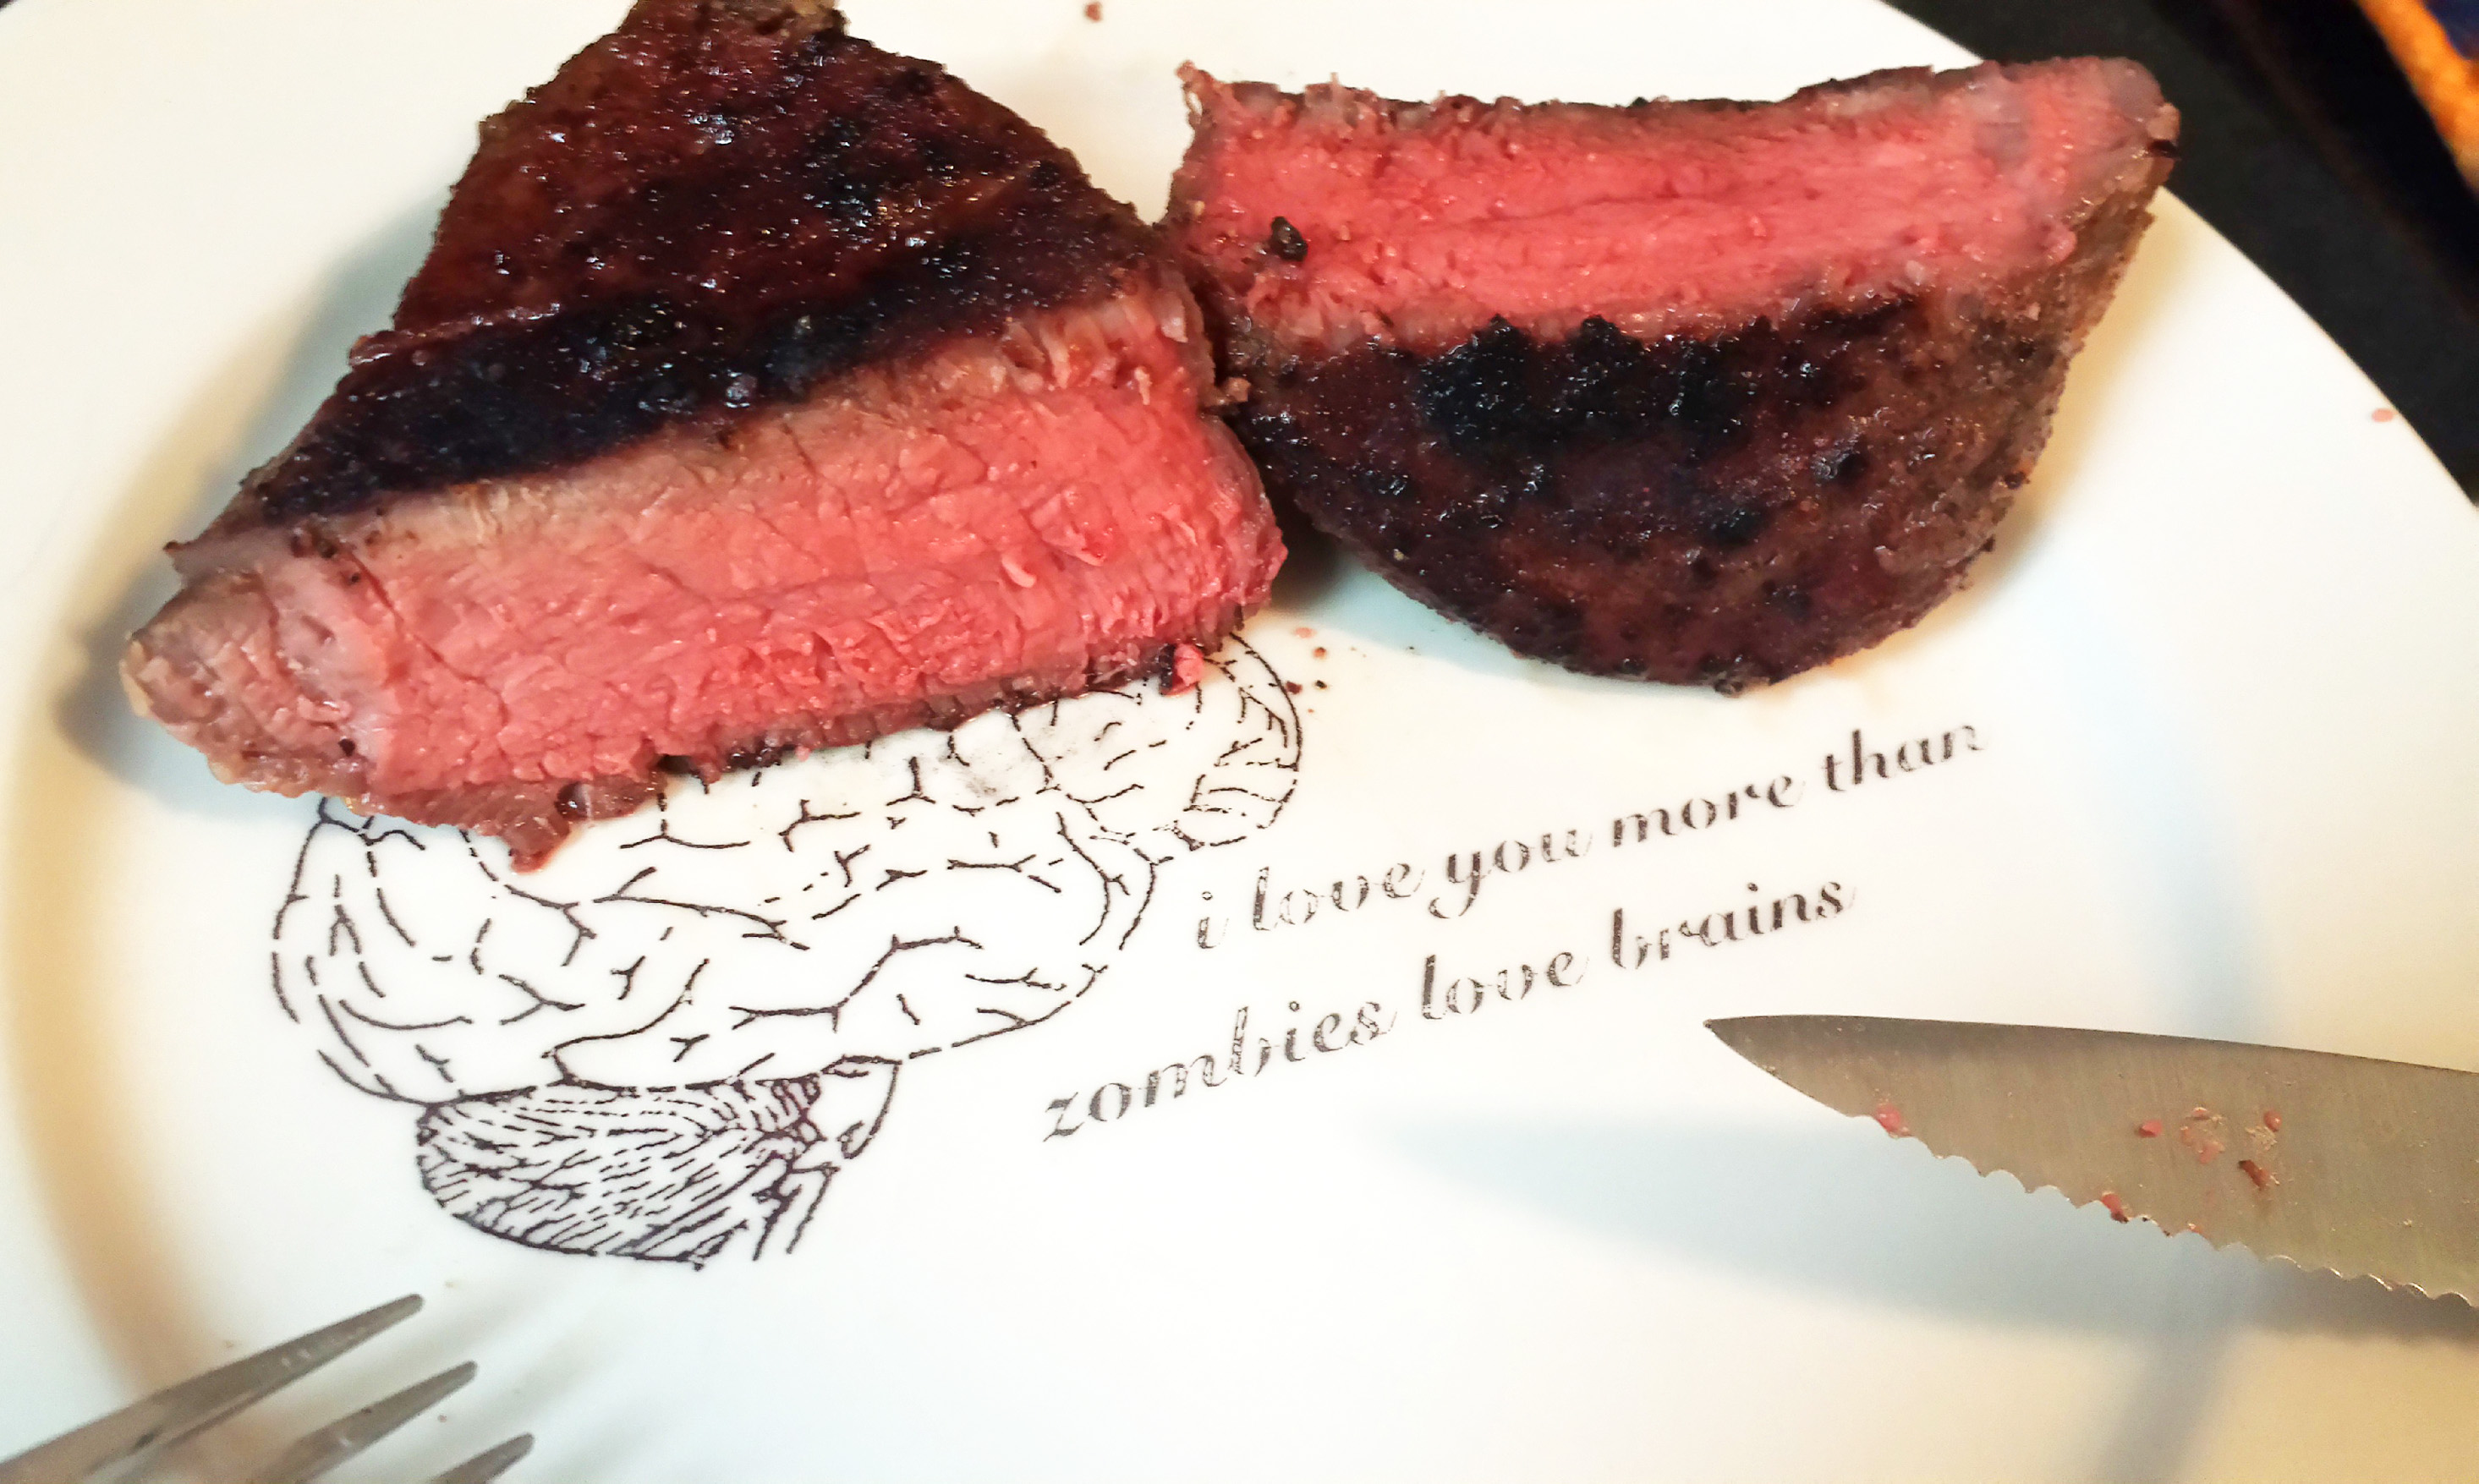
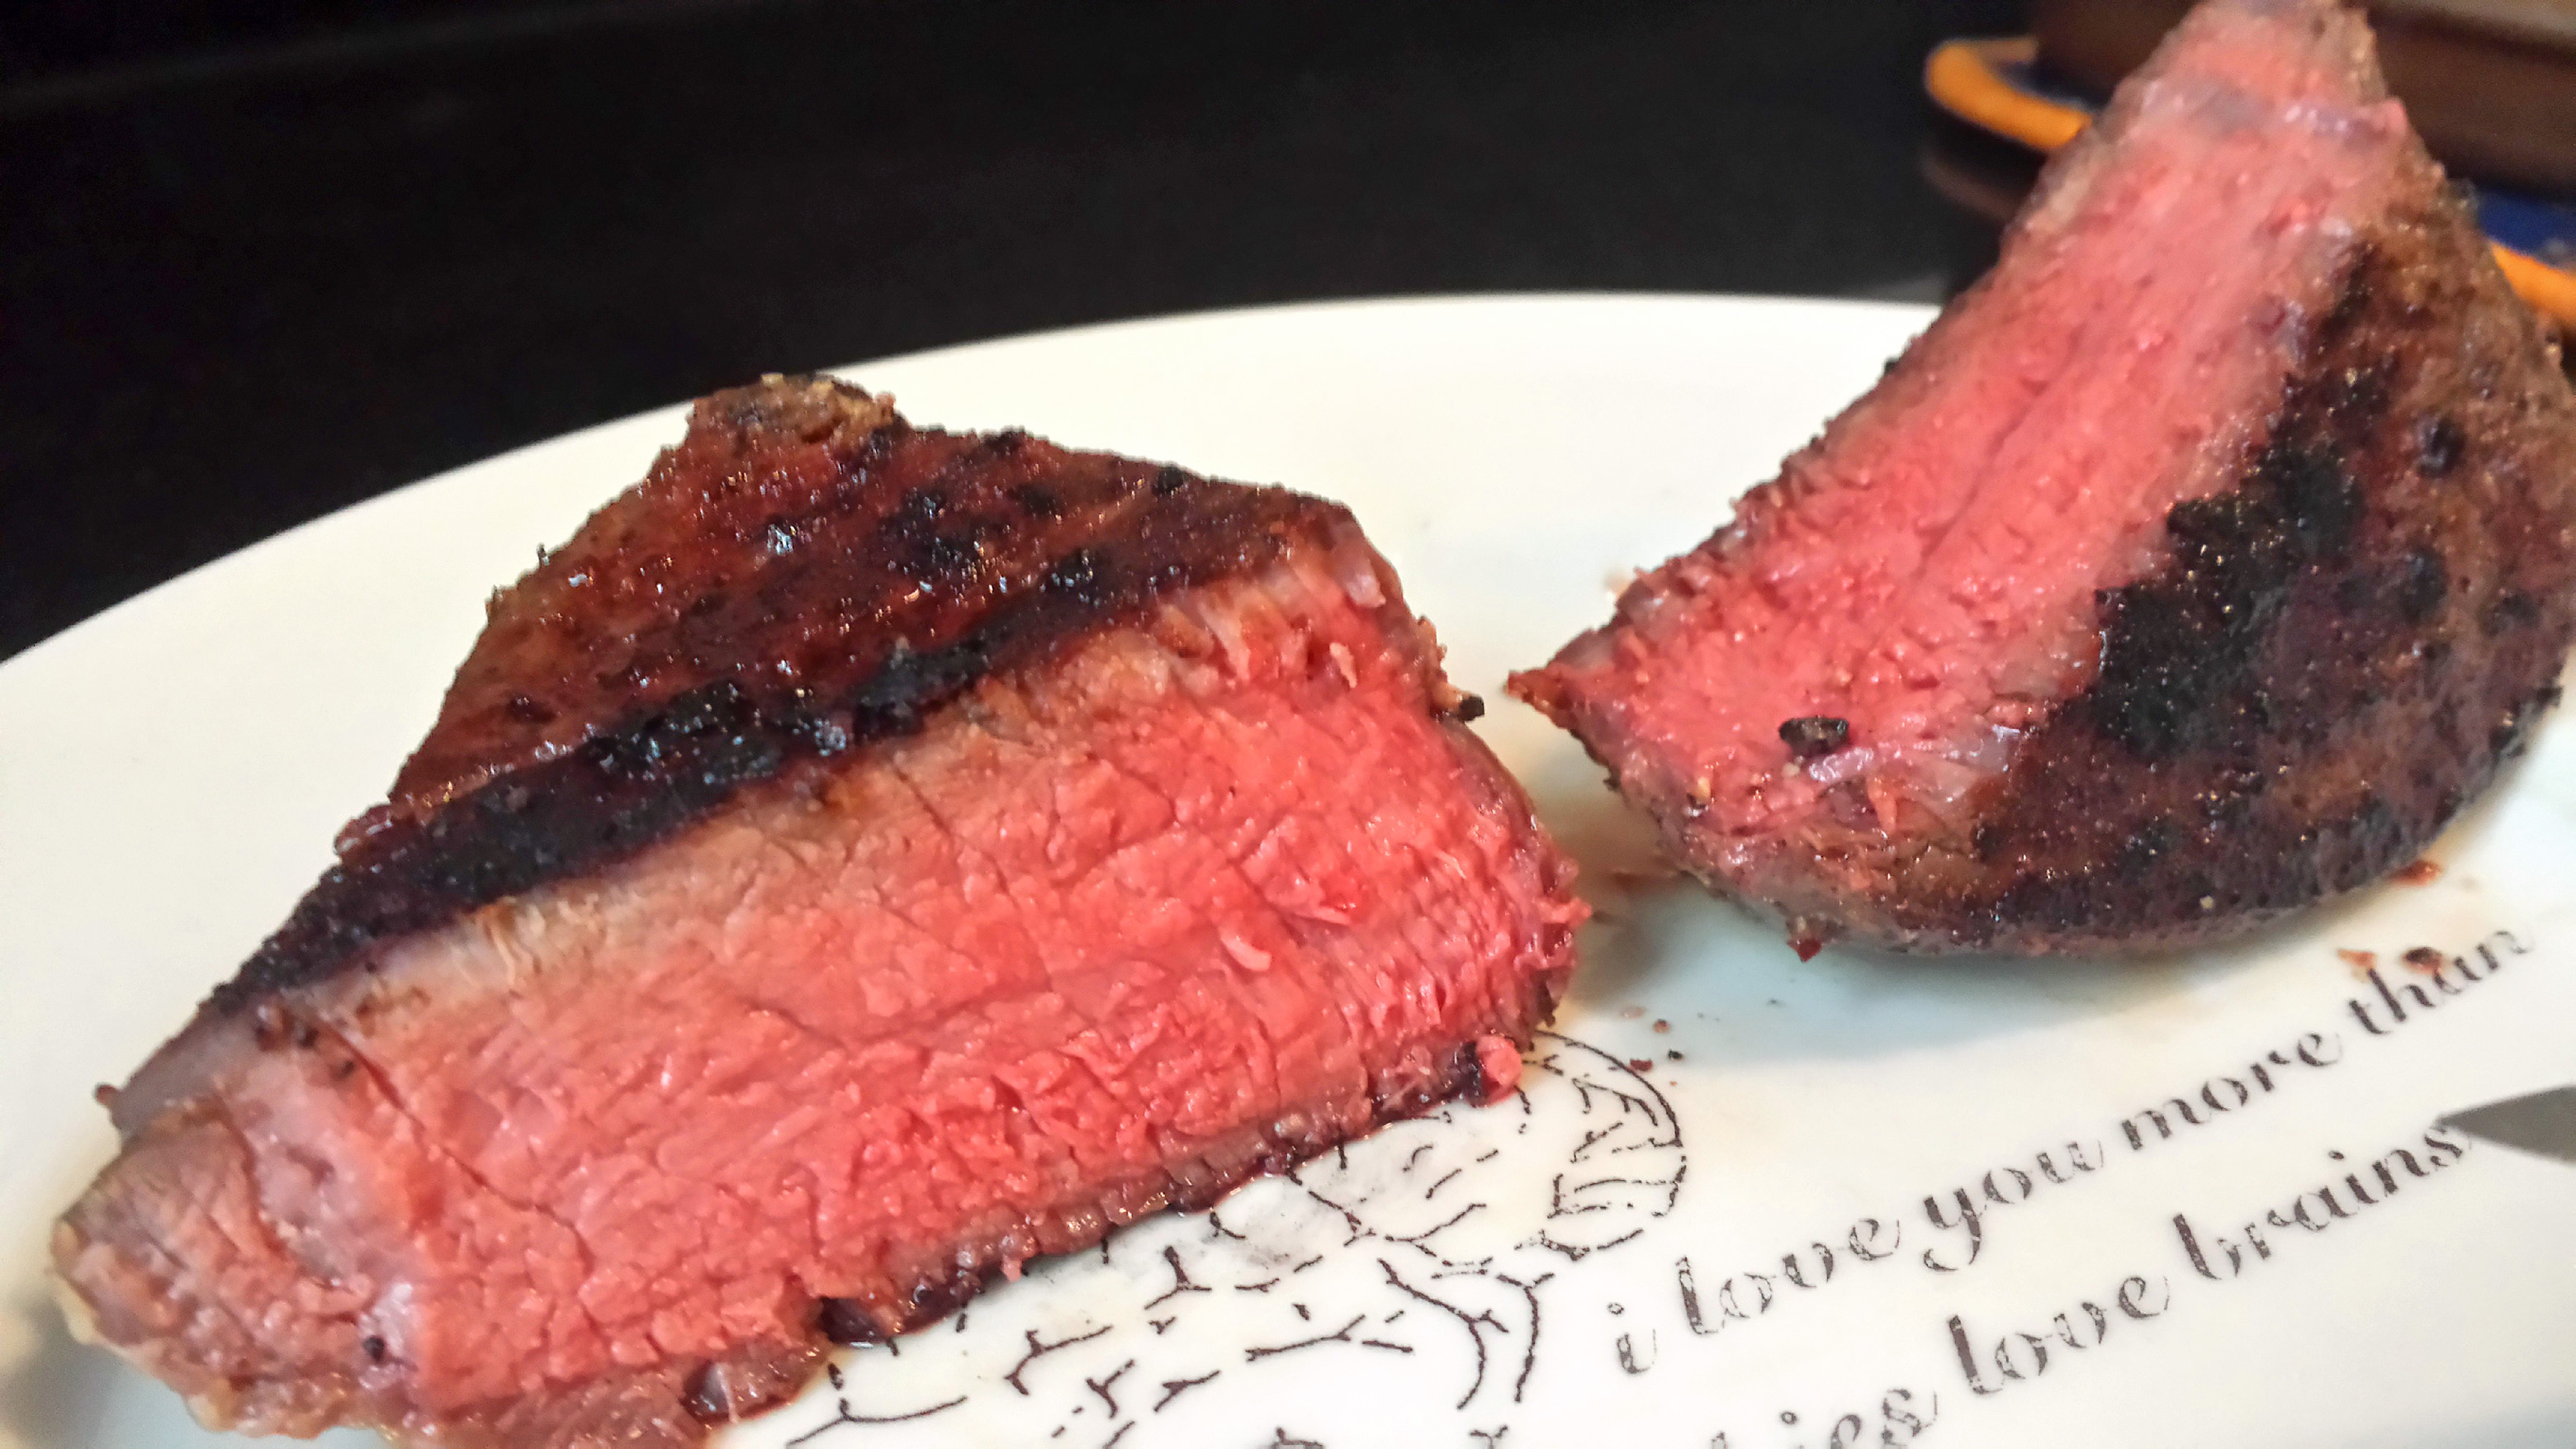
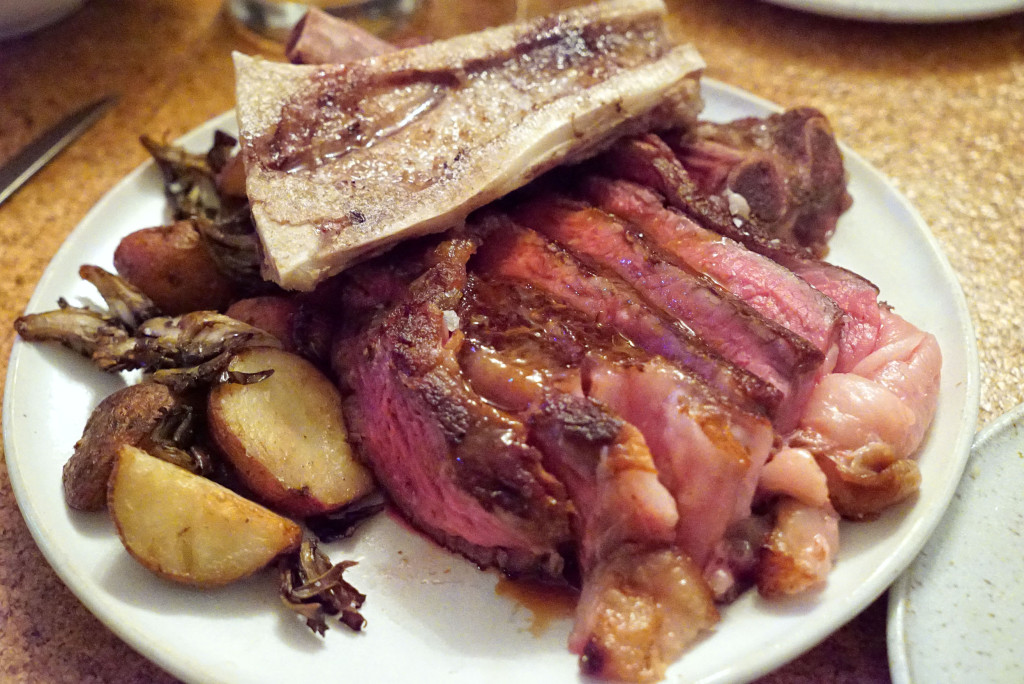
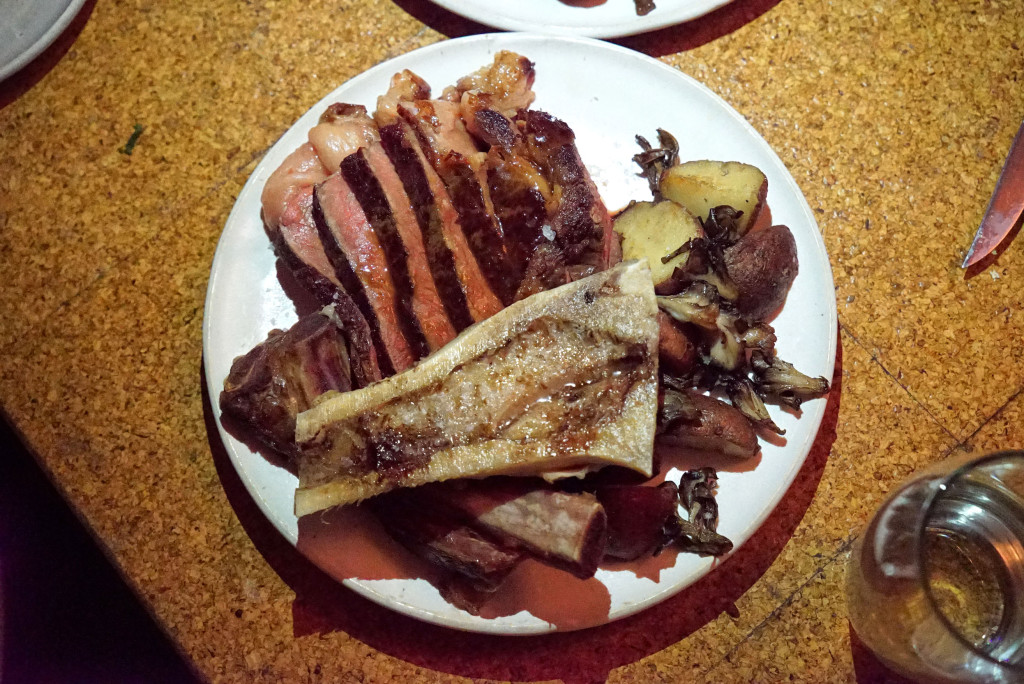
Anyway then the masterpiece came out:

DSC08664

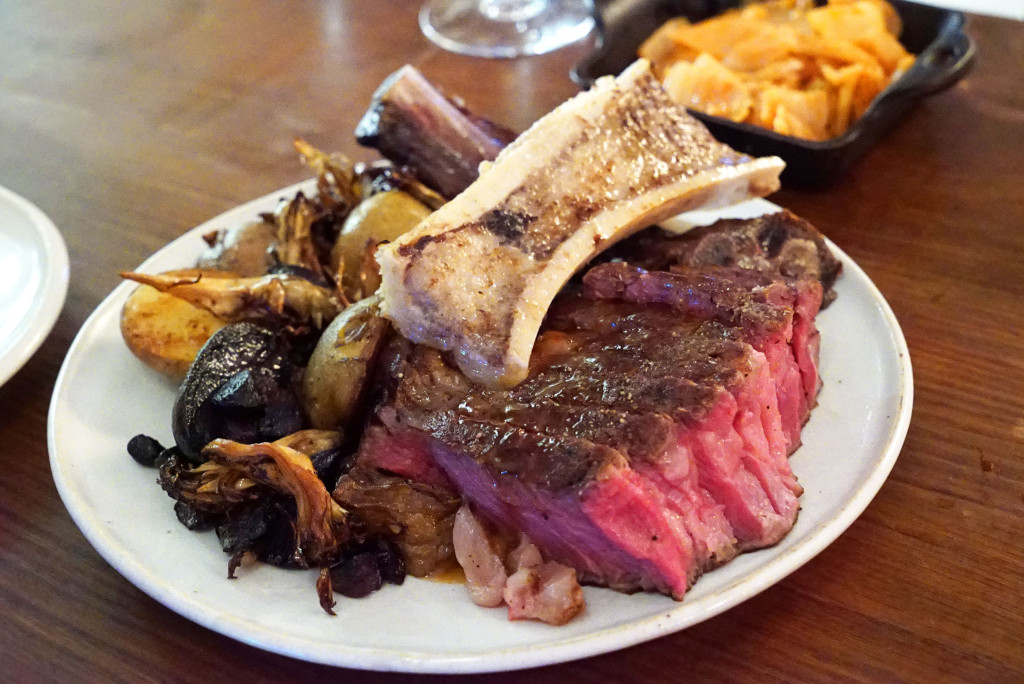
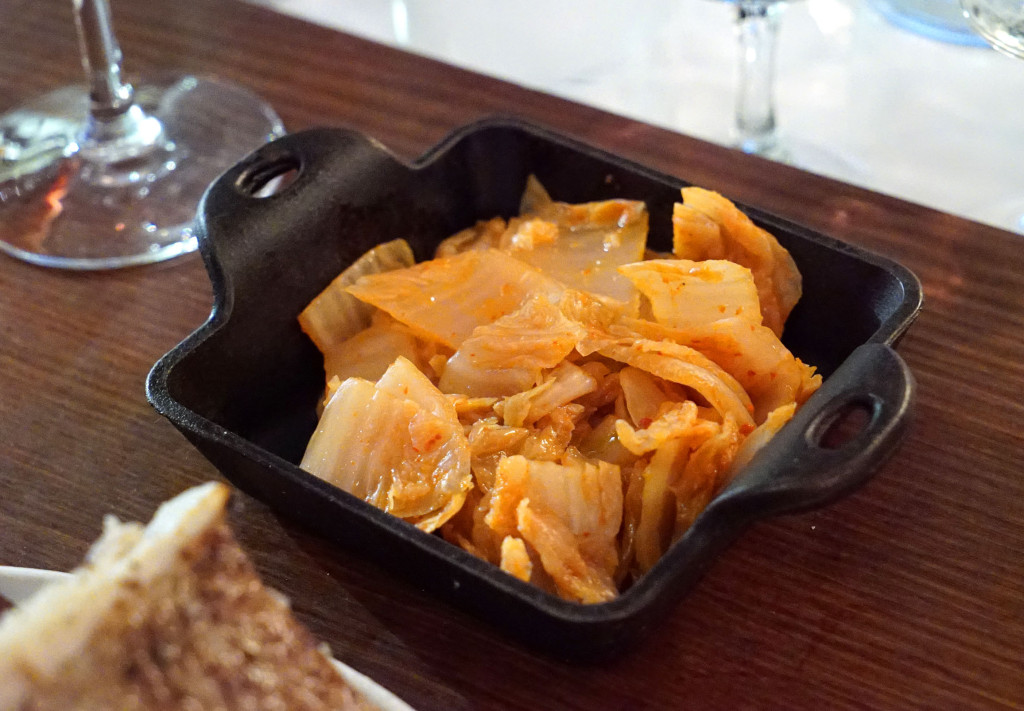
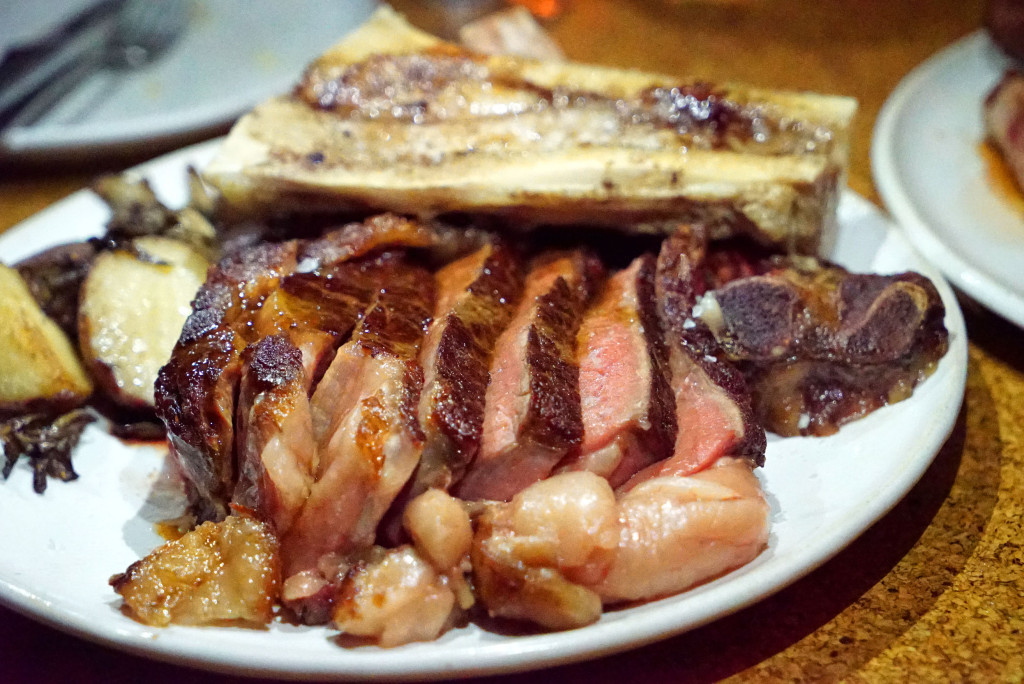
It was plated with grilled Japanese mushrooms, bone marrow, potatoes that were pretty much confit style, and this awesome kimchi cabbage that was finished with rendered beef fat:

DSC08673

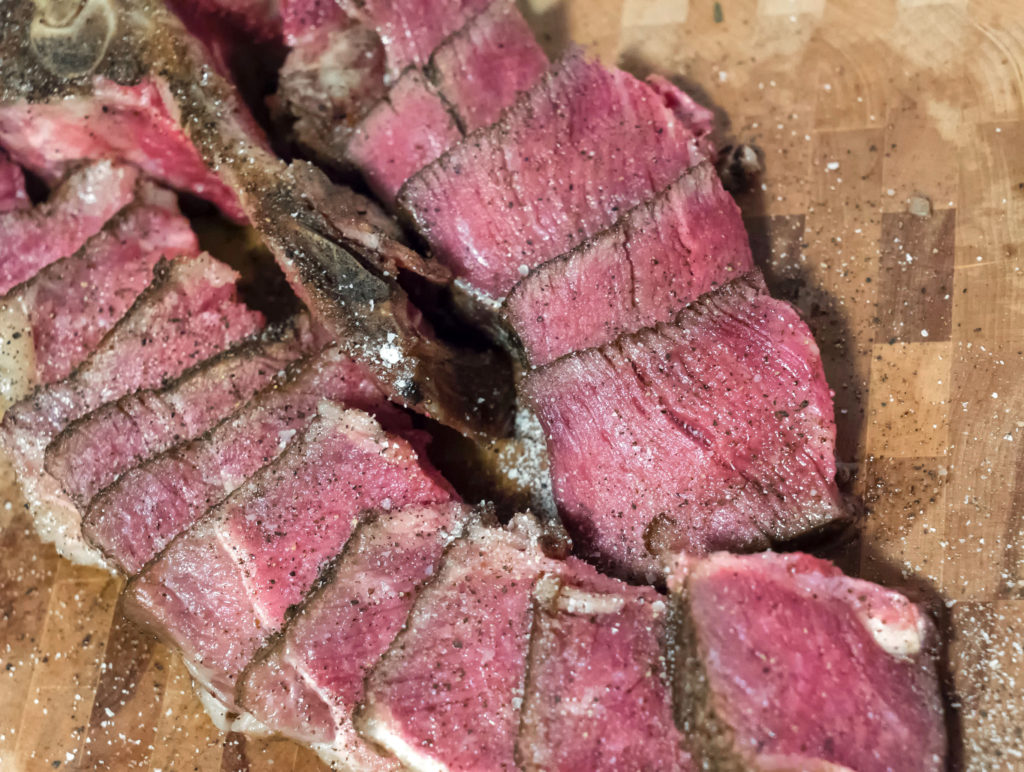
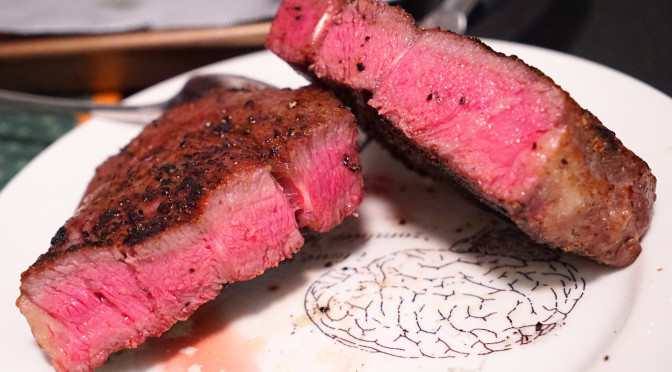
This right here is the best steak I’ve ever eaten at a non-steakhouse, and I can tell you it seriously rivals the best steakhouses as well – it may even be better than all of them.

DSC08676

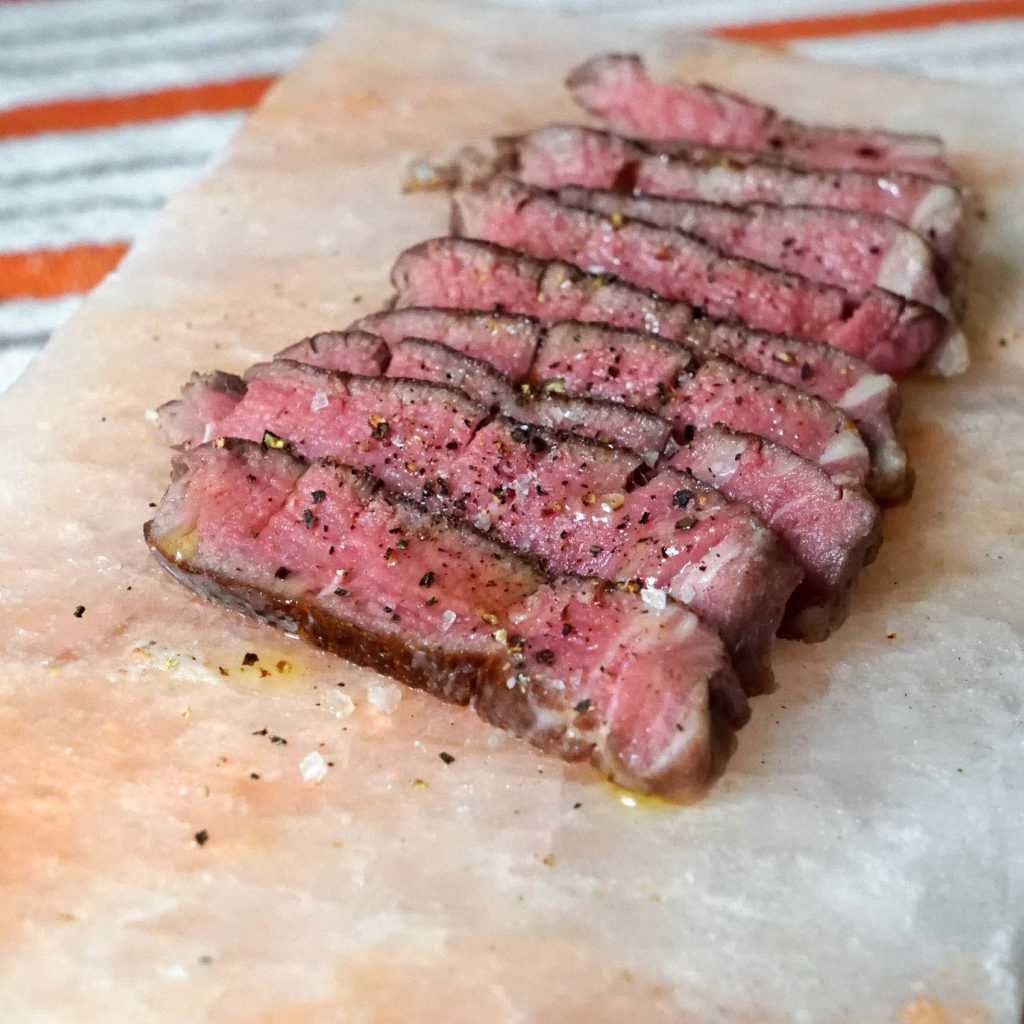
I’m still trying to wrap my mind around how incredible this thing was, and I don’t know if it can really compare to anything I’ve had at a steakhouse other than the long bone wagyu rib eye at Del Frisco’s. This thing is really in that kind of league. And look at how perfectly executed this thing is:

DSC08671

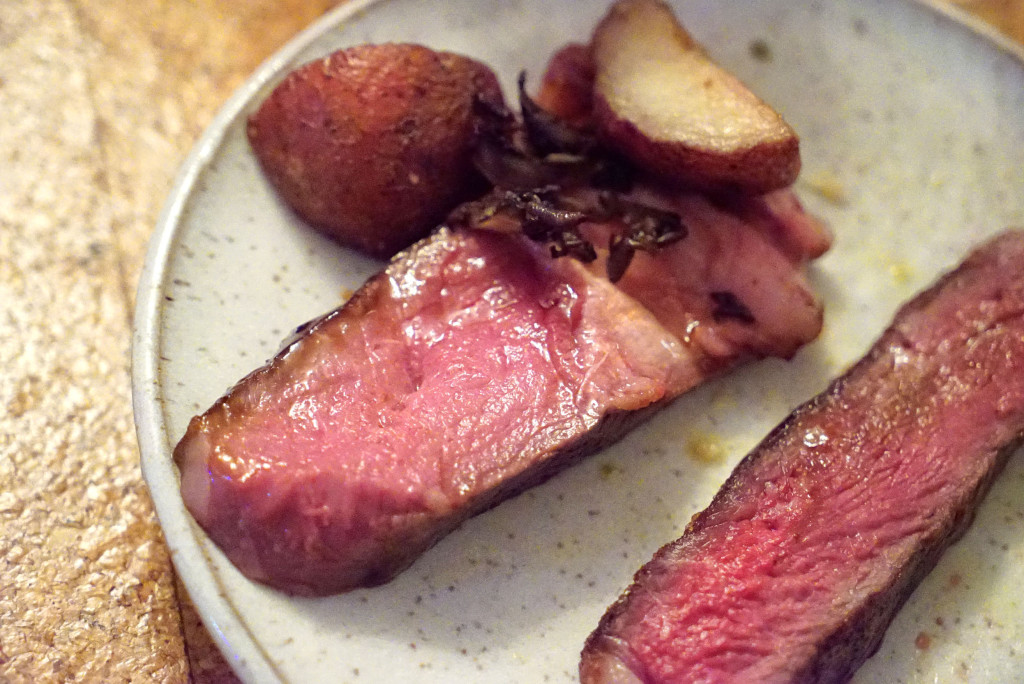
It was so tender and flavorful. Every bite was a “wow,” and the cap was fucking INSANE! I’ve never had anything like it before. I was expecting a lot of game and funk with this meat, but it was just the right subtle amount of “blue cheese” flavor. It came out most when I smeared some marrow onto the slices of eye meat. And the fat around the cap was even softer and more delicious than the marrow.

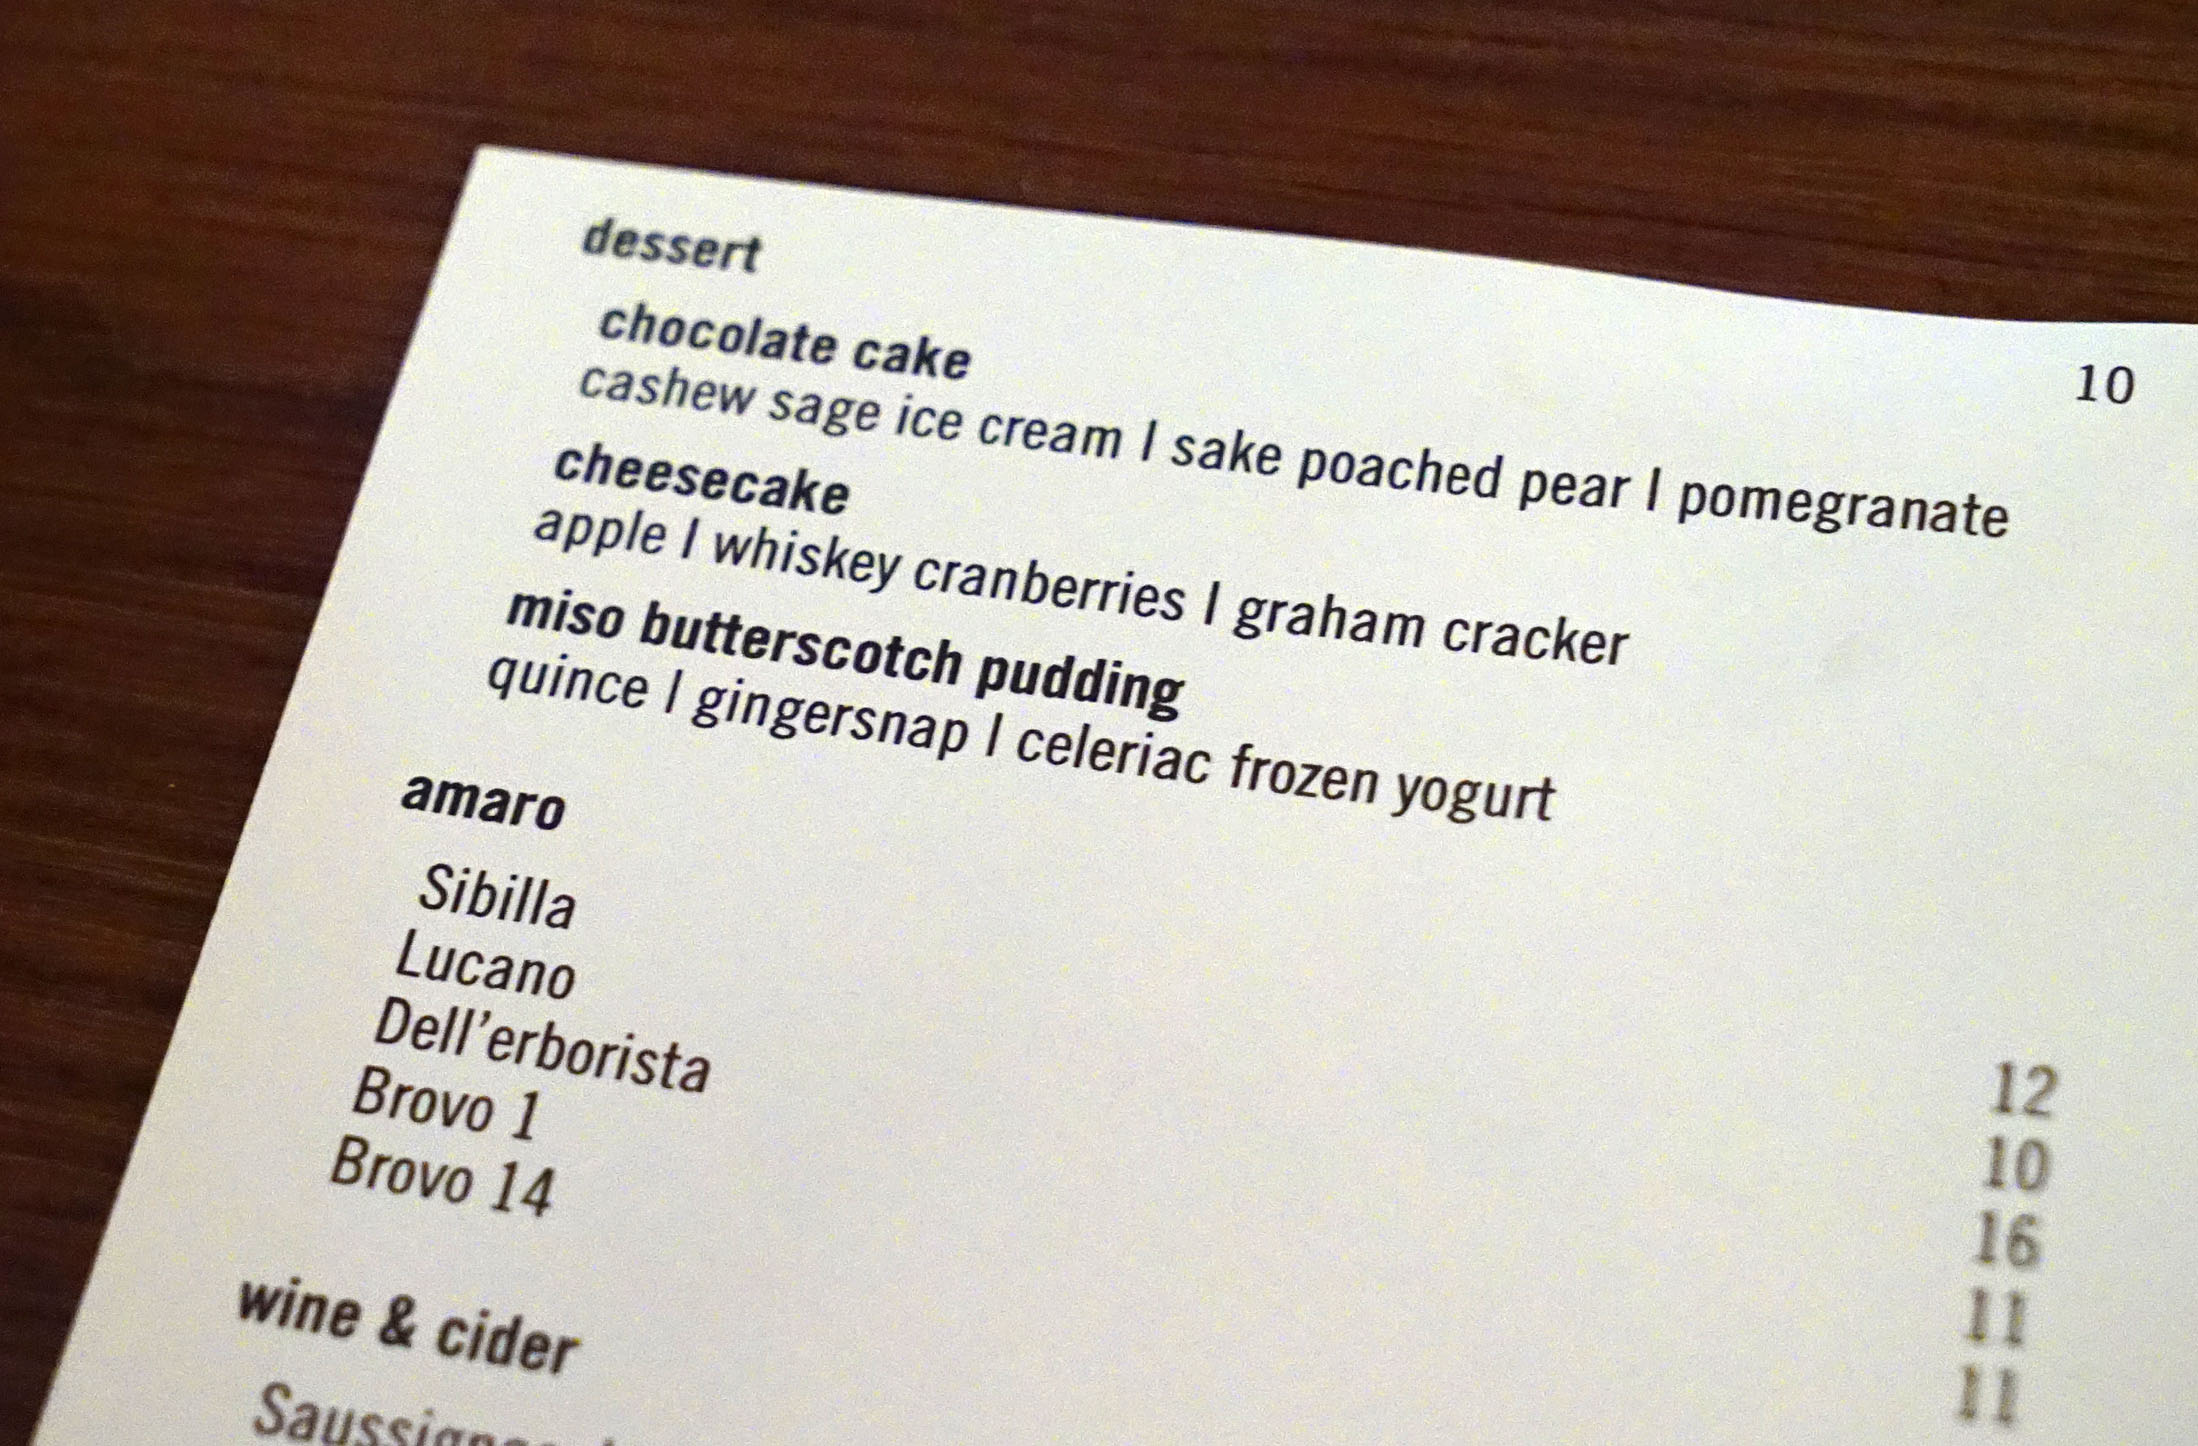
I don’t know how we did it, but we managed to fit dessert into our guts as well. Probably because what we saw on the menu was new and unique. We had to try something.

DSC08694

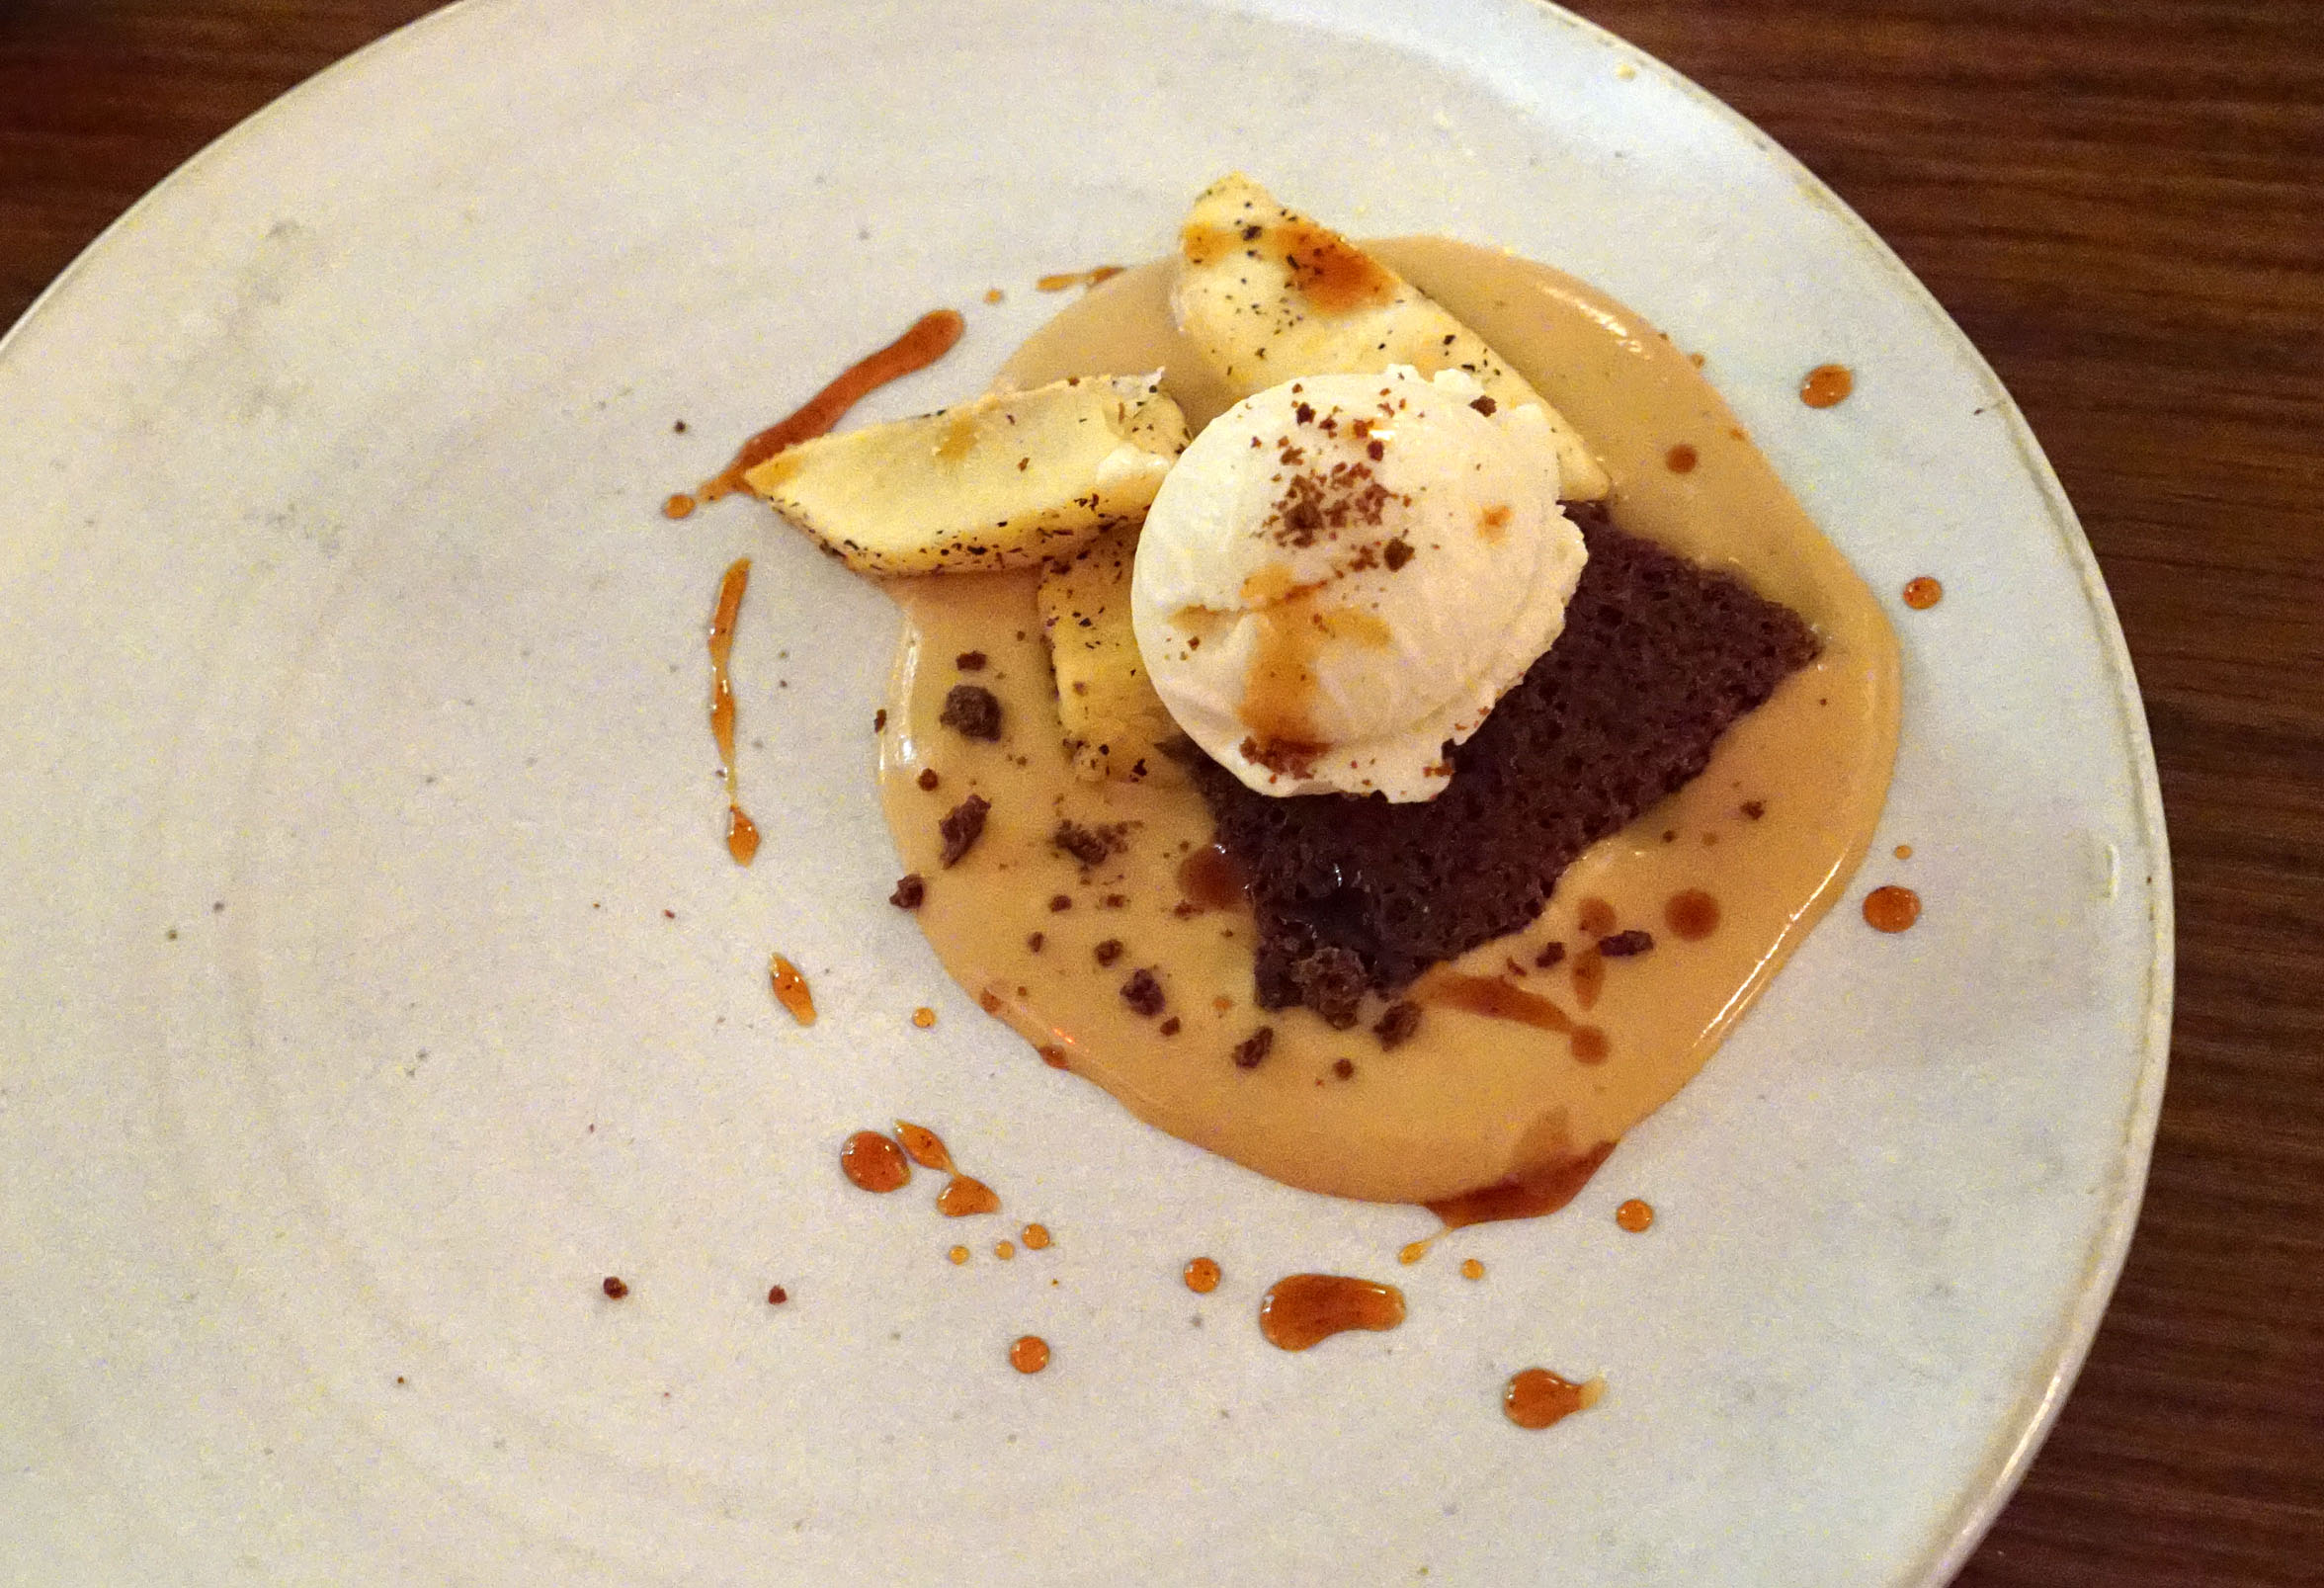
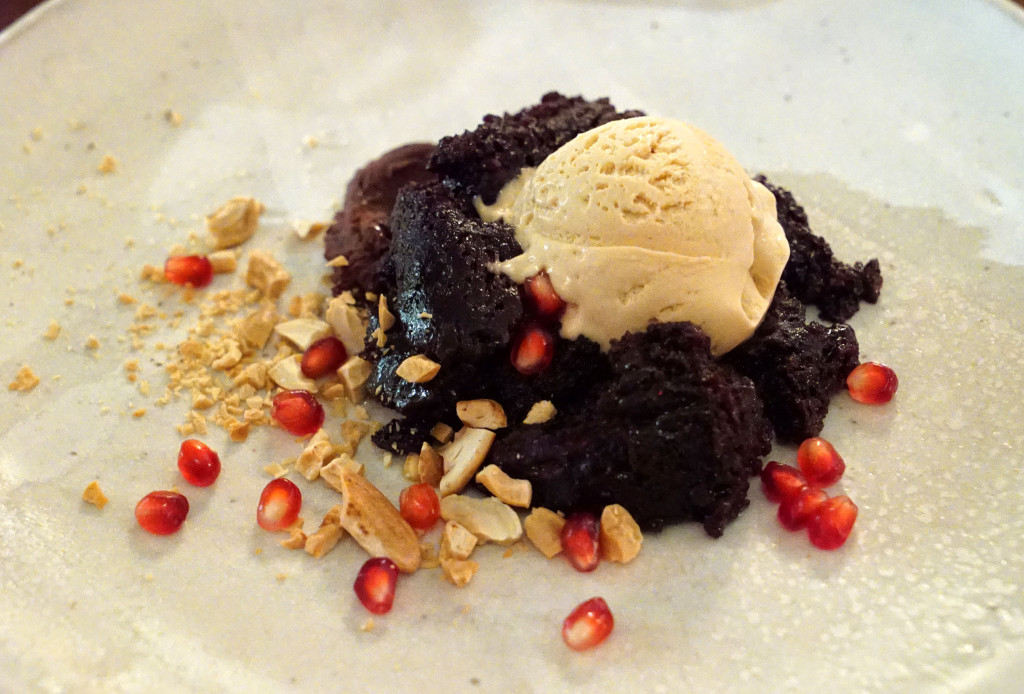
We went back and forth between two and ultimately left it in John’s hands. He came out with both; the chocolate cake, and the miso butterscotch pudding.

The chocolate cake was mildly sweet because it was expertly cut by the cashew and sage ice cream. The pomegranate balanced the whole thing with a nice acidic and tart zing.

DSC08690

The miso butterscotch pudding is definitely something for the more adventurous dessert person. I seemed to focus my attention more on the celery ice cream than the pudding at first, but that pudding was so freaking good. The ice cream was like a palette cleanser, and the pudding was creamy and velvety – almost like a liquified peanut butter in texture – extremely innovative.

DSC08680

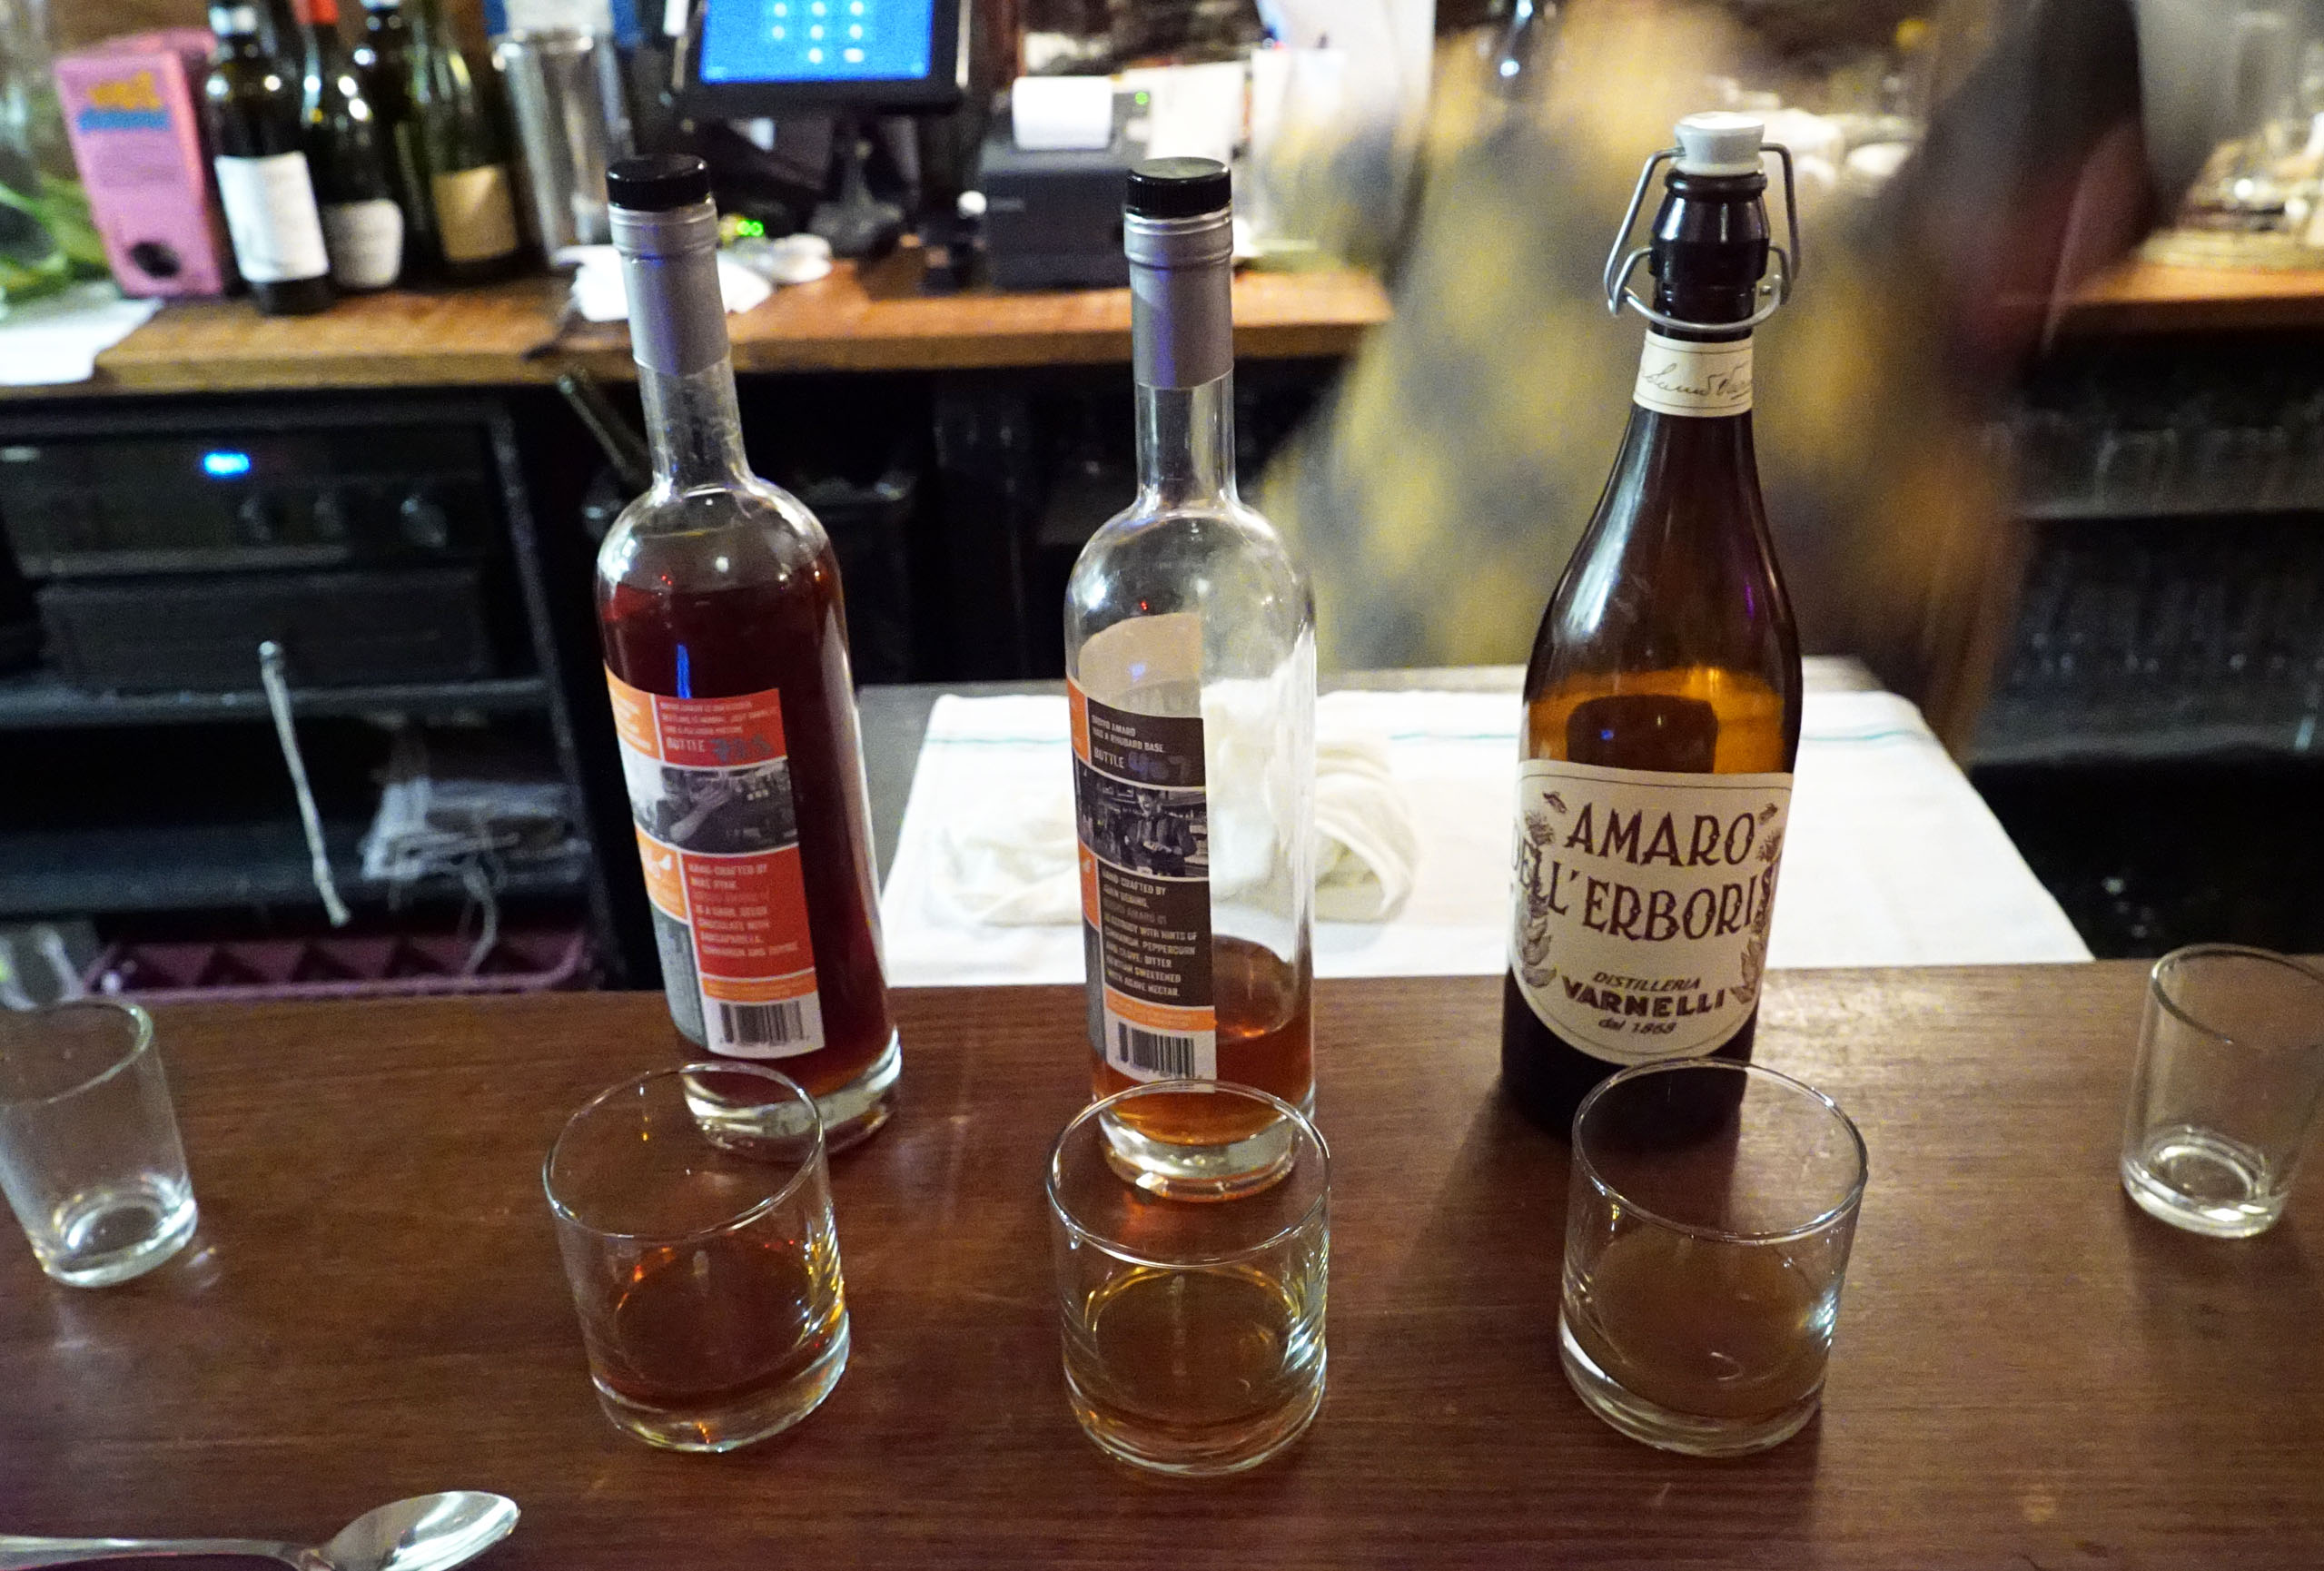
With dessert, we sipped on a trio of amaro selections, as well as a bitter lemon soda digestif that was made in house. Of these, our favorite was the Brovo #1 (center). It had a spicy cinnamon flavor that was easy to drink. And, as is true with the other stuff above, you can learn all about the people who make these spirits as you dine, because John and his staff are happy to share that information with you if you’re interested, like we were.

DSC08679

DSC08678

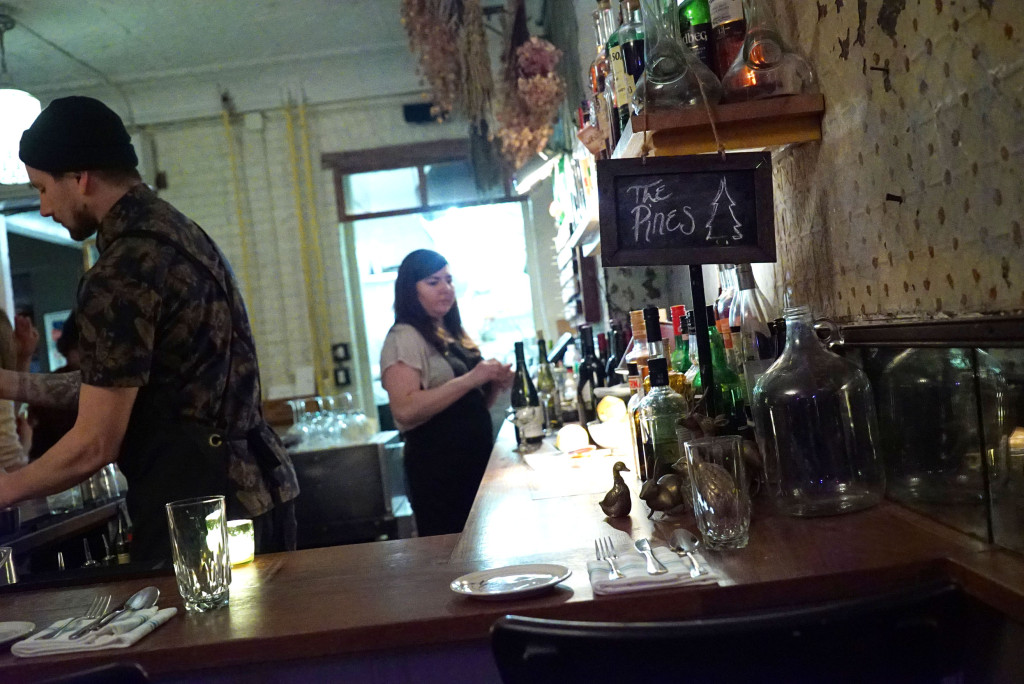
Want to hear something really amazing? This is the kitchen:

DSC08700

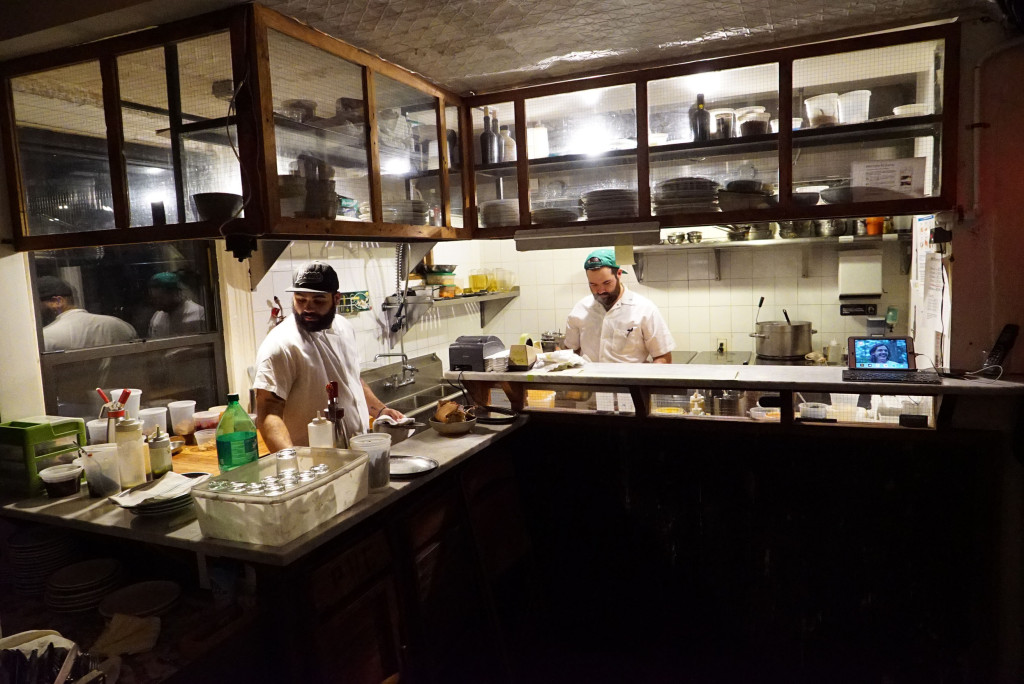
So small, yet so powerful. It is run like a well-oiled machine by incredibly skilled mechanics, pumping out what is absolutely some the finest food in NYC.

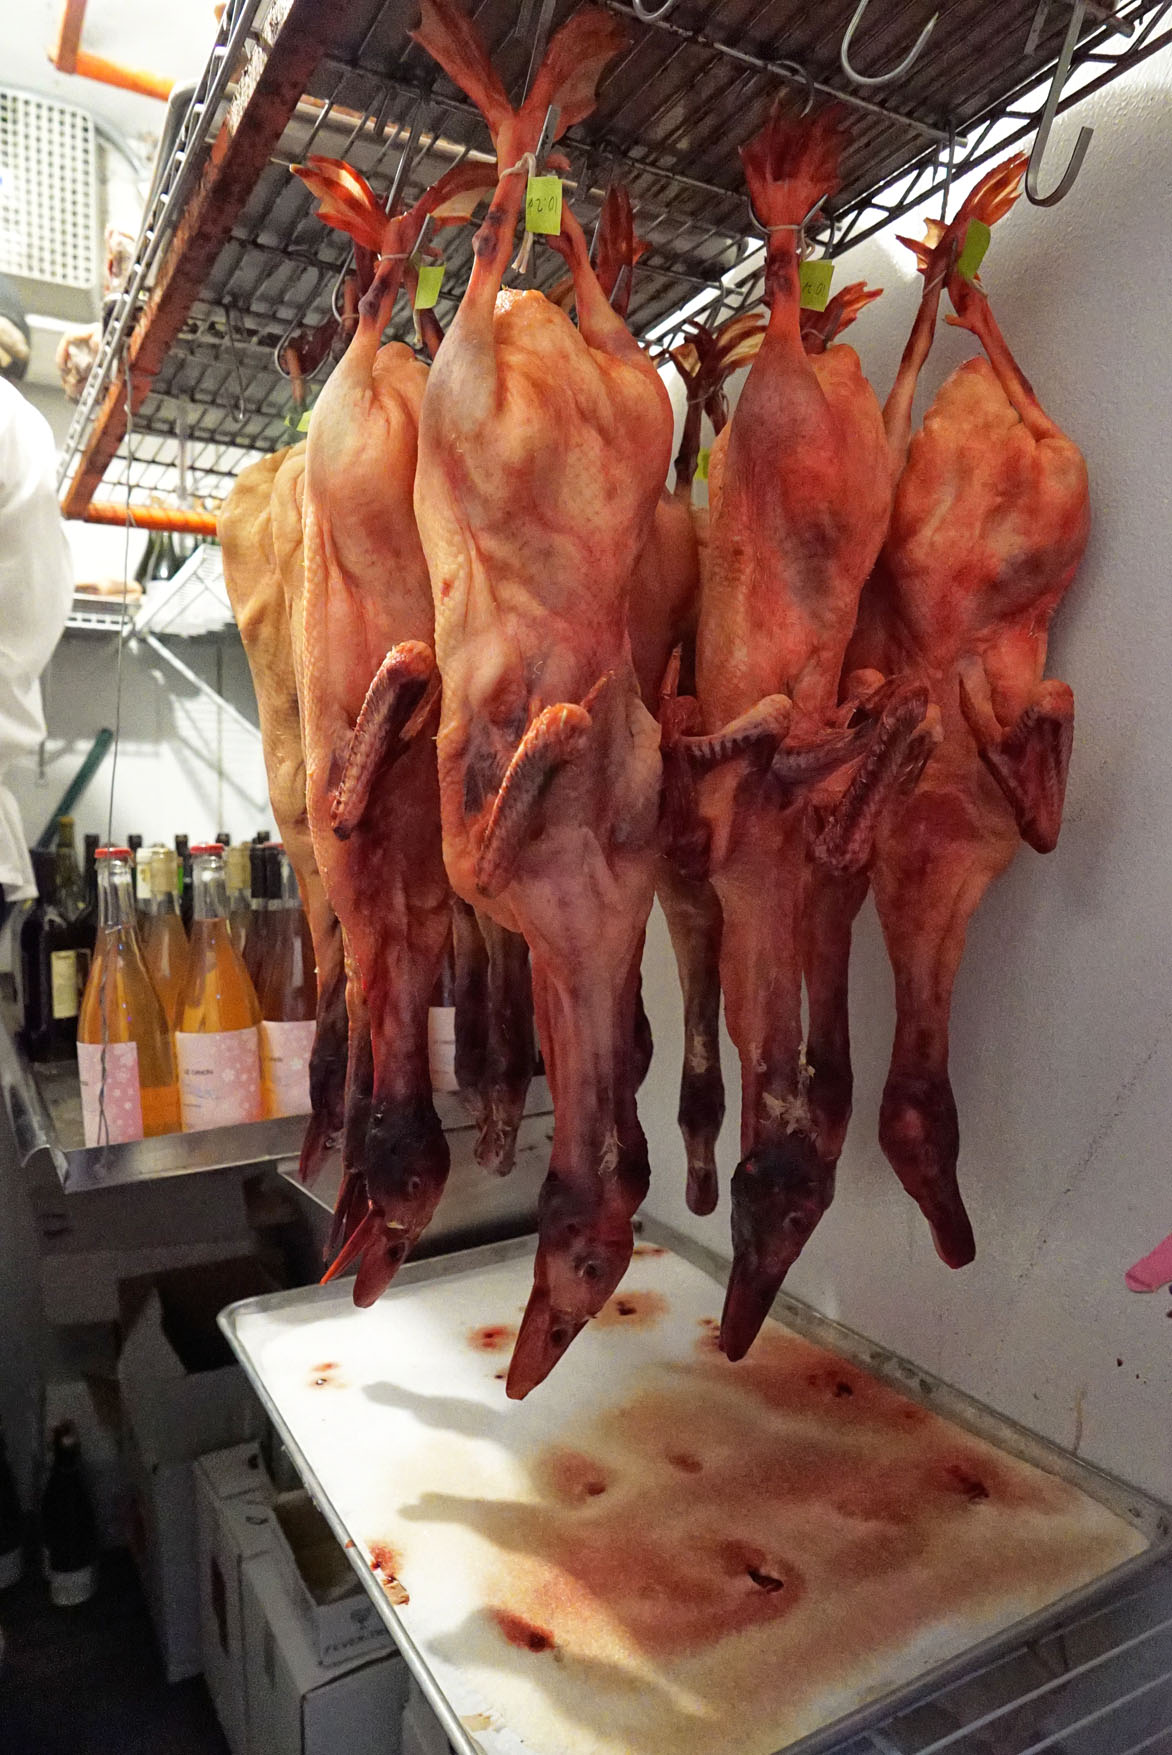
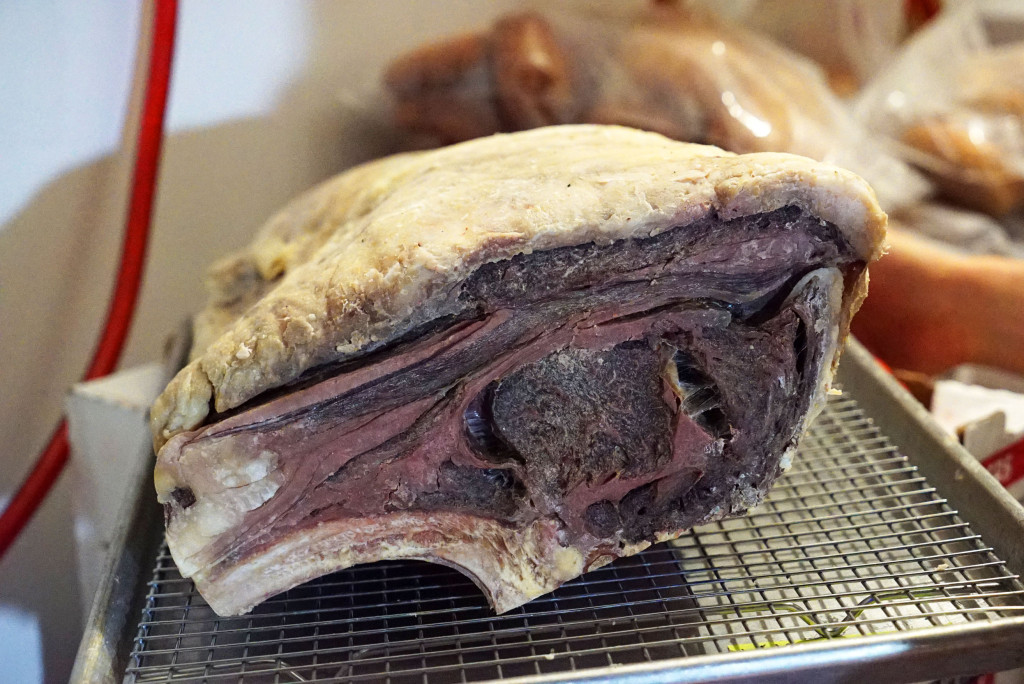
Please do yourselves a favor and go here. They may even give you a quick tour of the aging room out back if you ask nicely. Take a look at the ducks and steaks aging away! I think those ducks are at two weeks, and the steak is something like 86 days.

DSC08696

DSC08697

DSC09580

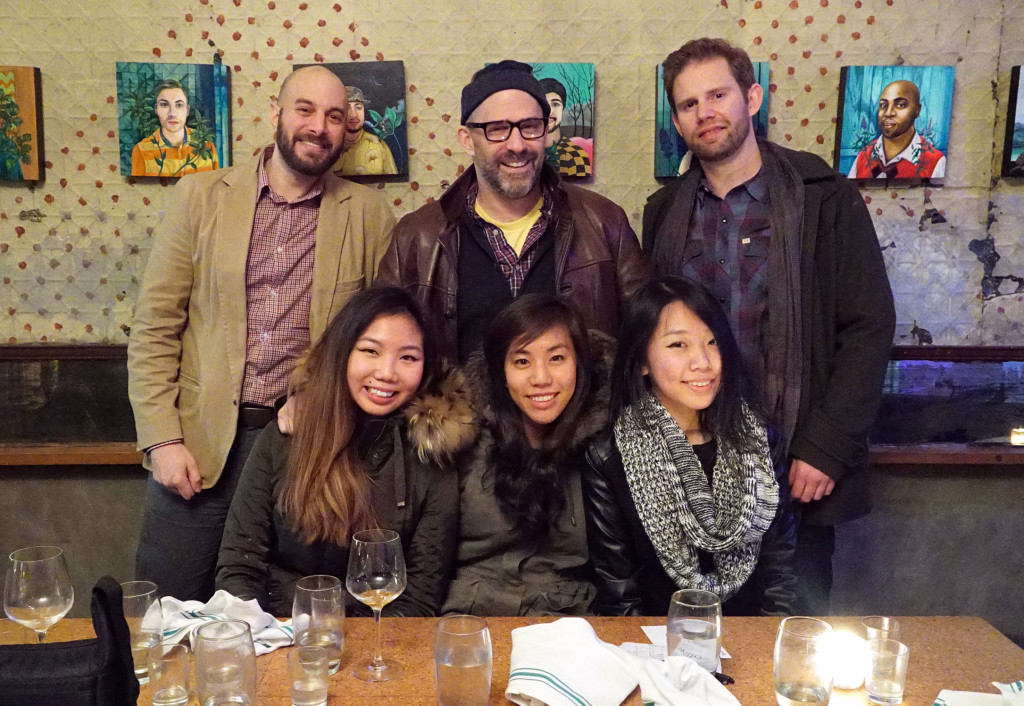
I went back with a crew of food bloggers and instagrammers for a nice meal around the holidays.

DSC09577

DSC09534

DSC09506

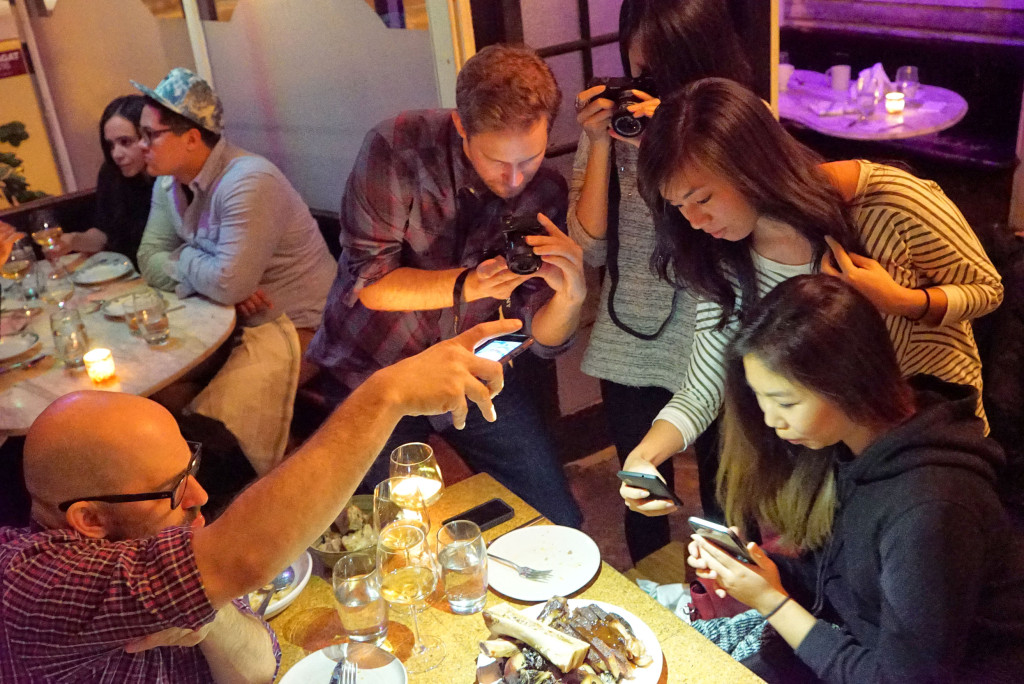
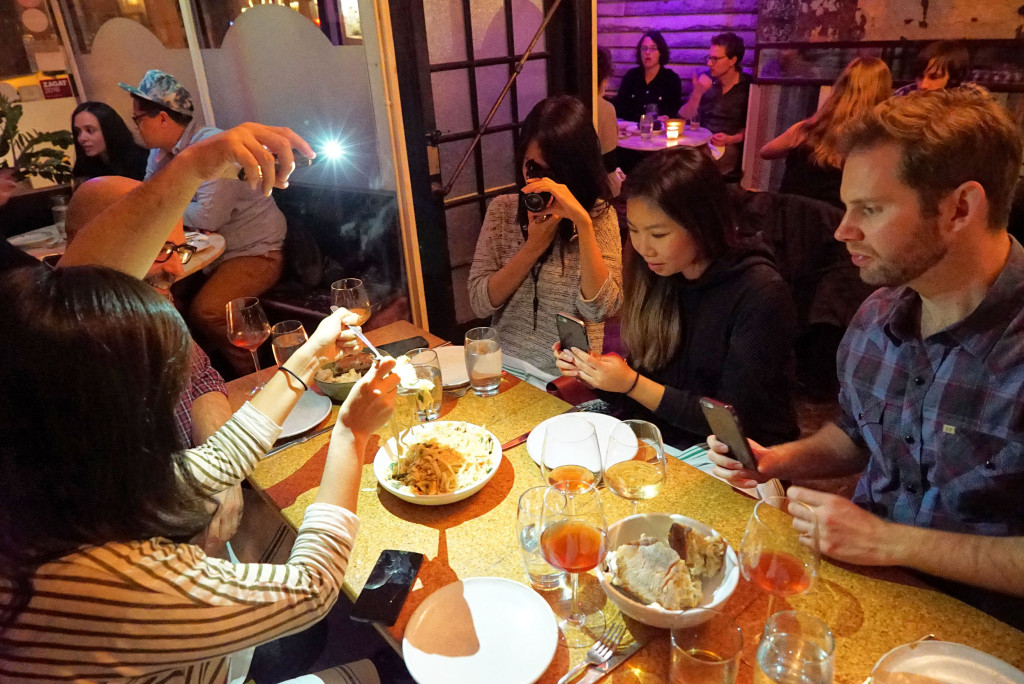
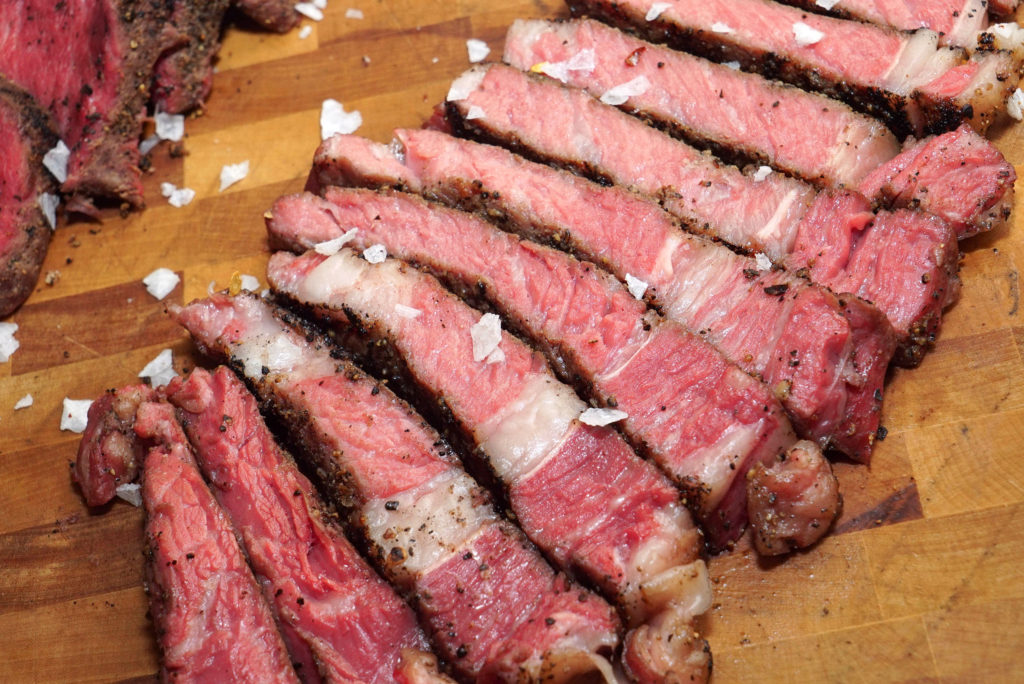
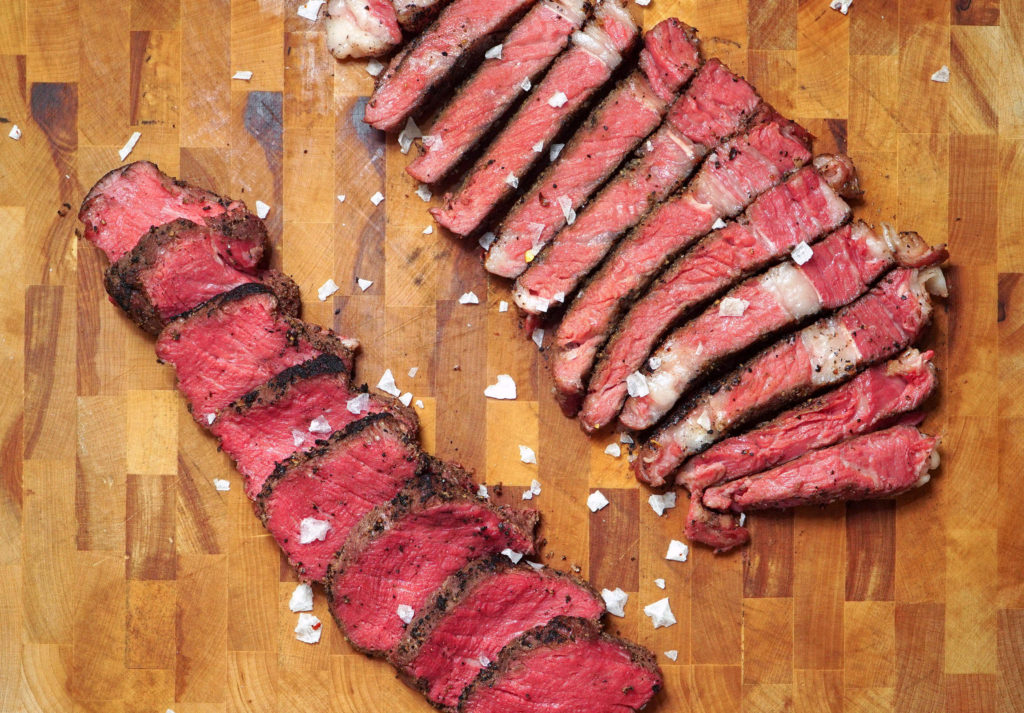
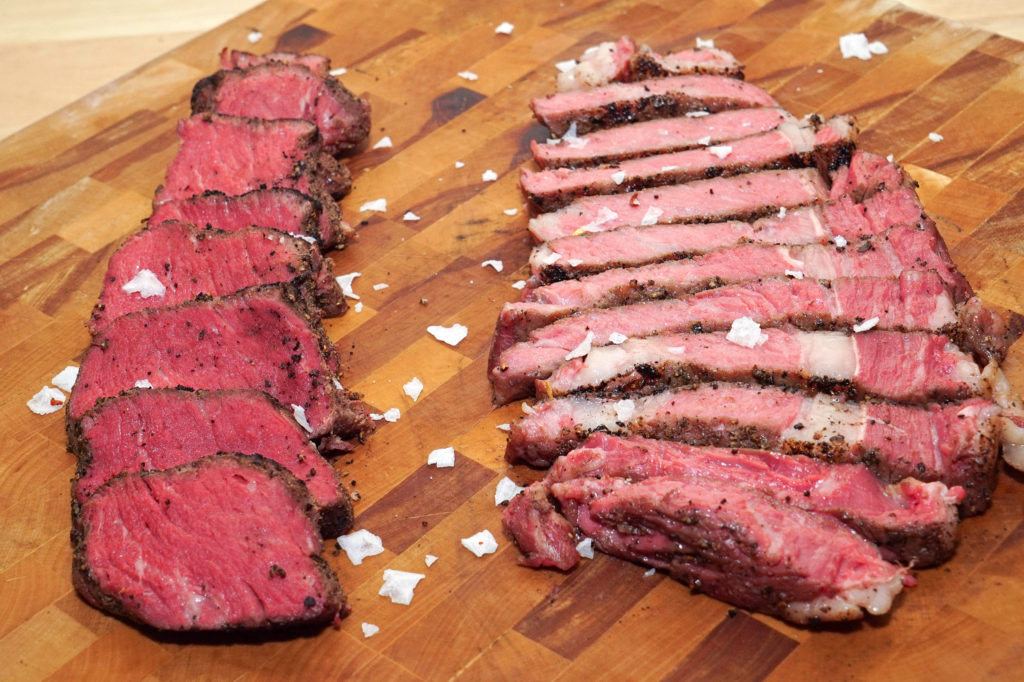
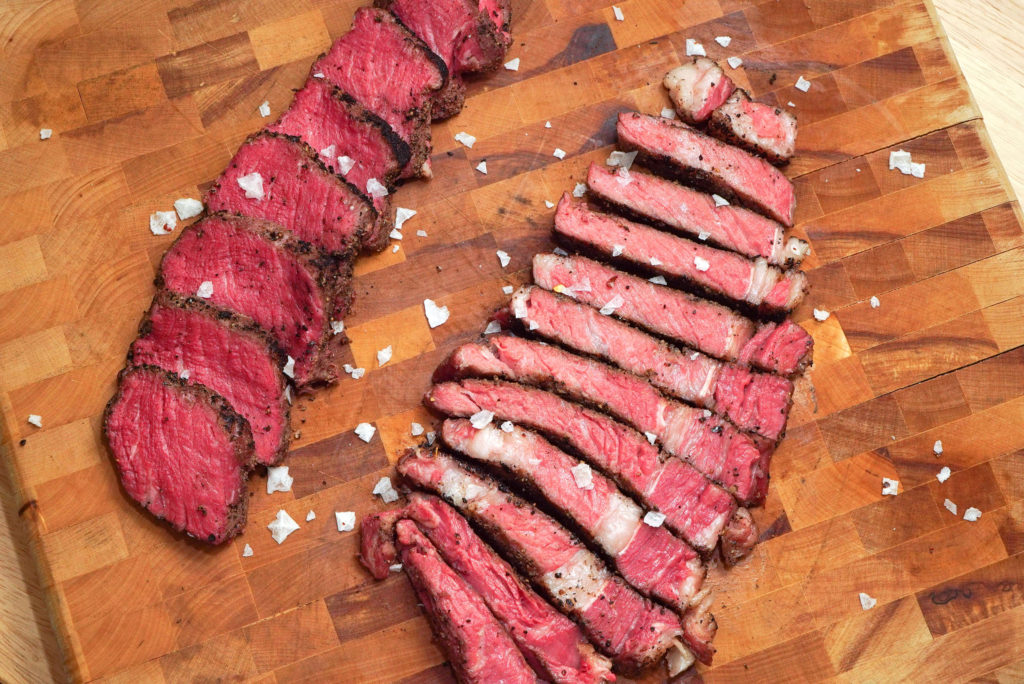
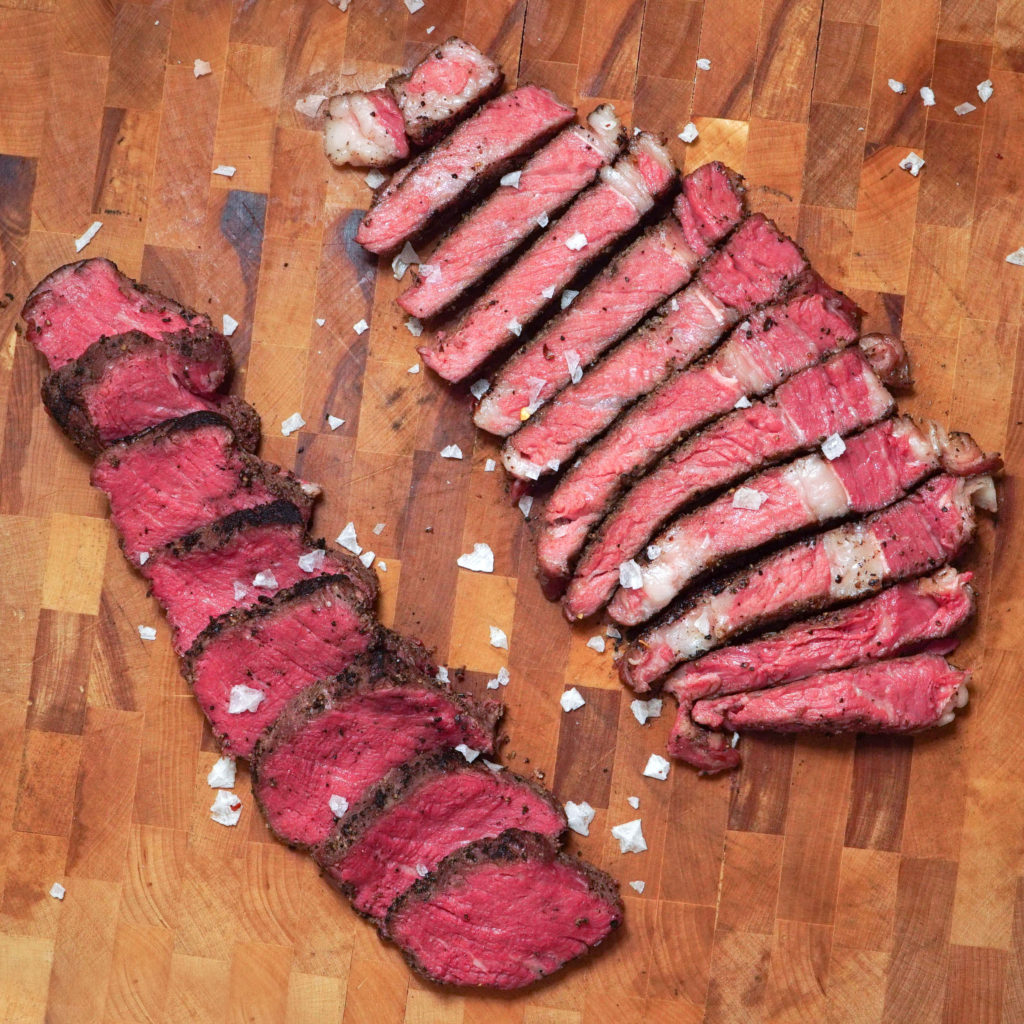
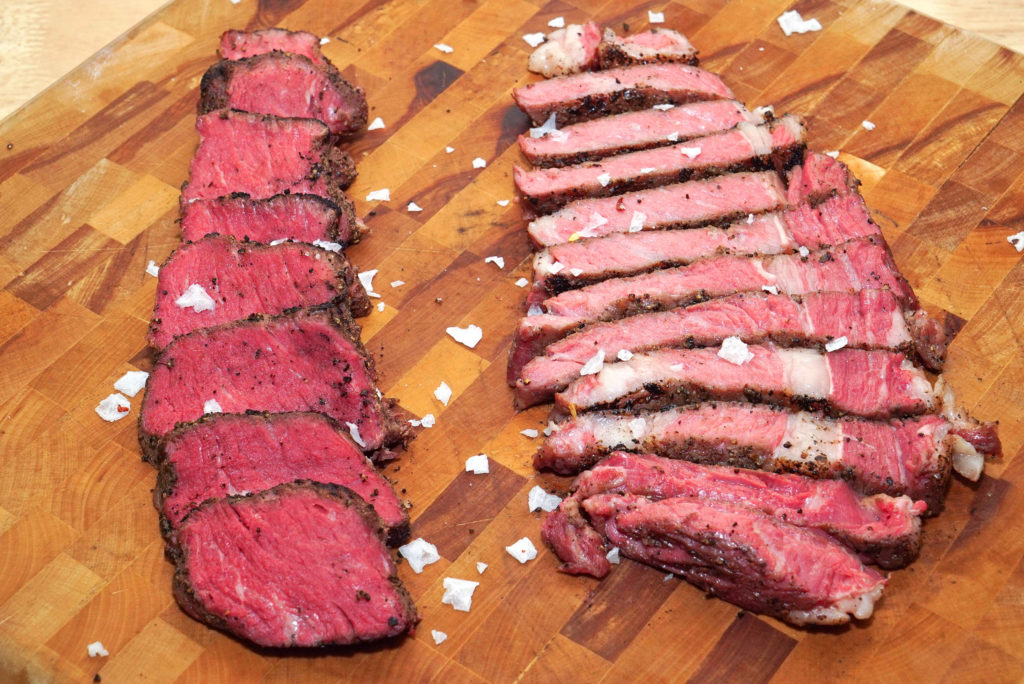
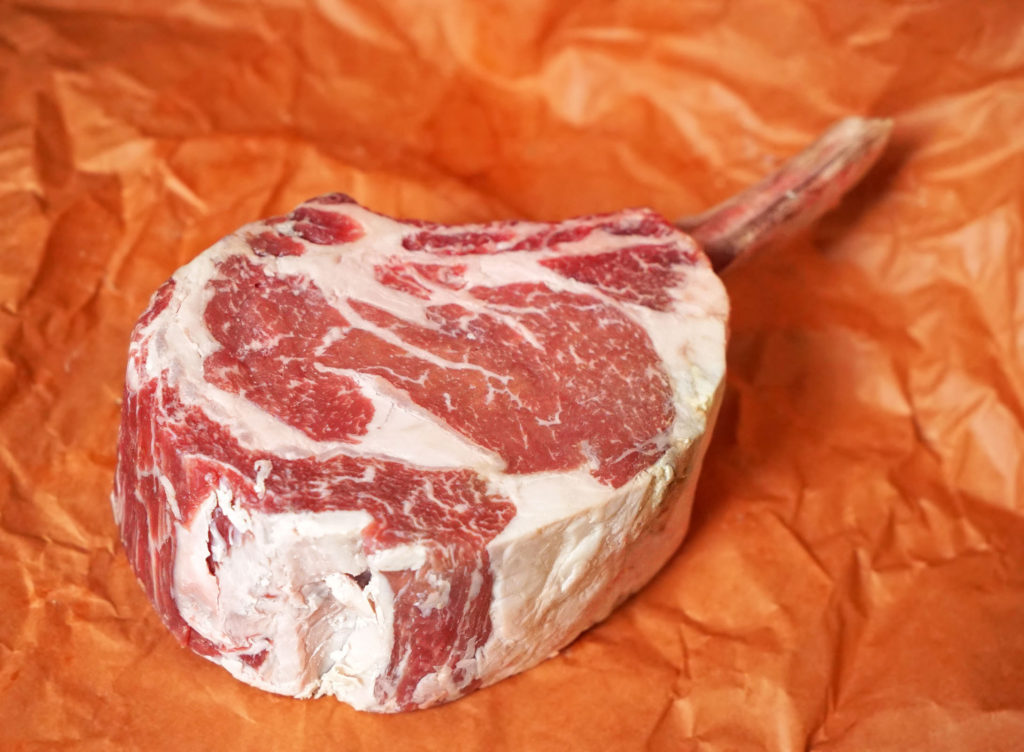
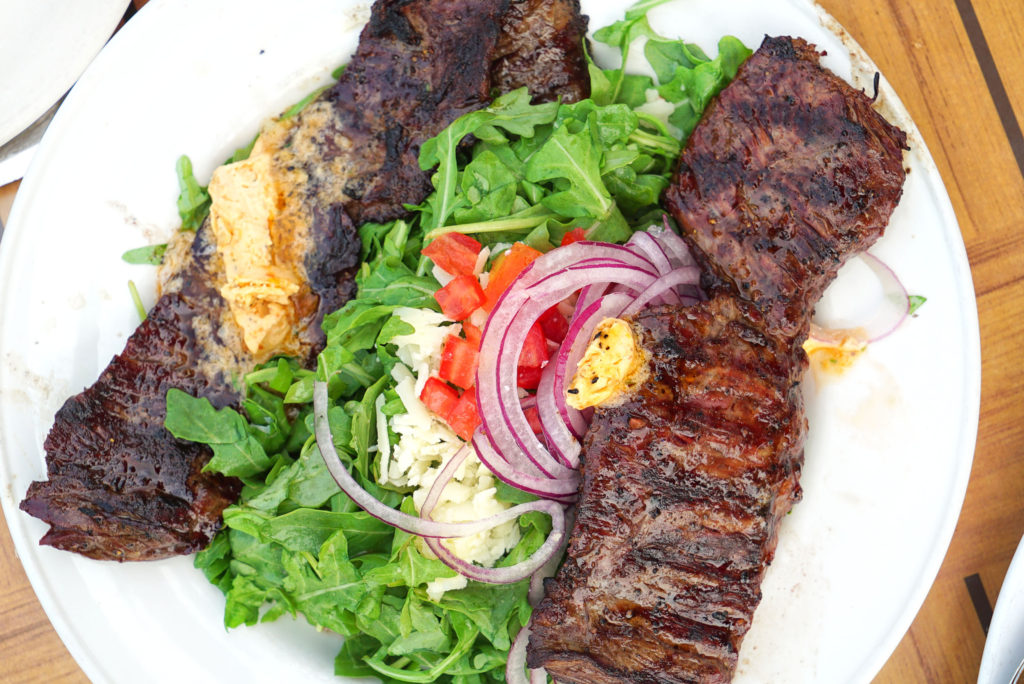
Here’s a photogasm of everything we ate, which included a duo of rib eyes – one aged for 35 days and another aged for over 80 days.

DSC09466

DSC09470

Molasses gingerbread cookies stuffed with fois gras and pistachios:

DSC09471

DSC09473

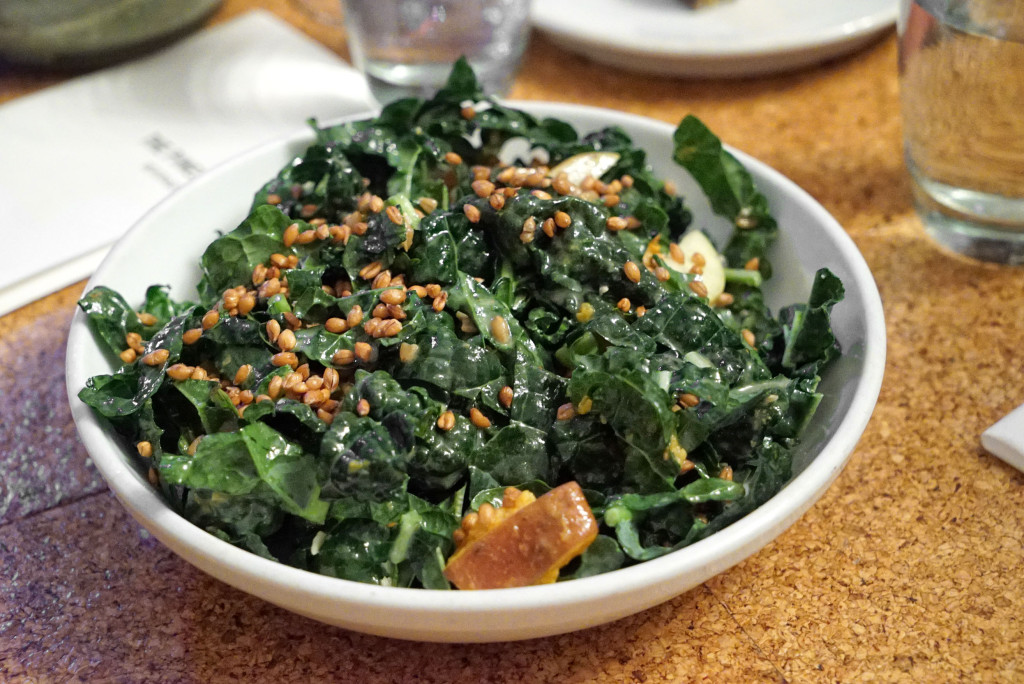
Kale salad with toasted barley:

DSC09480

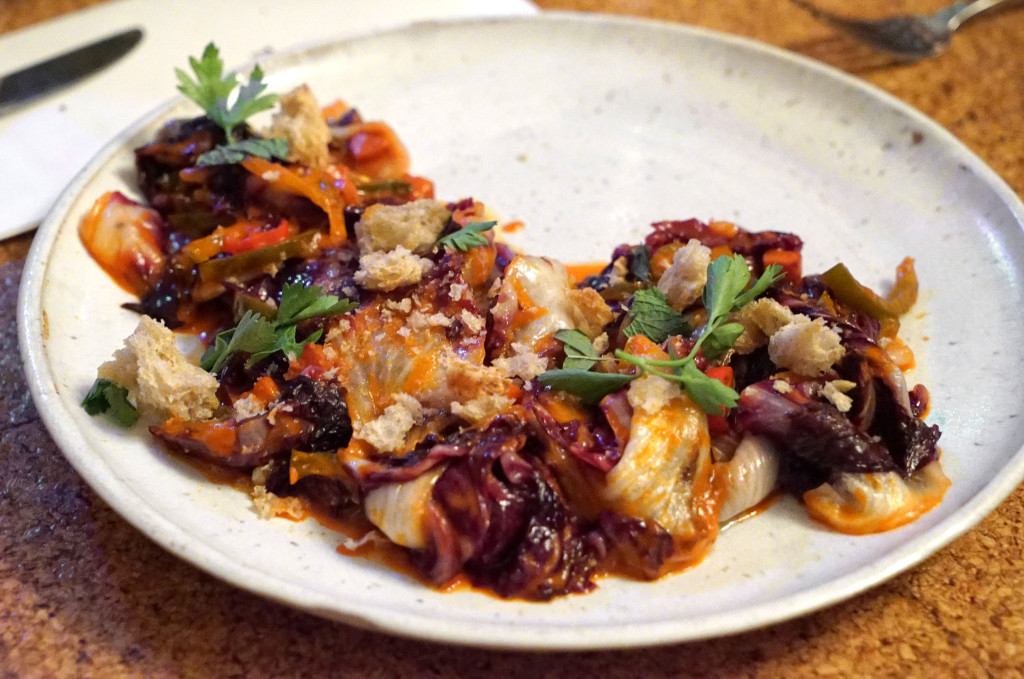
Grilled radicchio salad:

DSC09484

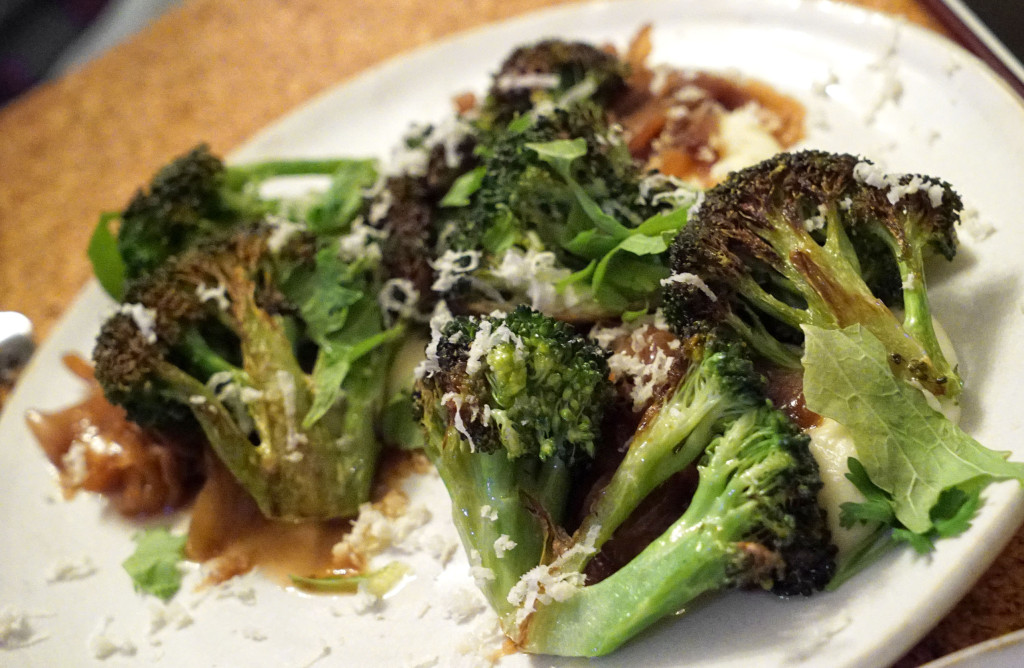
Roasted broccoli with shaved horseradish:

DSC09491

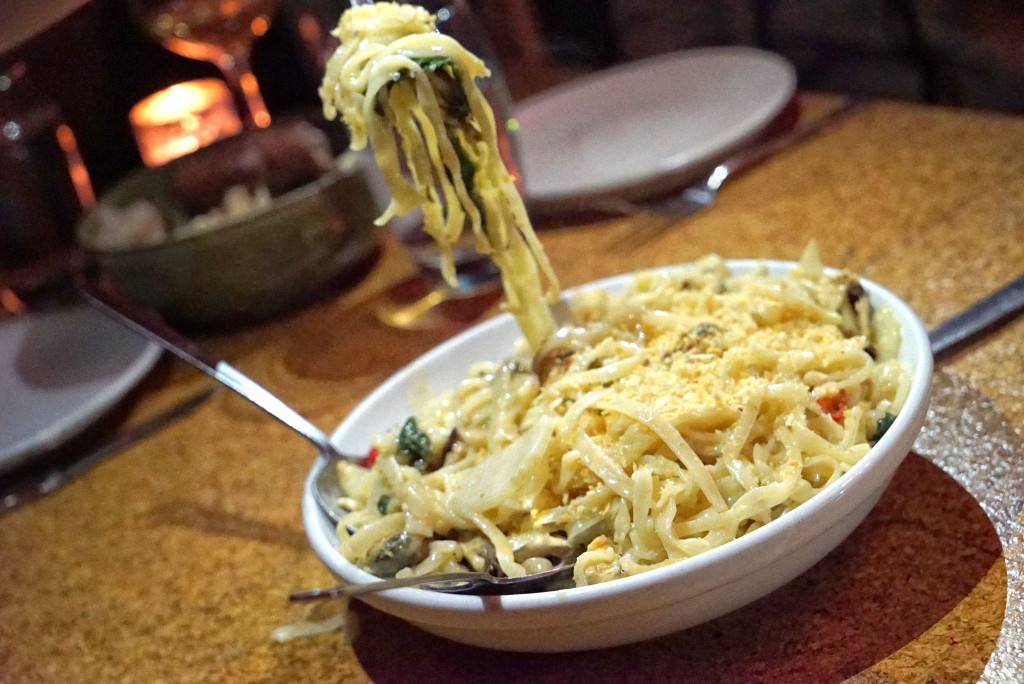
Fettuccine with mussels and chilies in a Parmesan cream sauce:

DSC09498

DSC09509

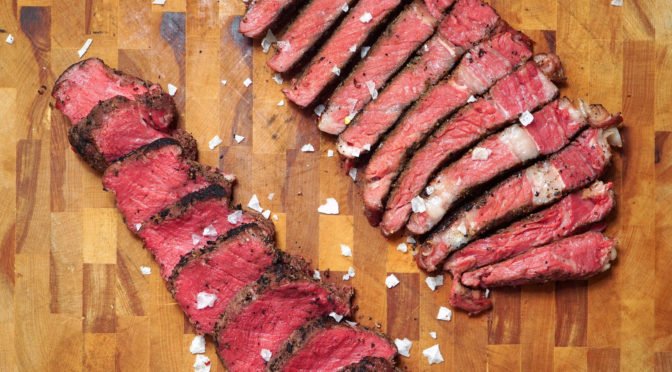
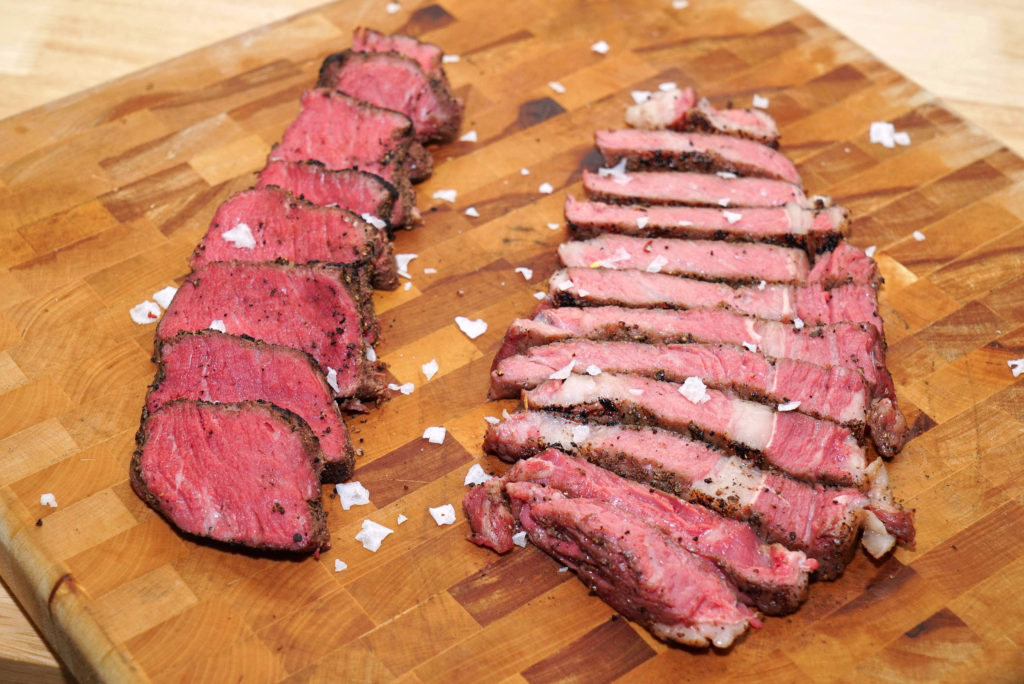
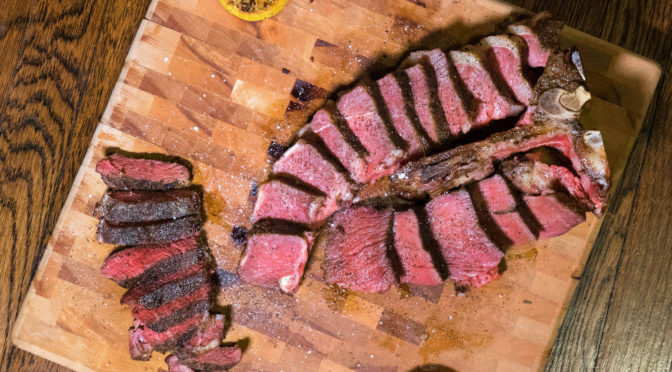
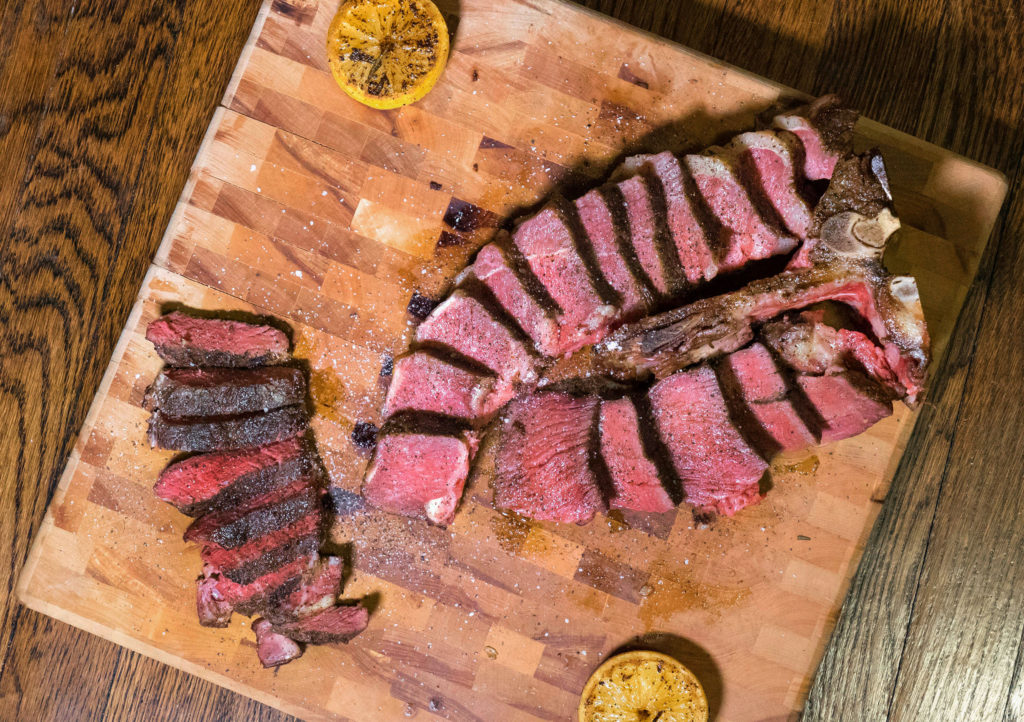
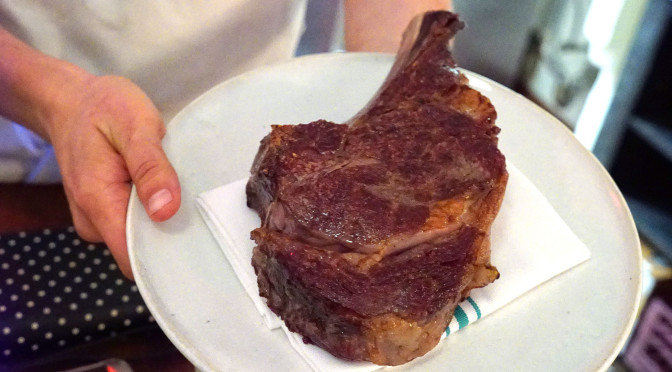
Presentation of beef!!!
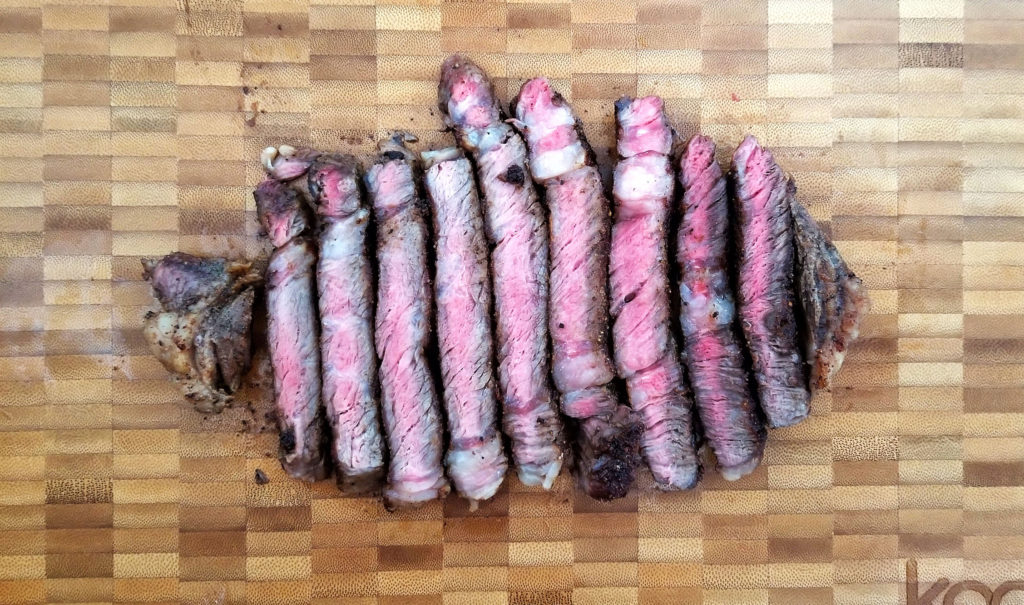
DSC09520

DSC09518

DSC09513

DSC09517

Post slicing:

DSC09521

DSC09550

DSC09541

DSC09537

DSC09546

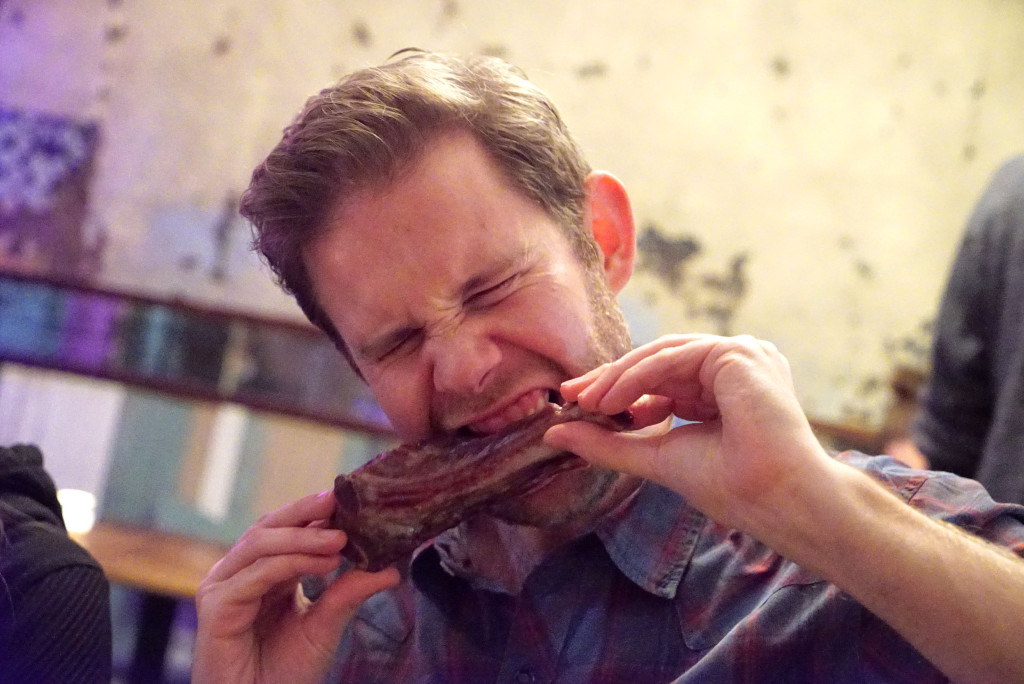
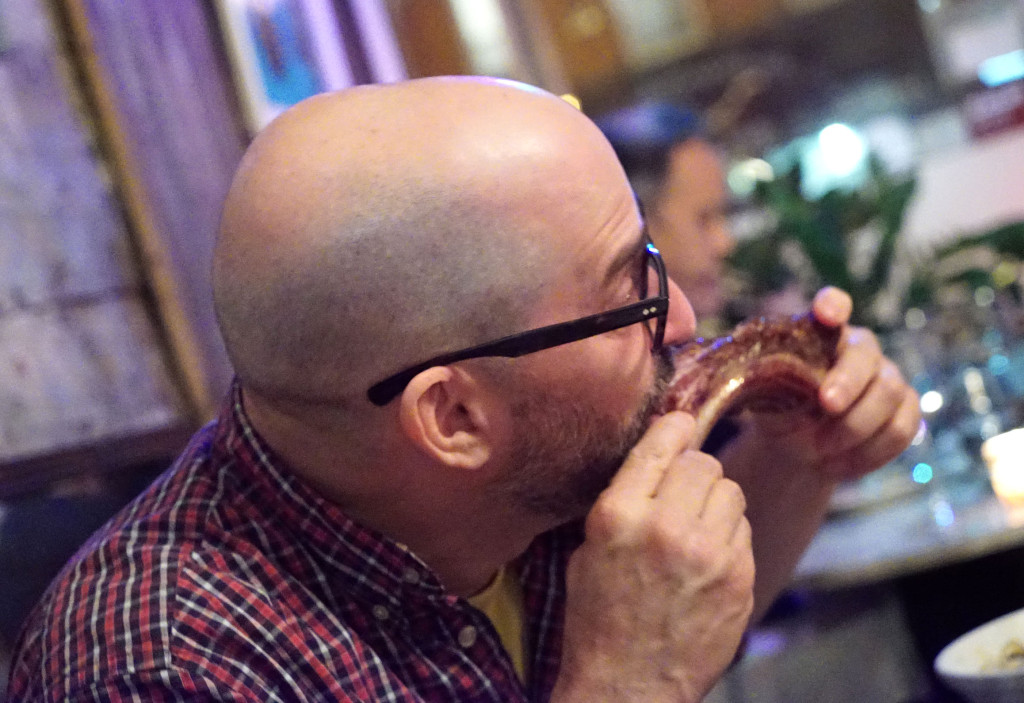
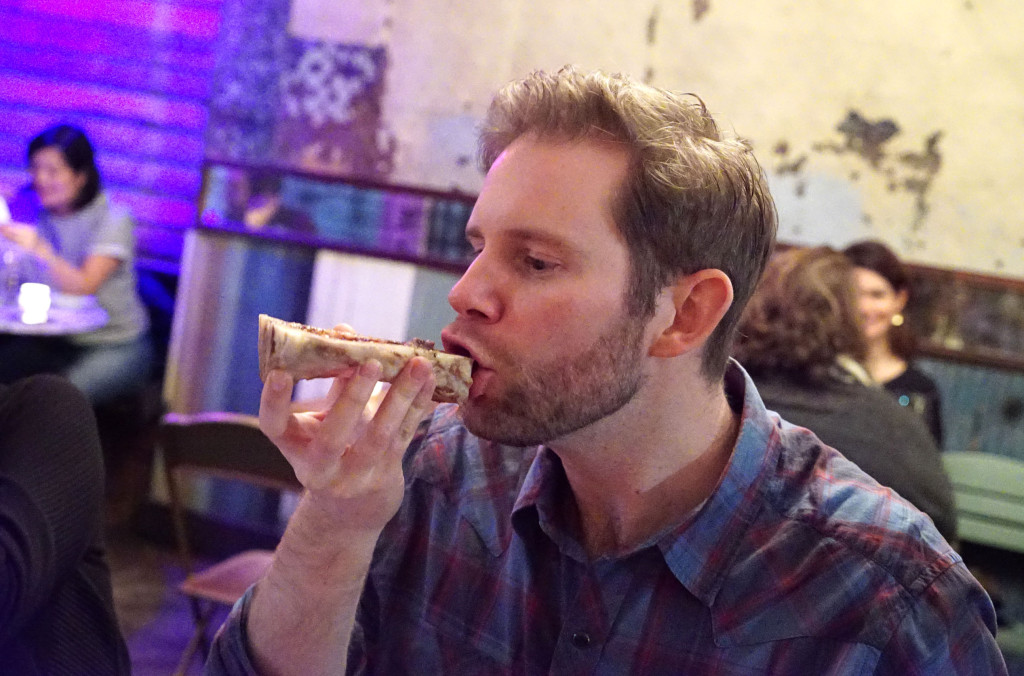
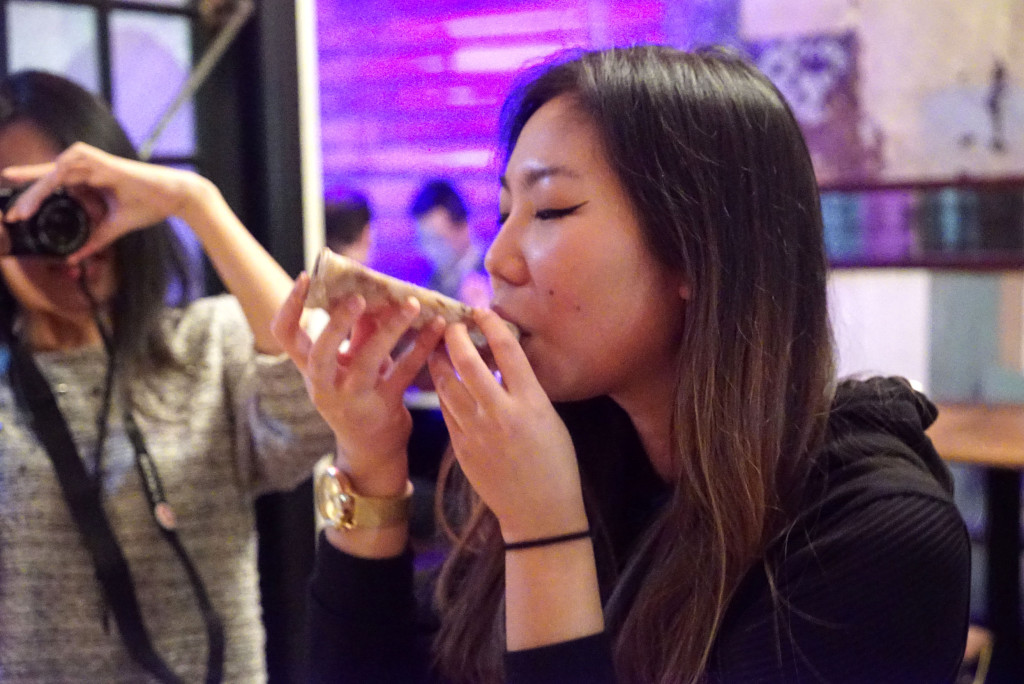
Gnawing on the bone is always fun:

DSC09561

DSC09560

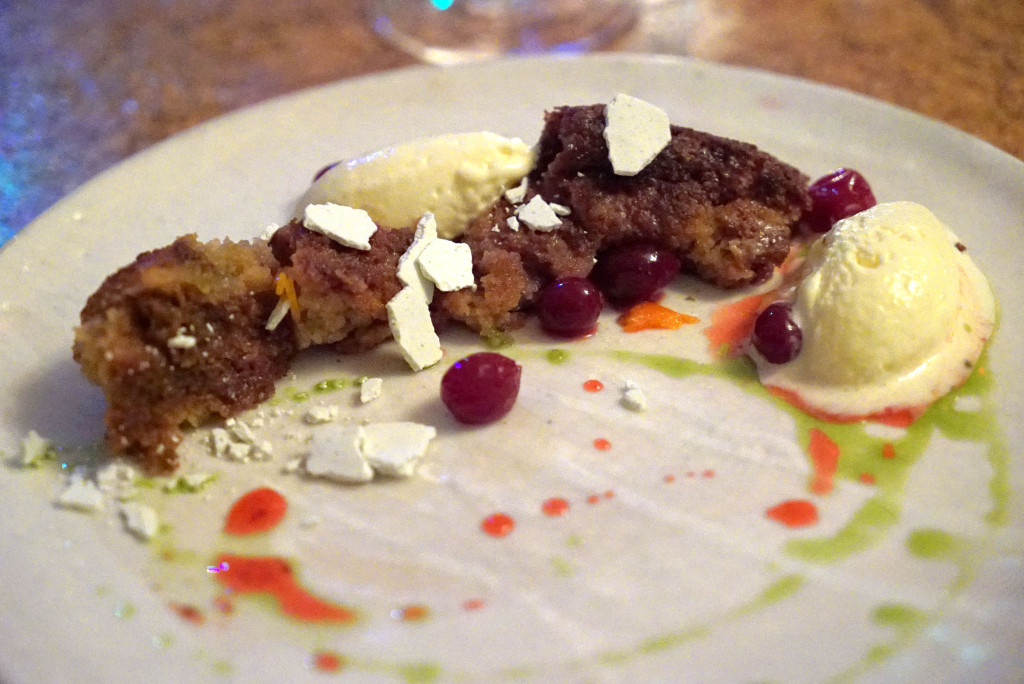
Dessert 1: bread pudding.

DSC09565

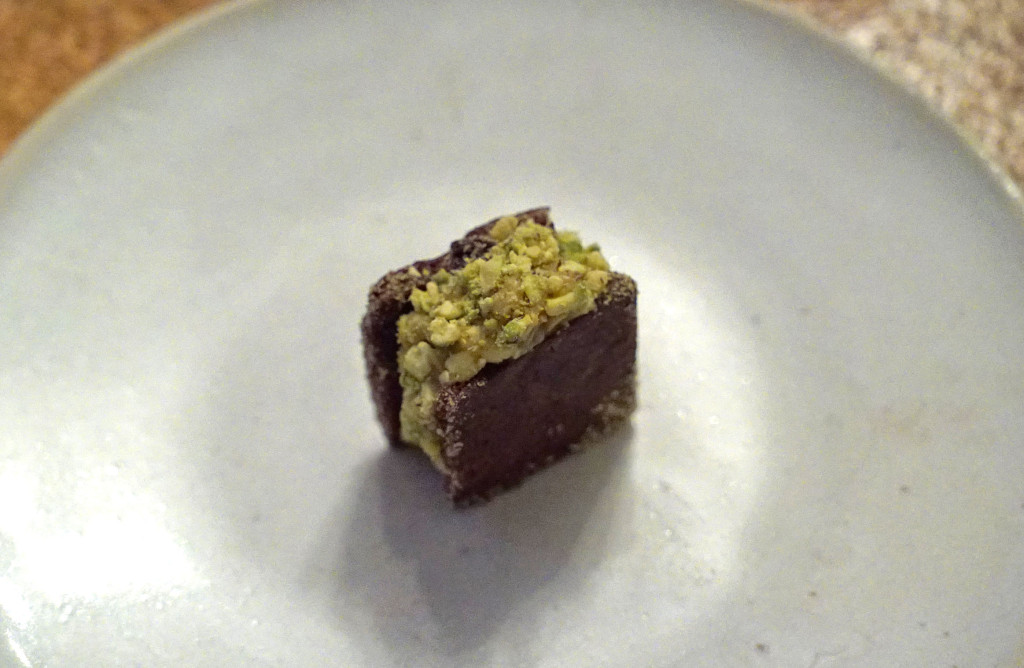
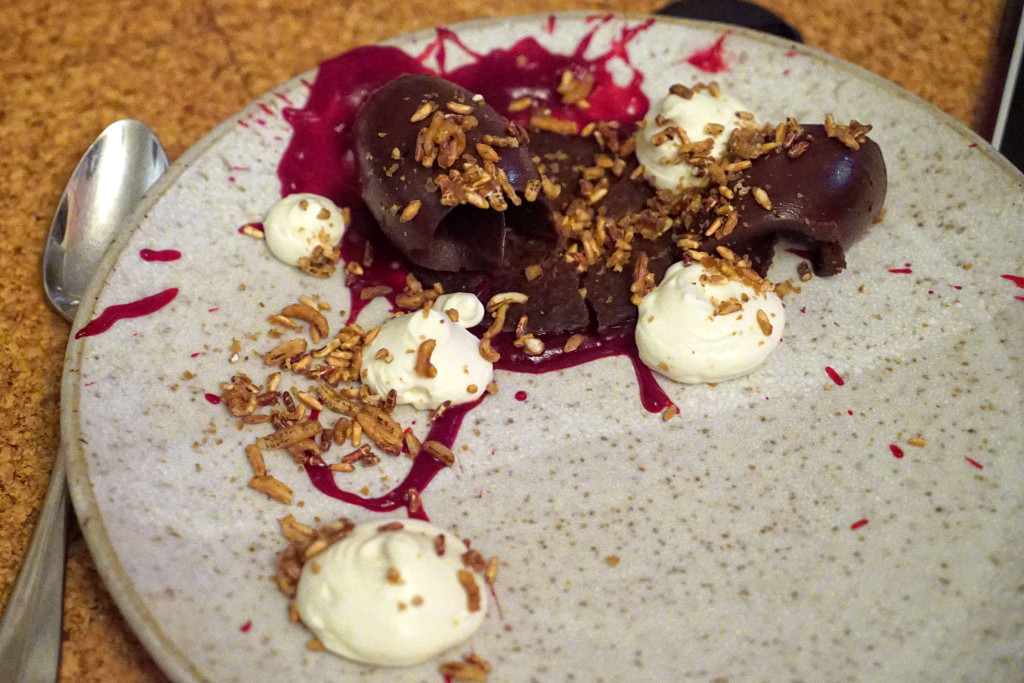
Dessert 2: herbaceous chocolate ganache.

DSC09573

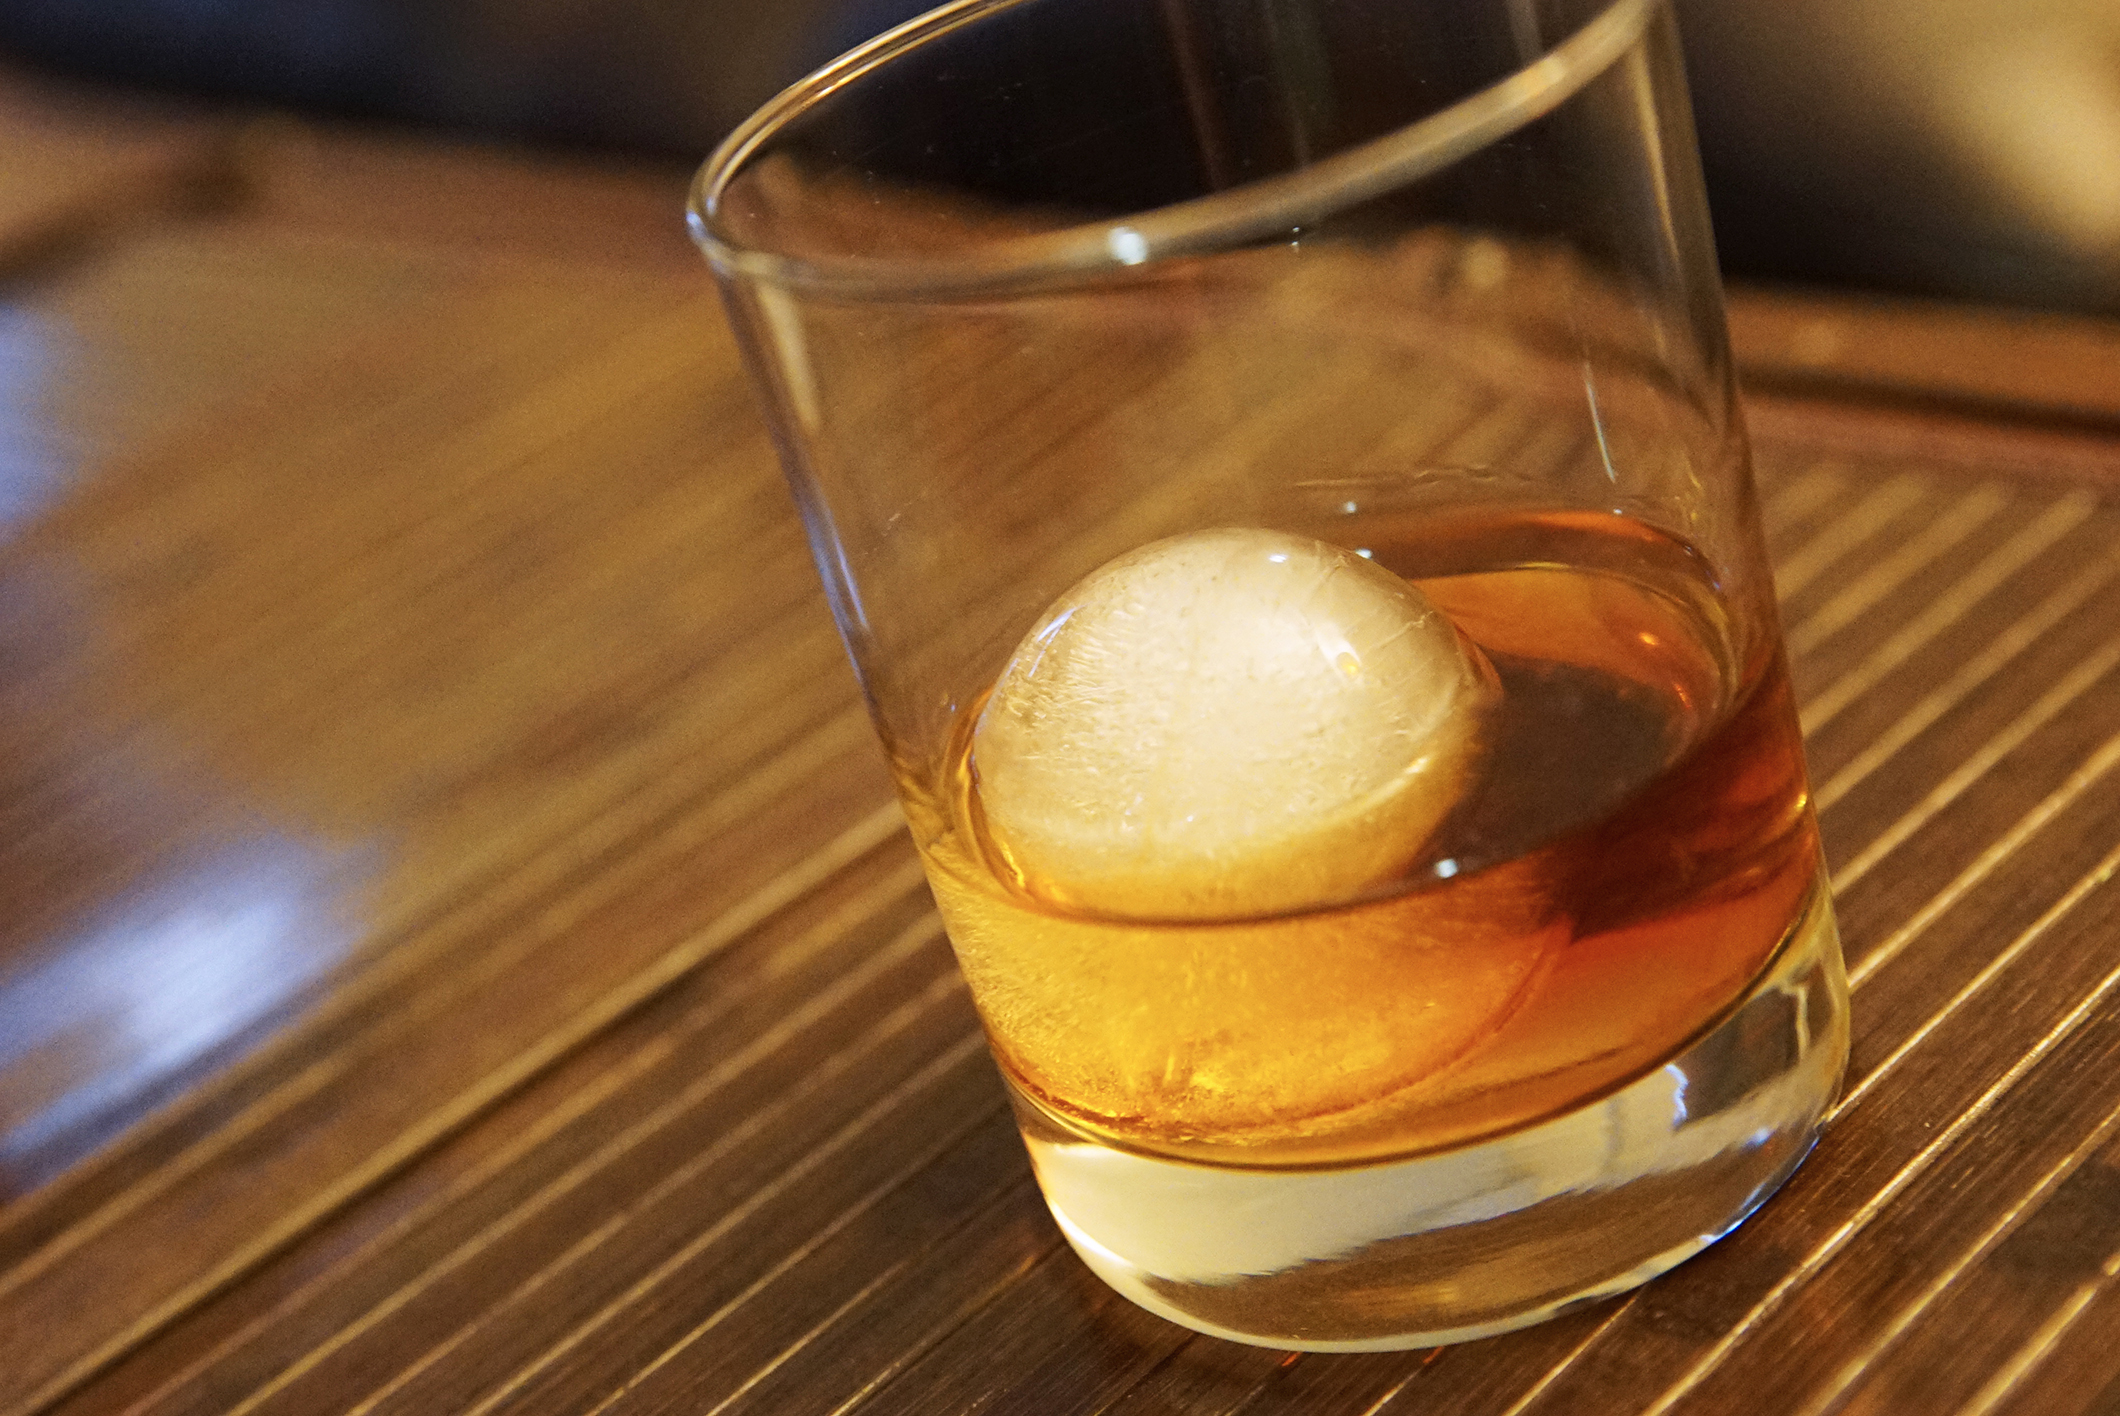
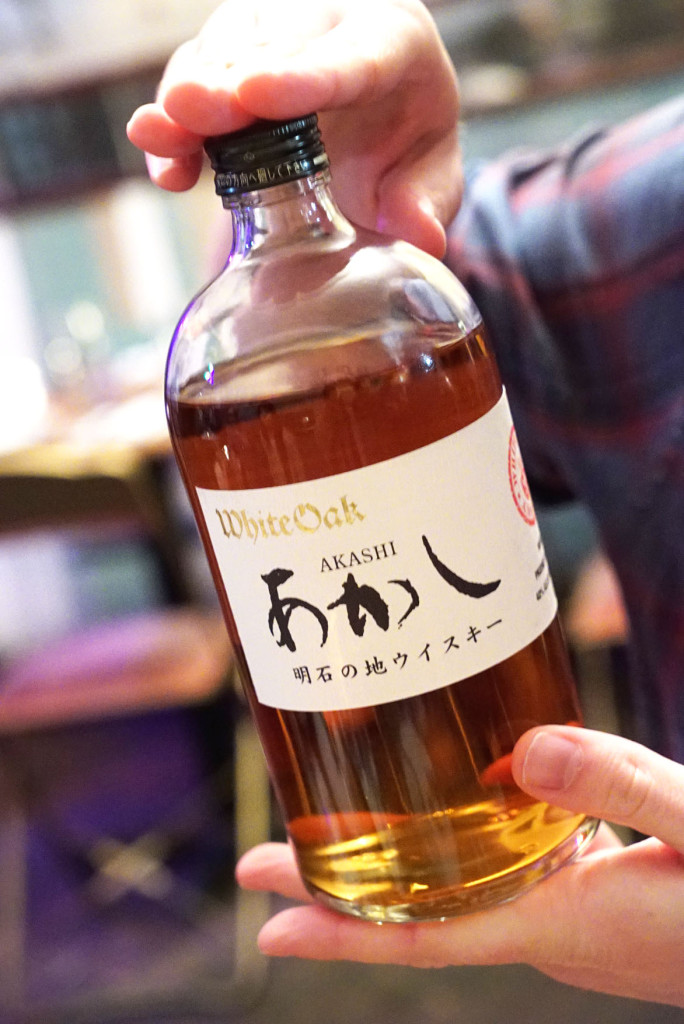
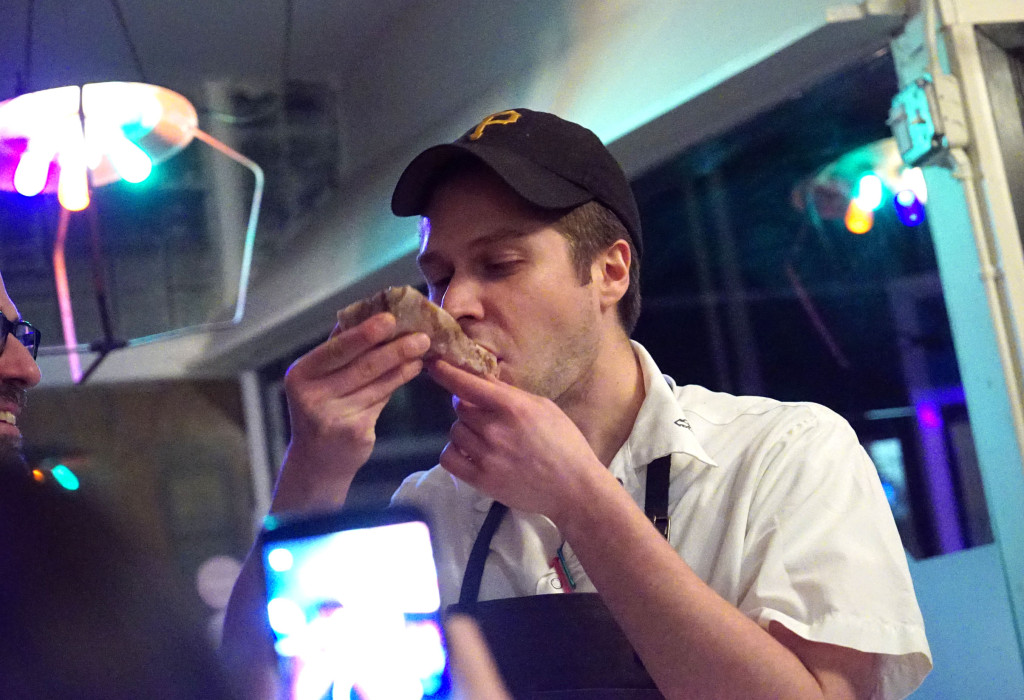
We even drank some Japanese whisky from a bone marrow slide!

DSC09478

DSC09552

DSC09554

Chef John even got in on the action. Marrow luges rule!!!

DSC09555

THE PINES
284 3rd Ave.
Brooklyn, NY 11215

Sous Vide Filet Mignon

This is one of the simplest things to make, now that I have a sous vide machine at home. I honestly don’t think I will ever order a filet mignon out at a restaurant ever again, because this shit comes out so fucking perfect at home.

The only catch here: you need a sous vide machine (the vacuum sealer and Searzall are optional). They can be pricey, but if you have the balls, you can make one yourself like a real man (or have your cousin make you one, like I did) for a quarter of the cost of a store-bought machine.

Step 1: Buy filets

Step 2: Season filets however the fuck you want. I used salt, pepper, garlic powder, garlic oil and crushed red pepper.

Step 3: Place filets into vacuum seal bag and seal it the fuck up, with some butter and herbs inside (thyme and rosemary are always nice).

sous vide steak recipe

If you’re a poor bastard and can’t afford a vacuum sealer, you can use ziplock bags. Place your meat into the bag and begin to submerge the bag into the water bath. Once you are all the way close to the zipper, zip it shut. The water surrounding the outside of the bag will push out all the air from inside – poor man’s vacuum sealer. If you do this, you may want to put a smooth, clean rock in there too, just for good measure, to keep the meat from floating.

ziplock

Step 4: Set your temperature to however the fuck you like your steak cooked. I put mine at 138º F for a nice medium rare / medium. I’m dealing with grocery store meat here, people. Don’t give me any bullshit about that being too well done.

Step 5: Wait. About an hour or two. Don’t panic, assholes! You can’t overcook your steak in a sous vide bath. That’s the whole point of it!

Step 6: Remove your steak from the water bath and re-season it a bit, if so desired.

Step 7: SEAR THE FUCK OUT OF IT. I used a Searzall, because I am a fucking badass with a massive bag dangling in the area between my asshole and my dick shaft. Listen to that fucking sizzle just before I flip it over:

But you can easily just toss this baby into a real hot cast iron pan with some more butter and herbs to get that brown and crispy coating. That’s how my cousin does it – see his results below:

IMG_2345

IMG_2346

As for mine? Check it out below… Seared to a fucking crisp on the outside, and pink as a snatch inside:

outside crust

sliced filet home 2

sliced filet home

Step 8: Pour yourself a hefty glass of Scotch whisky.

The ice sphere is so much cooler than the ice cube. The ice cube is such a square.

Step 9: Drink it, then refill it, and then EAT while you drink that second glass of Scotch. Here: watch me devour one of the filets in under two minutes and then lick the damn plate.

Step 10: Jerk the fuck off and brag about how awesome you are, which I clearly did in the video above, shit the booze out of your system, and then fall asleep drunk and naked in the bathroom.

Feel free to use any cut that you want for this. I recently did the same thing with some Mosner grass-fed rib eyes, with some added duck fat to round them out. See below for the setup and results:

DSC04703

DSC04704

DSC04707

DSC04710

DSC04713

DIY Sous Vide & The Searzall

Recently my cousin sent me a text message with some pretty alarming and exciting photos and videos.

Yeah, that’s right… the motherfucker made his own sous vide machine, cooked up some filets to medium rare, and then seared them the fuck off in a cast iron skillet to get some texture on the edges.

IMG_2345

IMG_2346

What exactly is a sous vide machine, for you non-food nerds? The words translated from French mean “under vacuum.” It is essentially a hot tub for meat. How it works: you place vacuum sealed meats into the water bath and leave them there until the meat comes up to the proper temperature, which is set and regulated with a water heater and temperature controller. You can’t overcook the meat! You get perfect medium rare shit every time, evenly cooked through and through.

As you can imagine, I was flipping out at what my cousin had achieved. I browsed some DIY sous vide instructional websites a few years back when I was living in a house on Long Island, but it seemed like a ton of effort. I thought to myself, “I’ll just get a real-deal machine someday.” But once I saw these things from my cousin, I knew it was time to pull the trigger.

Lucky for me, my cousin is super handy and craftsmanlike when it comes to stuff like this, and he has access to a bunch of great tools like dremels and drill presses.

A flurry of texts immediately ensued. It’d be fun to build one together, I thought. THIS LINK is the instructional we worked from. My cousin ordered a bunch of the materials online…

I pulled my cooler out of the closet, which would serve as the main cooking vessel or “hot tub” (and it saved me some bucks for not having to buy a plastic tub).

cooler

and I ordered a vacuum sealer via Amazon Prime…

81QTeq8J67L._SL1500_

I also nabbed a blow torch, a can of propane, and a Searzall, because I want to flame that shit sometimes instead of finishing in a pan. Plus, this works great if I ever do fish – the skin… oh maaaaan it gets crispy…

20150307_192249_LLS

20150308_154451_LLS

20150308_154609_LLS

20150308_160920_LLS

IMG_1925

I sent the dimensions of my cooler lid area to my cousin:

mark up

He used this to figure out how to cut the plexi down to size to serve as the top portion that suspends the water heater in position. He also built the temperature control housing, and wired the power supply for the temperature control unit and heater probe (thermometer).

IMG_2366

IMG_2373

IMG_2374

IMG_2376

IMG_2375

IMG_2368

DSC04698_2

DSC04699

I was initially concerned that the hinged top of my cooler wouldn’t close properly with the plexi in place. It turns out that closing the top tight isn’t too big of a problem when you’re using a nicely insulated vessel like a cooler. Also, we dropped the plexi to a lower lip within the cooler, so the thing closes nicely now:

DSC04701

Then you suction this to one of the walls. Essentially this is a water circulator. It keeps the water swirling around so that there are no warm or cold spots within the bath, which makes for a nice even cooking temperature.

DSC04700

BOOM! I can’t wait to fire this fucker up. I’m going to pick up some fish and beef right the fuck now.