Category Archives: Education

B.A.M. Episode 4: Herd Management & Health

Before we get further into the “meat” of these advocacy posts, it’s important to lay out a few basic terms and concepts that you might run into if you’re anywhere near the beef industry.

Animal Gender Terms

Heifer: A female that has never given birth to a calf.
Cow: A female that has given birth to at least one calf.
Bull: An intact male that still has his family jewels.
Steer: A castrated male.

Why do cattlemen castrate males? Well, it is one of three techniques used in herd management.

DSC04683

Herd Management Techniques

  1. Castration: Cutting the gonads off a bull is done for two reasons: (1) to control temperament; and (2) to improve meat tenderness. This process lowers testosterone. By lowering testosterone, farmers can reduce animal aggression as well as meat toughness. Castration is normally done within the first three months of life.
  2. De-Horning: Both males and females can grow horns unless they are genetically unable. By removing horns farmers can protect themselves and the herd from injury.
  3. Branding: The reason farmers brand their animals is to keep better records of individual animals, and to protect and identify their herd in the open range or at the marketplace. In the old days, this would also deter cattle theft.

Generally, if things are timed correctly with calving season, these three herd management techniques are done all at once, in one quick procedure, which results in less stress for the animal.

Calving

Calves need colostrum, a nutrient-rich version of mother’s milk, because it’s packed with beneficial vitamins and natural immunizations. But after some time, it becomes prudent to ween them off their mother’s milk and send them out to eat in the pasture. In most cases it’s as easy as putting the calves on the other side of a split-rail fence from their mother; they will still be in contact with one another, but the calf will eat grass instead of milk.

DSC04728

Contrary to popular myths, calves are not born and then immediately rigged up to some bio-mechanical factory farm machine where they can’t move and are force-fed until the moment they are slaughtered. These are myths.

Animal Health

Just like humans, animals need help every so often to fight off a bug. When sick, their ears droop, they cough, have runny noses and they separate from the herd and go off by themselves. Some diseases can be avoided through the use of vaccines, and illnesses can be prevented and combated with the use of vitamins and antibiotics.

Beef Quality Assurance guidelines limit the location of vaccination shots so that the process doesn’t harm the meat by piercing valuable muscle groups. In addition, beef safety laws require no trace of the stuff to be present in meat prior to slaughter (you must wait a certain number of days before  sending the animal to slaughter), and that little to no antibiotics that are given to the herd are in the same class as human medicines (to prevent a reduction in the effectiveness of antibiotics needed to treat human diseases).

Last, grain finishing allows for the animals to go off to slaughter sooner, when the animals are healthier and younger than grass finished animals.

Hida Beef

Hida is a region in Japan, located in the northern part of Gifu prefecture on Honshu island. That’s west of Tokyo, but not quite as far as Kyoto or Osaka. While I’ve never been there, I can tell it’s a place that I’d definitely want to visit.

Hida is known for it’s outstanding beef (Hida-gyu), which is derived from a black-haired Japanese breed of cattle. Laws are such that, to quality as the Hida brand, the cattle has to have been raised in Gifu prefecture for at least 14 months. The beef is characterized by intense, beautiful, web-like marbling with a buttery, smooth texture that melts in your mouth. The flavor is both rich and delicate at the same time. It can be likened to the top percentiles of wagyu beef, rivaling kobe and matsusaka in quality, with marbling grades of A/B 3, 4, and 5.

I was invited to a Hida beef tasting event at EN Japanese Brasserie, one of the seven restaurants in the area that will be serving Hida beef on their menus. The other six are Brushstroke, Hakubai, Hasaki, Sakagura, Shabu-Tatsu and the Members Dining Room at the Metropolitan Museum of Art. This is the first time that Hida beef is available here in the States, so if you’re a meat aficionado like me, you should definitely hit one of these places and give it a try. This stuff is expensive though, so make an occasion out of it.

I tried the beef in four different preparations: (1) sliced raw, nigiri sushi style, and then kissed with the scorching flame of a blowtorch; (2) seared edges, a tatami trio, with three different kinds of salt; (3) “Hoba-miso” style, stone grilled with miso sauce; and (4) chopped raw, tartare or ceviche style, with citrus and uni. Despite all the marbling, the meat doesn’t come off tasting very fatty, like some highly marbled cuts do. It didn’t leave a coating of waxy or fatty residue on my palate like certain cured salamis with high fat content. And it didn’t cause the flavors of whatever I ate next to change or taste different due to that fat, which is sometimes the case with aged beef and cured salami. In short, it was really a very pleasing experience.

I’ll start with my favorite preparations: (2) and (3). The tataki trio was essentially three slices of Hida beef (strip loin), each dressed with a different salt element: yuzu soy sauce, sea salt and a special red salt that had hints of spice to it. All three were great, but I think I liked the classic sea salt topper the best.

dsc09020

dsc09025

The hot stone grilled preparation, Hoba-miso, was the only one in which the beef was cooked through. This dish is local to Hida. The sliced beef is placed on Hoba (a big Magnolia leaf) with miso and scallions, which then sits directly on the surface of the hot stone. As you can see, the before and after photos of this method indicate that this beef can be thoroughly enjoyed fully cooked if you’re one of those puss-bags who is afraid to eat raw or under-cooked meat.

dsc08935

dsc08937

dsc08939

dsc08983

dsc08971

dsc08977

Fully cooking the beef did not take anything away from the meat. You still get that buttery smooth texture and melt-in-your-mouth flavor characteristics. In fact, the leaf and miso bring nice flavor accents to the beef that compliment it well. This, too, was a strip loin cut of beef, and it was presented to eat on grilled sticky rice patties.

dsc08942

dsc08976

dsc08978

Here’s the chef, Abe Hiroki, who was grilling these delicious morsels to absolute beef-paradise perfection:

dsc08985

dsc08970

The torched nigiri style reminded me slightly of spam musubi, for the sole reason that it was a warm meat item served atop sushi rice. Here, you can get a real, unadulterated taste of the beef in all its marbled glory. It truly is spectacular.

I’ve been eating aged beef for so long that something this pure and clean really blew me away. This was strip loin as well.

dsc08987

dsc08944

dsc08999

dsc08932

dsc08996

This was the sushi master behind these perfect pieces of nigiri:

dsc08988-sepia

Finally, this tartare or ceviche style came dressed with a citrus yuzu sauce and was topped with uni (raw sea urchin). Absolutely stunning and decadent. The reason I am interchanging tartare with ceviche is that, typically, ceviche involves fish and citrus, while tartare features meat and egg yolk. Since this dish had elements of both but not all, I figured I’d split the baby. Tarviche? Why not. Also strip loin.

dsc09016

dsc09007

The event also showcased some nice sake selections with flavors ranging from dry to sweet, traditional to aromatic and fruity.

dsc09003

dsc09005

dsc09006

In fact, the event began with a “breaking the mirror” ceremony on the casks of sake, as well as a sake toast.

dsc08968

dsc08962

dsc08963

The governor of Gifu was even in attendance, introducing the beef, the region and the customs to the audience.

dsc08956

The restaurant itself is beautiful, and I look forward to coming back to try some more of this amazing beef. Every preparation was 10/10 for flavor, and I highly recommend it.

EN JAPANESE BRASSERIE
435 Hudson St
New York, NY 10014

B.A.M. Episode 3: Raising Cattle

Once again I am going to dedicate this post to dispelling some common misconceptions about the beef industry. Some of the biggest fabrications I hear these days is that the US beef industry is chock full of “factory farms,” where thousands of cattle are born and raised on feed lots, jammed into tight spaces, given nothing but grain and hormones for sustenance, and are generally mistreated and abused whilst farmers destroy the natural environment. ALL FALSE.

DSC04679

Most people don’t know that 97% of the 619,000 beef farms in this country are small, family owned operations with an average of 50 head of cattle. There goes the factory farm myth. And beef farming makes up about 29% of all US farms, in case you were wondering.

“Calving,” or the birthing of cattle, generally happens in a different area of the farm, removed from the feed yard, where farmers and veterinarians can more closely monitor the animals and keep them healthy. Once the calves are weened from their mother’s milk, they are put out in the pasture to eat grass and grow. Born and raised on feed lots? Screw that “bull crap.”

DSC04710 test edits

Cattle in the US are grass-fed in pasture for the majority of their lives. Don’t believe what you hear to the contrary. The development of grain feeding started way back, when the addition of grain into the animals’ diets was done to supplement meals for cattle during winter months and times when there were less live, growing grasses for cattle to eat. It was often mixed with stored hay silage as well.

Farmers noticed that the addition of grain to the diet caused cattle to grow faster. So today, grain is used for finishing and fattening up the cattle in the last months of their lives, prior to slaughter. This adds flavor content to the meat in addition to getting them up to a profitable weight for the marketplace. Grass finished animals (animals that only eat grass for their entire lives) take longer to get up to market weight, and are therefore older when they go to slaughter. That means they have to survive more winters and tough out more illnesses before getting to your dinner plate.

Jammed into crowded spaces? Nope. While cattle can withstand cold temperatures, farmers started using barns and other fully or partially enclosed shelters early on to shield their animals from the harsh weather in winter.

DSC04703 sepia

DSC04667

They found that cattle naturally gravitated toward one another anyway. They are social creatures. Even in pasture, when they’re out in wide open spaces, you will still see them huddled up together. Bison/buffalo do this as well. They even do it on the feedlot, where each animal has about 125-250 square feet of space, on average, in the US. Another myth bites the dust.

DSC04683

Now let’s discuss the environment. The US beef industry grasslands account for nearly 75% of US natural wildlife, and cattle spend a majority of their lives feeding on these natural grasslands. Up to 85% of our grassland in the US is actually not suitable for farming crops due to soil characteristics, topography, or rainfall. So cattle grazing is a good use of the otherwise inarable land that doesn’t do any additional harm. Lastly, bovine digestive systems are perfectly set up to convert the inedible plants on these grasslands into protein; beef that humans can eat!

DSC06489

I think that’s a good start for now. I’ll address animal care and animal health in the next BAM.

The Ultimate Guide to Cooking Steak

Every food-oriented website out there, whether it’s Eater, Grub Street, Thrillist or what have you, has their own version of “The Ultimate Guide for Cooking a Steak,” or whatever it may be. Many of them do offer good information, but they’re almost all incomplete. They set you up with one method for one cut of meat. This piece will serve as a place where you can get instructions for cooking several different cuts of steak via several methods. Let’s get right to it.

GRILLING

This is probably the method that most people are familiar and comfortable with. Since it is actually my least favorite way to cook one of the four major cuts, I will discuss it first, up front, with the caveat that I do actually prefer grilled skirt steak to any other cut that’s done on the grill. That said, there are some significant pros and cons for grilling. Depending on what you want out of your steak eating experience, you should take these into consideration before deciding if this is the right method for you. What time of year is it? Summer, winter? Are you grilling over charcoal or propane?

DSC04730

Johnny’s Preferred Cuts for Grilling: Skirt, Flank, Hanger

Pros

  • Easily accessible
  • Familiar and comfortable to most home cooks
  • No smells or smoke indoors
  • Can easily cook many steaks at once

Cons

  • Fat, flavor and juices fall through the grill bars
  • Can be difficult to control heat levels
  • Lowered ability to sear evenly

Grilling is perfect for outdoor cooking in the warm months, and especially for large groups of people. You don’t get any lingering smells in your home, and you can enjoy the day like a good American, beer in hand as you cook. Since I like a good even sear across the entire cut of meat, I generally don’t like cooking the four major cuts of beef in this manner. Generally I go for skirt or flank, something that benefits from a good, fast blast of heat; something where I don’t mind if I lose a little fat or juice through the grill bars; and something cheap that can be sliced up and served family style. Charcoal is a tough medium to master. Some people are experts at creating and maintaining even heat levels for a cooking session. Others use propane. This is easier, cleaner, and more convenient, but you lose some of that desired charcoal and smoke flavor unless you’re adding soaked wood chips to the grill as you cook. If grilling is right for you, then read on below.

DSC06461

Instructions

  1. Get your steak up to room temperature and pat it dry.
  2. Crank up your grill to as high as it will possibly get.
  3. Season the skirt/flank generously with salt and pepper.
  4. Grill the meat with the grill top open. Do not poke, prod, press or move the meat once it is set down on the grill bars. Allow the bars to create nice markings on your meat.
  5. After a few minutes, flip once and repeat the previous step.
  6. Use a meat thermometer or the “hand test” to ensure that your steak is properly cooked to medium rare. Remove it from the grill at 125F.
  7. Let the steak rest for a few minutes on an elevated and porous surface, like a metal baking rack. During this time the meat will continue to cook a bit more while off the flames, and it will retain more juices during the next step.
  8. Slice against the grain of the meat, or “against the bias,” and serve.

PAN SEARING

This is probably my favorite method for cooking steak. I always try to use a cast iron skillet, as they just work better for creating that crusty sear that we have all come to know as steak lovers. If you can’t get your hands on one, then a standard pan will do.

Johnny’s Preferred Cuts for Searing: Filet Mignon, Strip, Rib Eye, Porterhouse

Pros

  • Even sear across entire steak
  • Juices stay put
  • Easy to execute

Cons

  • Smoke smell can permeate the home, set off smoke detectors
  • Pan cleanup can be annoying
  • Large pan needed for big or multiple cuts
  • Cast iron not ideal for glass electric cook tops

Instructions

  1. Get your steak up to room temperature and pat it dry.
  2. Crank up your burner to as high as it will possibly get, and heat up the pan with a small amount of butter.
  3. Season the steak generously with salt and pepper.
  4. Sear the shit out of your steak, and add a wad of butter to melt in the pan. Throw in some rosemary and garlic too, if you like. Do not poke, prod, press or move the meat once it is set down. Allow the meat to stick to the pan a bit, with as much of the bottom surface touching the pan as possible.
  5. Spoon the melted butter over the top as the meat cooks, basting it in flavor.
  6. After a few minutes, flip the cut with tongs and do the same thing of the other side of the steak.
  7. Once both sides are seared, then you should also sear the edges if you are working with a thick-cut steak. Anything over an inch and a half should get a little side sear if possible.
  8. Use a meat thermometer or the “hand test” to ensure that your steak is properly cooked to medium rare. Remove it from the pan at 125F.
  9. Let the steak rest for a few minutes on an elevated and porous surface, like a metal baking rack. During this time the meat will continue to cook a bit more while out of the pan, and it will retain more juices.

Alternative Instructions From Step 8 Onward

This secondary step is helpful if you have a very thick cut of steak, and a good, hard sear is all you can really get from the pan without overcooking. You want your meat to be pink from top to bottom, with no “grey band” in sight. To achieve this on thick cuts, lots of people will put the steak into the oven at a low temperature, like 250-300F, to allow the internal temperature to come up to medium rare once the pan-searing steps (1-7) are complete. Here, a meat thermometer is key to ensure that your meat is cooked to the proper temperature inside.

REVERSE SEARING

This is very similar to searing with an oven finish, like above, only done in the reverse order.

DSC06893

Johnny’s Preferred Cuts for Reverse Searing: Thick Cuts of Filet Mignon, Strip, Porterhouse, Rib Eye

Pros

  • Even sear across entire steak
  • Juices stay put

Cons

  • Slightly more difficult to execute than a simple sear
  • Multiple cooking steps and waiting

Instructions

Here, the first step is to cook your steak in the oven at a low temperature, like 250-300F, to allow the internal temperature to come up to rare or medium rare. Again, use a meat thermometer to ensure accuracy. Once that step is done, the steak gets finished in the hot searing pan with butter. This will form the desired crust on your steak. You just have to be careful not to overcook your steak in the pan as you are trying to get that crust to form. I recommend allowing your steak to cool down to room temperature before searing it off, and/or getting that pan screaming hot before you put the steak in.

BROILING

Generally speaking, broiling means that the heat source is coming from above the meat and close to the meat. Contrast with baking, which means that the heat source is below and more diffused or distant from the meat. Broiling a steak gives you more direct exposure to the heat source than baking, whether it’s an open flame (gas oven) or the heating element (electric). While not as direct as, say, touching a hot pan, broiling is better for cooking traditional cuts of steaks than baking, because you can get a charred outer crust easier and still get the inside of the meat to the desired temperature. Baking is better suited for roasting meats, since the heat source is often diffused a bit by the oven bottom when baking.

DSC06903

Johnny’s Preferred Cuts for Broiling: Thick Cut Bone-In Porterhouse, Thick Cut Bone-In Rib Eye, Bone-In Tenderloin, Bone-In Strip, Large T-Bone

Why the bones, you ask? When cooking with “surrounding” heat, like roasting or broiling in an enclosed oven, bones are very effective at radiating heat into the center of the meat tissue. This method, therefore, also makes large/thick cuts easier to work with.

Pros

  • Cleaner, less smoke and permeating odors
  • Relatively easy to execute
  • Easier to get an evenly cooked center of your meat

Cons

  • Easy to overcook if not careful
  • Requires meat thermometer (puncturing meat is never good)
  • Harder to get the desired crust than other methods

Instructions

  1. Get your steak up to room temperature and pat it dry.
  2. Set your oven to broil.
  3. Season the steak generously with salt and pepper.
  4. Bring your oven rack close to the heat source (near the top) and place steak in the oven in a shallow roasting pan that can catch any drippings.
  5. Once the top crisps up a bit, flip the meat in the roasting pan to get the crust on the other side as well.
  6. Use a meat thermometer to ensure that your steak is properly cooked to medium rare. Remove it from the oven at 125F.
  7. Let the steak rest for a few minutes in the roasting pan. During this time the meat will continue to cook a bit more, and it will retain more juices.
  8. Slice the major muscles off the bone, slice the muscle against the bias, and arrange the meat on a platter for serving.

DSC06489

ROASTING

Roasting is synonymous with low and slow diffused heat from a bottom source, or all around the meat, from all sides. This method is best suited for large hunks of meat that take a long time to cook down to the center, generally for serving many people.

Johnny’s Preferred Cuts for Roasting: Standing Rib Rack Roast, Chateaubriand, Large Brisket

Pros

  • Great for large format dining
  • Easy to execute
  • Result is very juicy, tender and delicious

Cons

  • Takes a long time to finish
  • May require extensive carving
  • Generally lacks outer crust like a standard cut of steak

Instructions

  1. Many people like to brine their meats before roasting. While this is generally more common with pork roasts or fowl, some steps can be taken with beef to increase flavors. You can crush up some garlic and stuff it into your roast (flavor injectors), or rub it on the outside of the meat; you can rub it with rosemary or roast it on a bed of herbs; and you should season it generously with a multitude of spices. You want all those flavors to permeate deep into the meat, so massaging, rubbing and pushing into the meat is all recommended. If you use a flavor injector, I suggest getting a lot into one or a few injections, that way you don’t pierce the meat too many times.
  2. Set your oven to a low bake temperature, like 350F.
  3. Place your meat on a roasting pan to catch any drippings, and set it in the center/middle rack of your oven.
  4. Place your meat thermometer into the center of the roast.
  5. As the meat cooks, use a turkey baster to suck up liquids from the bottom of the roasting pan, and squirt it over the top of the roast occasionally. This will add some flavor to the outside and help to create a flavorful edge to the roast.
  6. Remove it from the oven at 125F. Let the meat rest for a few minutes in the roasting pan. During this time the meat will continue to cook a bit more, but the resting phase will help the meat retain more juices for the next step.
  7. Slice and carve for serving. Sliced roast beef pairs perfectly with both hot gravy and cold horseradish sauces (either cream-based or tomato-based).

DSC07210

SOUS VIDE

Sous Vide means “under vacuum” in French. In this method of cooking, you are cooking your steaks in vacuum sealed bags by submerging them in a hot water bath to precisely the desired temperature, and then finishing them in a pan as a secondary step. This may sound like high tech restaurant science only kind of stuff, but there are items available in the consumer market to do this with great results at home.

Johnny’s Preferred Cuts for Sous Vide: Thick Cuts of Filet Mignon, Boneless Strip, Boneless Rib Eye, Bavette, Denver Cut/Blade Steak

Pros

  • Perfect internal temperature every time
  • No monitoring necessary
  • Easy to achieve success

Cons

  • Requires a special unit or item, a vacuum sealer and bags
  • Wait time can be lengthy
  • Still need to use a pan (or torch) to sear the outside

Instructions

Lucky for you all, I’ve got a nice discussion of the sous vide cooking method here, with pretty pics and everything. In any case, here is the gist of it:

  1. Season the steak however the you want. I use salt, pepper, garlic powder, garlic oil and crushed red pepper.
  2. Place steak into vacuum seal bag and seal it up with some butter and herbs inside (rosemary is always nice).
  3. If you’re a poor bastard and can’t afford a vacuum sealer, you can use ziplock bags. Place your meat into the bag and begin to submerge the bag into the water bath. Once you are all the way close to the zipper, zip it shut. The water surrounding the outside of the bag will push out all the air from inside. This is the poor man’s vacuum sealer. If you do this, you may want to put a smooth, clean rock in there too, just for good measure, to keep the meat from floating.
  4. Set your temperature to however you like your steak cooked. I put mine at 125F for a nice medium rare. I’m dealing with grocery store meat here, people. Don’t give me any shit about that being too well done.
  5. Wait about an hour or two. Don’t panic! You can’t overcook your steak in a sous vide bath. That’s the whole point of it!
  6. Remove your steak from the water bath and let it cool back down to room temperature.
  7. Re-season it a bit, if so desired.
  8. Sear it. I use a Searzall, because why not? But you can easily just toss this baby into a real hot cast iron pan with some more butter and herbs to get that brown and crispy coating.

DIRECT FROM FROZEN

Some food scientist people were messing around and cooking strip steaks in a test kitchen; some cuts were thawed in a fridge overnight, and others were still frozen. The results stunned them. The steaks were cooked more evenly, with less “grey band” when cooked direct from frozen, and those steaks retained more juices (they lost less moisture during the cooking process). While they took longer to cook, they still browned at nearly the same rate as a thawed steak.

I think a major issue that home cooks with have here is that it may be difficult to prevent ice crystals to form on the outside of the meat during the freezing process. When cooking, these ice crystals will melt into water or sublimate into water vapor. At that point you are either boiling or steaming the bottom of your steak in the pan, which is bad. When doing that, you won’t ever achieve the crust that we carnivores all desire.

The scientists attempt to solve this problem by freezing the steaks in a special way at first, uncovered and flat. Once they’re frozen, they are then wrapped and bagged for storage. If you’re going to attempt this you will want to be very careful to replicate the freezing technique that the scientists utilized, to avoid excessive ice crystals from forming on the outside of the meat.

This method involves cooking in a pan that contains a good amount of oil. This is done to ensure that the nooks and crannies of the steak surfaces all get cooked the same amount, and it helps to displace any water that may melt out of ice crystals. Second, it also retains more heat, so you can bring the steak surface up to browning point faster, without overcooking any of the interview (which should still remain pretty cold since it is frozen). The result is less grey banding, and a more end-to-end pink steak interior.

You will still need to finish the steak in the oven, however, since the interior will likely be too rare or still frozen if you only use the pan.

In any event, here is my analysis:

Scientists’ Preferred Cuts for Frozen Steak Cooking: Strip

Pros

  • No waiting for steak to thaw or come to room temperature
  • Less meal planning needed ahead of time
  • Nice, even cook temp throughout

Cons

  • Difficult to avoid ice crystals
  • Complicated freezing technique
  • Still requires second step in the oven

Instructions

Refer to this link and the embedded video below for proper steak preparation and cooking instructions.

DIRECT ON COALS

I haven’t tested this method out myself yet, so you’ll have to take this with a grain of salt, as above, with the “Direct from Frozen” method. My first exposure to this method was when I saw Alton Brown discuss it on his blog. I was intrigued enough to include it here, but since I no longer have the ability to cook often with real wood, I have never tested this out.

Alton’s Preferred Cut for Coal Cooking: Skirt

Pros

  • Fast
  • Natural flavors

Cons

  • Covering in foil step essentially steams the meat
  • Potential for soot contamination

Instructions

I think the best bet here is to just follow the directions from Master Alton, since he’s a culinary wizard, and I’m a mere apprentice. One thing I’m apprehensive about, which I noted in the “cons” section, is the part where Alton wraps the hot steak in foil. This means the meat will cook in steam. He then tosses it back into the juices. All of this makes me think “wet steak,” and that turns me off.

___

For more specific recipes, as opposed to these more general methods of cooking, check out my recipe page.

B.A.M. Episode 2: Beef Nutrition

There are a ton of misconceptions in the world of beef. One of the biggest going around today is that consuming red meat is somehow bad for you. It’s fat. It’s poisonous to your body. It lacks nutritional value. Give me a break! Beef is nutritious and good for you! Let me just attack some of these points here for you guys in this article, which is my second installment of Beef Advocacy Mondays (BAM).

First the fat: The beef of today is leaner than it was in the past, due to genetic selection of certain characteristics for over four decades throughout the beef supply chain. Sirloin, for example, is 34% less fat today than it was in the 1960’s.

About 66% of beef cuts are considered lean cuts today, and a part of that is due to the fact that there has been an 80% decrease in external fats on grocery store meat cuts.

DSC05717

Most saturated fat from beef is located in the outer portions of fat, located externally from the muscles that we eat. The marbling, or intra-muscular fat, does contain saturated fat, but a third of it is steeric acid, which is cholesterol neutral. Beef also contains mono-unsaturated fat, which is the same kind of fat content you get from olive oil or avocados – the good fats, in other words. What this means is that if you trim your beef of any external fats before cooking and choose a lean cut, you’ll end up discarding most of the remaining “bad” fats and retaining the good fats.

20140322_091905_LLS edits

I’ve thrown around the word “lean” a bunch of times here already. There’s actually some unpacking to do here. The term “lean” means that the beef has 4.5g or less of saturated fat per serving, and 10g or less total fat per serving. Leanness is mainly a function of the grade of beef (prime or choice vs select) and the location of the cut (rib vs sirloin or tenderloin), as opposed to farming and production methods (grain finished vs grass finished).

Okay so aside from fat content and leanness, I also mentioned that beef is nutritious and good for you. Here’s why: Beef contains 10 essential vitamins and minerals that are abundant in each serving. Most notably, it’s an excellent source of iron, B-vitamins, protein and zinc, but beef is a good or excellent source for all of the following:

  1. Protein: 48% daily value
  2. Vitamin B-12: 44% daily value
  3. Selenium: 40% daily value
  4. Zinc: 36% daily value
  5. Niacin: 26% daily value
  6. Vitamin B-6: 22% daily value
  7. Phosphorus: 19% daily value
  8. Choline: 16% daily value
  9. Iron: 12% daily value
  10. Riboflavin: 10% daily value

A 3oz serving of beef averages just 150 calories, and contains 25g of protein (48% daily value). You can imagine how great this is for building and repairing muscle after a hard workout or a long run.

Plant based proteins don’t provide all the amino acids that beef provides. Essentially they’re “incomplete” proteins. Let’s take beans, for example: You’d need to consume 371 calories worth of beans to obtain the protein content found in just 170 calories of beef. And peanut butter? Even worse. With that we are looking at nearly 600 calories. At that point you are blowing through your daily allotment of calories too fast, and you are not being satisfied in the meal.

With beef, you spend fewer calories for equal if not better nutritional content. In other words, beef is the better buy, the most bang for your buck. And it has been scientifically shown that consuming meat proteins actually has a satiating and hunger-satisfying effect on a person. I know I have perceived this phenomenon. On days when I have tried to eat veggies only, I ended up over-eating because I couldn’t ever seem to feel satisfied. Screw that. Give me some damn meat!

DSC05726

Grass-finished animals, or animals who exclusively eat grass and not grain for their entire lives, produce meat which also contains more Conjugated Lineolic Acid (CLA). This has been linked to long term weight management, and is thought to have health benefits that help combat a host of diseases, including cancer and heart disease. You just have to be careful with some of the research here, as many proponents of the grass-fed trend are very quick to bash anything that has to do with grain feeding without having the full picture. While I generally don’t particularly fancy the flavor of grass fed beef, the nutritional benefit of CLA is something to consider, and it just further strengthens the argument for consuming beef.

One caveat to this CLA business: The difference in CLA content between grass and grain -finished beef isn’t really big enough to justify excluding grain-finished beef from your diet. If CLA is what you’re after, maybe work some salmon into your diet, as that seems to contain more. But don’t forget to eat that yummy and nutritious beef either!

Steaks Around the World Infographic

Meat Minions:

Check out this awesome info-graphic from Pettitts:

X-Ways-to-eat-steak-around-the-world-DV6 smaller


B.A.M. Episode 1: Beef Industry History

Happy Birthday America! What better day to start a new series of articles than the one celebrating our independence from tyranny?

This is the first installment of my B.A.M. posts. No, it’s not a damn sound, like Emeril’s ridiculous catch phrase. In these hallowed halls of meat, B.A.M. stands for Beef Advocacy Monday. My goal is to share something positive or educational about beef on each Monday, or at least once a month if I get lazy. Let’s see how long I can go before I run out of crap to talk about. I love beef, so I’m sure this will continue for quite some time. I’m a beef pusher! You all know I’m passionate about meat; so that’s the main reason I’m doing this.

But another reason I’m doing this is to combat the horrible “Meatless Monday” trend going on in the food world lately. I’m sorry, but the phrase “Meatless Monday” should have no place in the American lexicon. Why? Because we Americans pretty much revolutionized the beef industry to make it what it is today. We run the biz when it comes to beef. Yeah, yeah, yeah… we all know that Argentina, Australia, Brazil and Japan are responsible for some great beef as well. But come on, people. It’s the 4th of July, so I’m going to briefly talk about the USA and our vibrant beef history.

DSC04696

We have a rich beef history here, considering our relatively short time in existence as a nation. At first, beef was generally just slaughtered as needed. Most if not all beef was very fresh and hyper local. I’m talking 1600’s days here, and lots of the animals were really bred for dairy and milk rather than protein consumption.

Pork was different. Salting and smoking were common “packing” techniques that allowed pork to be preserved so that it could be transported away from localities and moved around as a commodity for sale. Cincinnati became a pork epicenter for this packing biz.

Beef never took off like pork did during those days, because cattlemen would have to drive their herd literally across the country to these packing and slaughtering hubs in order to get their product to the market. Not only was this a dangerous endeavor given our relations with Native Americans at the time, and given cattle thieves who would kill and steal for a herd, but the harsh weather conditions at various times of the year were also an issue. Cattle would die very often on these drives. This meant that ranchers were breeding their cattle to be able to survive the cattle drive rather than for flavor quality or meat grade.

It’s no wonder the industry wasn’t taking off. The market was not responding favorably to the product and there were too many obstacles in the way for farmers to make a good return on their investment.

It wasn’t really until the advent of the railroad system and the Industrial Revolution that the beef industry really began to flourish as a major part of the US economy. With the advent of railroads, cattle from the mid-west and Texas could reach the northeast and other major cities with ease. There were no more worries about whether the herd could survive the long journey by hoof. The animals were simply loaded into train cars and transported to places like Chicago, where, in 1865, the Union Stockyards overtook Cincinnati as the epicenter of the meat packing industry. Beef was, in turn, becoming a much larger piece of the American diet. The beef industry actually saw a 61% increase in beef consumption from 1850 to 1860. That’s huge.

Refrigerated train cars even began popping up as early as the 1850’s, allowing for slaughter facilities to be built and maintained closer to the farms, rather than near the packing centers in Cincinnati and Chicago. This eliminated the need for crowded animal transport, and allowed farmers to stay involved with the process from calving to carving.

By 1888, most farmers were breeding and feeding cattle to produce the best quality beef for taste rather than to survive the cattle drive north and east. As you can imagine, this made for much happier meat eaters.

The men who built America and the railroads – those mega-capitalist captains of industry like Andrew Carnegie, John D. Rockefeller and Cornelius Vanderbilt – were really the ultimate reason for this explosion in the beef industry. I thank them for their efforts.

But that’s not the end of it. We all remember learning about Upton Sinclair’s 1906 book The Jungle, which exposed nasty conditions within the meat packing industry. This eye-opening expose led to Congress passing the Federal Meat Inspection Act, which prevents adulterated or mis-branded meat and meat products from being sold as food. It also ensures that meat and meat products are slaughtered and processed under sanitary conditions.

Then, in 1967, the Wholesome Meat Act extended those federal regulations into the states. It requires that states have inspection programs equal to that of the federal government. These programs are administered by the Food Safety and Inspection Service (FSIS) of the Department of Agriculture (USDA).

In 1978, the Humane Methods of Slaughter Act amended the 1906 Federal Meat Inspection Act and created standards for the humane treatment of animals prior to slaughter.

Since then, various amendments and add-on regulations have honed the guidelines further and allowed for new information and scientific breakthroughs to better inform the whole process. In 1997, in response to a 1993 E. coli outbreak, many best practices guidelines came down the pike for reducing the incidence of food-borne pathogens in meat products. The Beef industry was the only industry to meet the goals of reducing food borne pathogens by half by 2010, and it intends to reduce that number by half yet again for 2020. And we are talking about a decrease in food borne incidents from 2.1% to 0.6%. These figures are much lower than other industries, like poultry.

In addition, in 2004 there were more guidelines and regulations introduced to address things like Mad Cow Disease. Now, inspections happen at every point in the cycle of the beef industry, from calving to animal nutrition on the pastures and in feed yards, to transportation requirements as the animals move to slaughter facilities, and even beyond, to the post-slaughter workplace conditions at packing plants, shipping facilities and grocery stores.

Taken together, the history of the beef industry and these important safety improvements have really created an atmosphere where the American beef consumer can feel confident that the product he or she is buying is safe, nutritious and delicious.

So go forth and heat thy grills for thy July 4th BBQ’s. Slap some burgers and steaks on there and enjoy! Then go blow shtuff up in the sky (safely, of course), because America rules.

Happy “Beefday” to “US.”

DSC04730

Get Your MBA: Masters of Beef Advocacy

The generous folks at Beef.org offer a free set of five online course modules, after the taking of which you become an official Master of Beef Advocacy. I discovered this by poking around their website one day. After reading more about it, I decided to fill out the application.

This was an ideal opportunity for someone like me, who spends so much time thinking about, writing about, photographing and eating beef. I mean, I have the “CC” after my name for “Carnivore Connoisseur,” which is completely made up, so I figured I might as well try for the official Beef.org certification as well! It would lend a bit more legitimacy to my screeds on here, no?

Anyway, a few days later I received my acceptance letter! Soon after, I began taking the module courses. The courses are as follows:

The Beef Community: an overview of how to talk to consumers about the way beef is raised from pasture to plate. It focuses on the community of people involved throughout the beef life-cycle.

Raising Cattle on Grass: this introduces the student to the first step in the beef life-cycle and the benefits of raising cattle on America’s vast grass pasture resources.

Life in the Feed-Yard: this course is a discussion of the role of feed-yards, including animal care, nutrition and environmental stewardship or sustainability.

From Cattle to Beef: this is an in-depth look at the slaughter process and the humane handling and safety measures that are in place today at beef processing facilities.

Beef – It’s What’s for Dinner: this module is a primer on choosing and cooking the right cuts of beef, and the important role that beef plays in a healthy diet.

What you come away with from these courses is a ton of valuable information about how to address consumer concerns regarding issues like hormones, antibiotics, grass and grain finishing, GMO feed, choosing cuts of beef and cooking.

wp-1466185789398.jpg

Anyone who is a big fan of steak, like me, should think about investing some time into these free courses. I’m a big proponent of knowing a lot about what you are eating. And not only are you getting a ton of info here, but you are also having various health myths dispelled in the process.

NCBA_MBA_Logo-01

Beef most certainly IS what’s for dinner. At least in my gut anyway. And knowing what I know now, after taking these courses, I’m going to keep it that way.

How To Use Your Camera

I’ve been a hobbyist and semi-professional photographer for about 12 years now. As both a photographer and a food person, one of the most depressing things for me to see is a terrible photo of food. We eat with our eyes first, after all, and if a photo of food looks like dog vomit, then it doesn’t matter how good it might taste; you aren’t convincing anyone about anything with a terrible photo.

With the craze of Instagram food accounts at full blare, and with more and more people shooting their food than ever before, I figured this page might help. I get a lot of questions about camera operation from friends and family, both within and outside the food world. Through the years, I have always kept a draft email ready to go for people who ask. I’ve pretty much provided that here for all.

Essentially, this is a tutorial about how to use a camera. As a disclaimer, this is not really geared for cell phone usage (though there is some overlap). I don’t use a cell phone to take photos of food, because they suck unless you have friends holding lights. Afterwards you still have to spend a bunch of time editing to get everything to look right. Sometimes they’re good if you’re dining outside, but otherwise my advice is to avoid them.

The tips below are for people who shoot with a good point and shoot, an entry level dSLR or some other professional-grade camera. Many people who buy these nice cameras have no idea how to really use them, or what the settings even mean. Below is a quick guide on how to use your camera, with some specific tips geared toward shooting food. It’s a Cliff’s Notes of your camera’s user manual.

LIGHT

Light is the most important aspect of photography. The amount of it, the color value to it, and the positioning of the light source all matter tremendously for a good photo.

Amount of Light

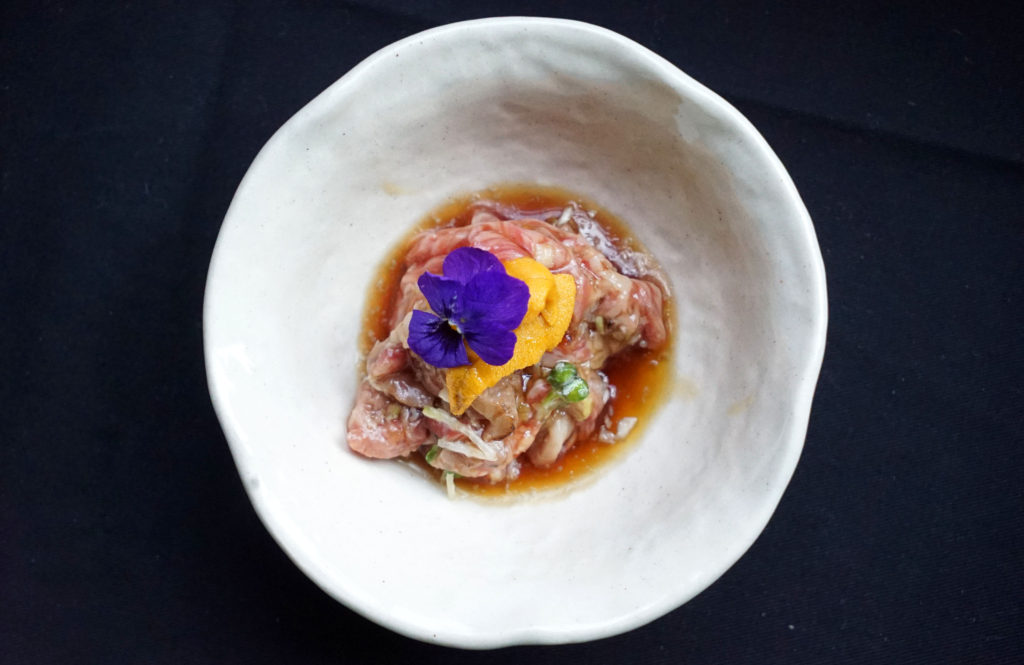
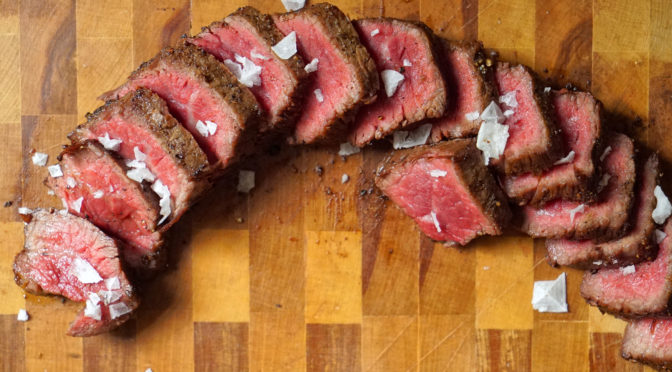
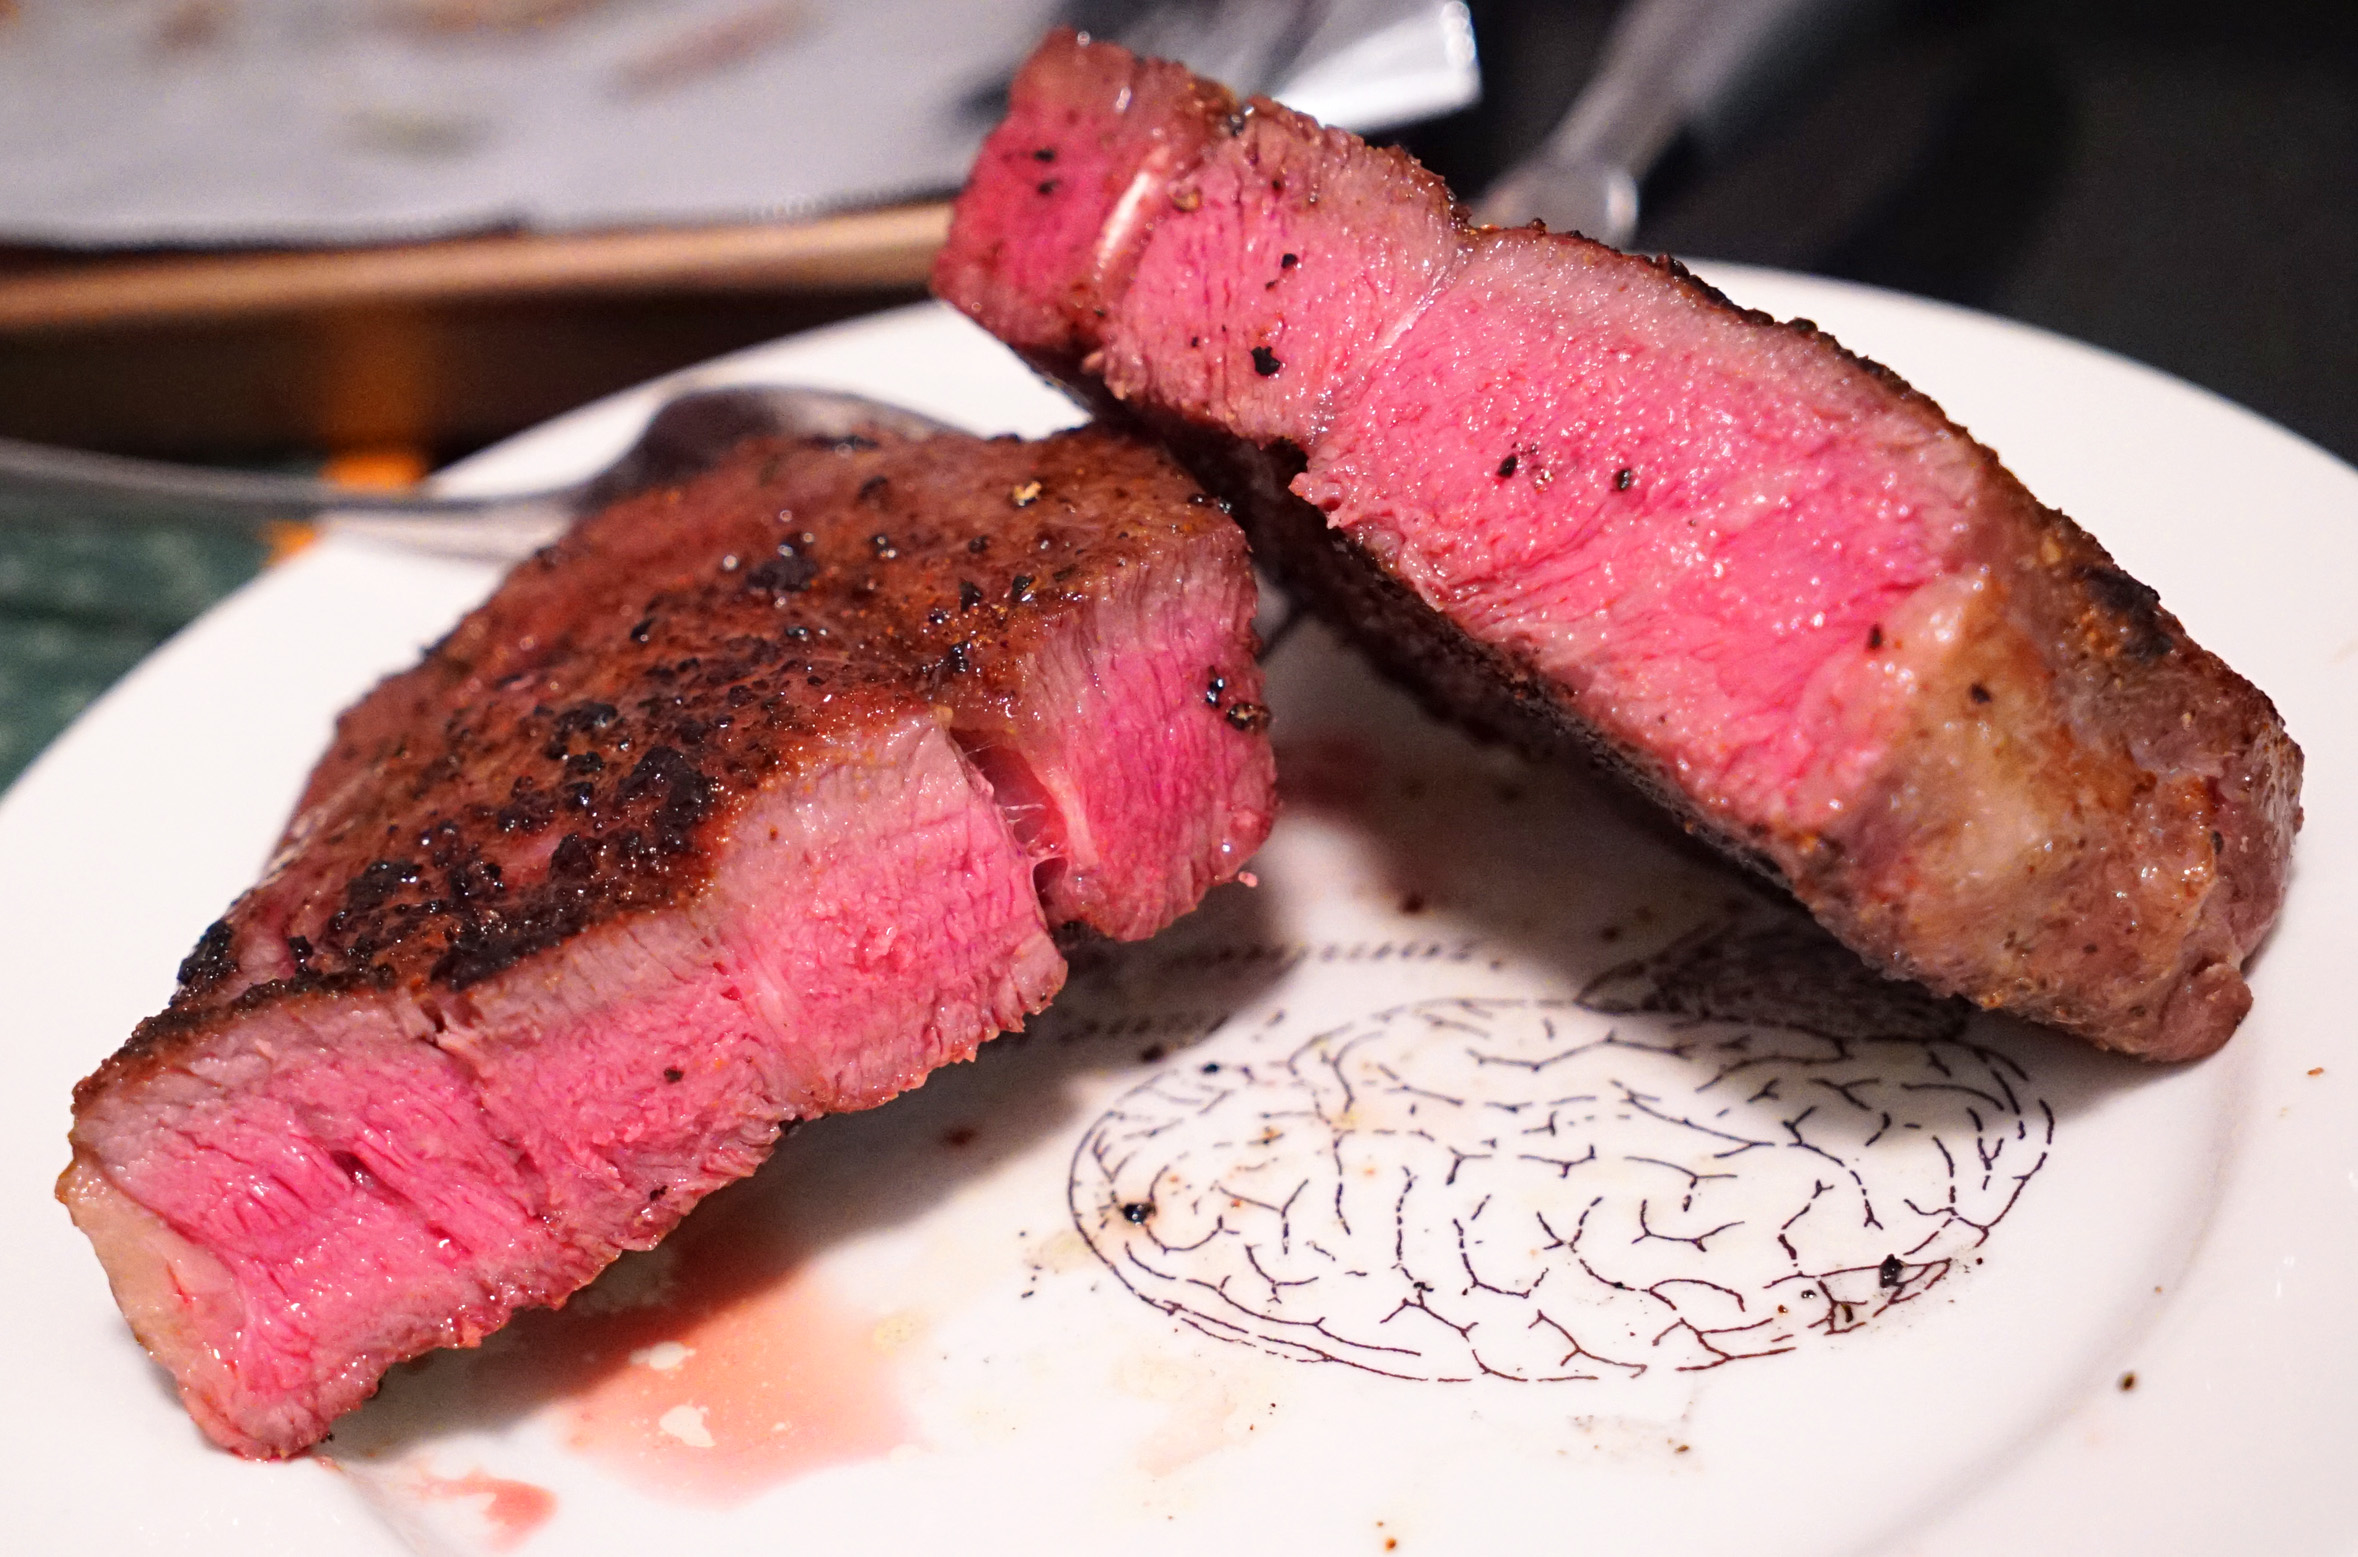
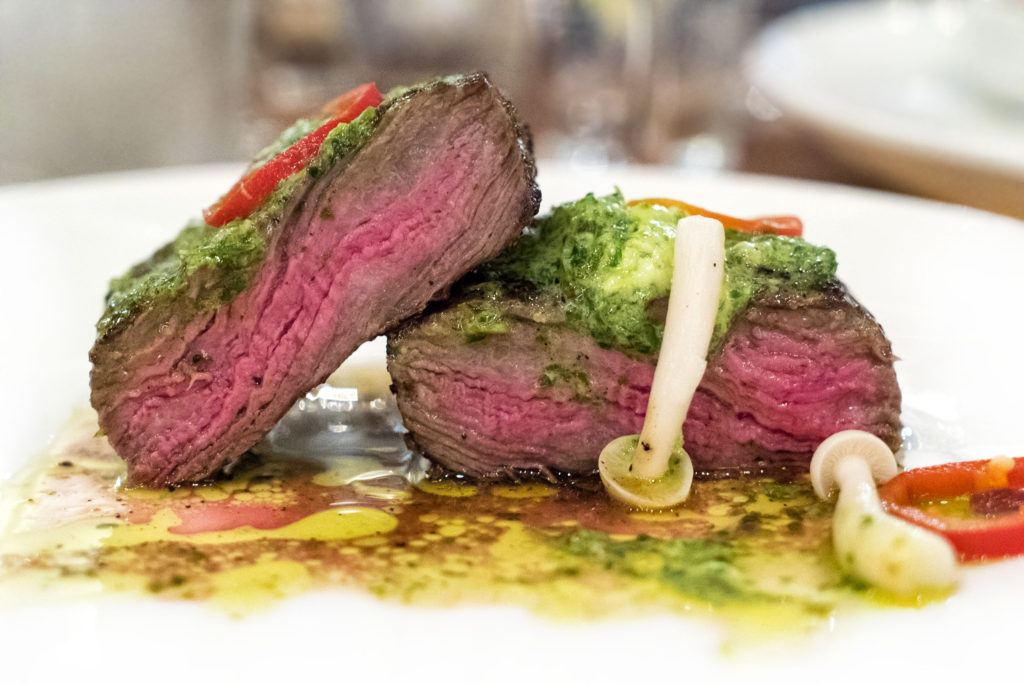
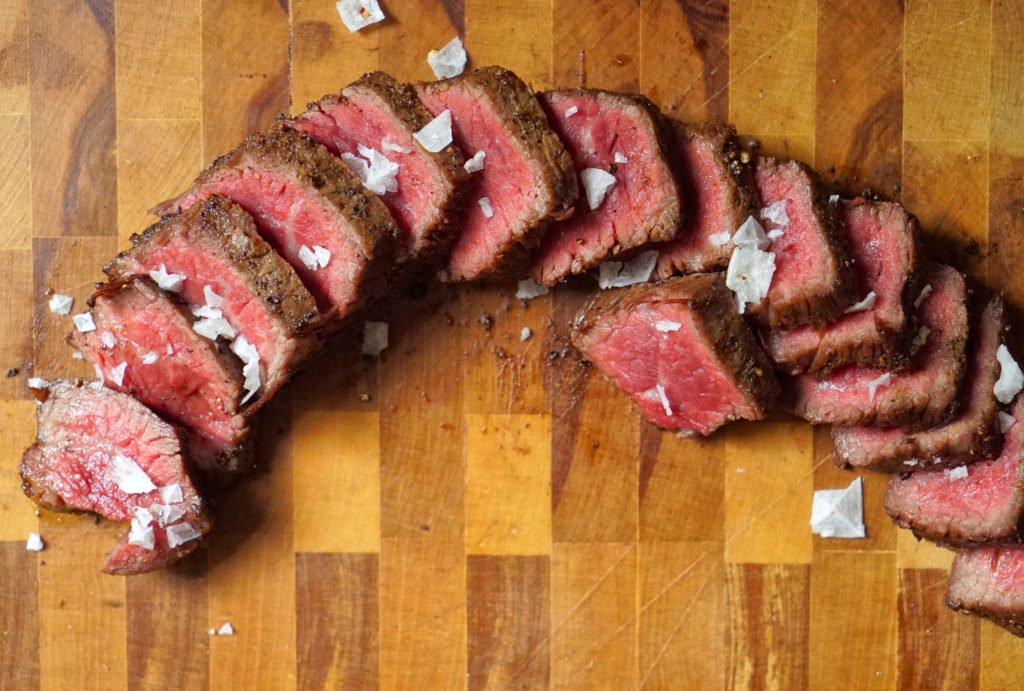
For food photography, you generally want a lot of light so that details can be seen and colors can pop. A good, bright and colorful food photo will actually make someone hungry!

DSC04425

Source of Light

Generally you want to avoid back-lighting or light sources that originate from a direction which casts unsightly shadows across the front or focal point of your subject. Unless you’re going for an artistic silhouette or something with lens flare beaming all over the place, you should get on the other side of the subject.

Practical Tips

The first thing I do when I go to a restaurant when I know I will be shooting photos for the website is to look at the salt shaker. I take note of which way the shadows are trailing. I want to be on the side that gets the most light, not in the shadow.

Shooting in restaurants is not always easy, so don’t get frustrated if at first you don’t succeed. If you must, turn on the flash. But know that using a flash or off-camera light can be intrusive and rude to other diners.

I, personally, don’t use portable lights or flashes for restaurant food photography. Most flashes are hot-shoe mounted or built in, and direct frontal light is not very appealing in photos. They make everything look like a mug shot with a harsh, dark shadow behind. Use your available, natural light if you can.

Off-camera lighting, from up and to the side (“key” light positioning), with a reflector or second fill flash on the other side (to eliminate all shadows), is typically more desirable, but that takes a lot of work that you’re probably not going to do at a restaurant. I do this at home. I may set up a little light box or studio if I am shooting something there, but never at a restaurant where I am casually dining and cataloging for the website.

31

Color Value of Light

As a general matter, you want to keep your color values as neutral as possible, in order to be true to the look of the food (see White Balance below for more detail on this).

WHITE BALANCE

>The next thing you need to learn about is white balance. White balance is about the warmth or coolness (“temperature”) of the images you are shooting. Unless you are going for a specific effect, the white balance should be neutral so that what your camera captures is true to the environment in which you are shooting, or true to the actual colors and brightness of the object you are shooting. While this may seem somewhat advanced, as it mixes both light and color, I think it is absolutely key to good photography. If you learn it, no – WHEN you learn it – you will improve your photography skills tenfold right off the bat.

Remember that crazy photo that went viral of a blue dress? Or was is gold? The reason it was so ambiguous was because of terrible white balance. When you set the white balance of your camera, you are telling it what colors in the frame are neutral and what should be white. From there, the camera will adjust the color spectrum accordingly, and you should end up with a better, more accurate hue to your images.

before and after

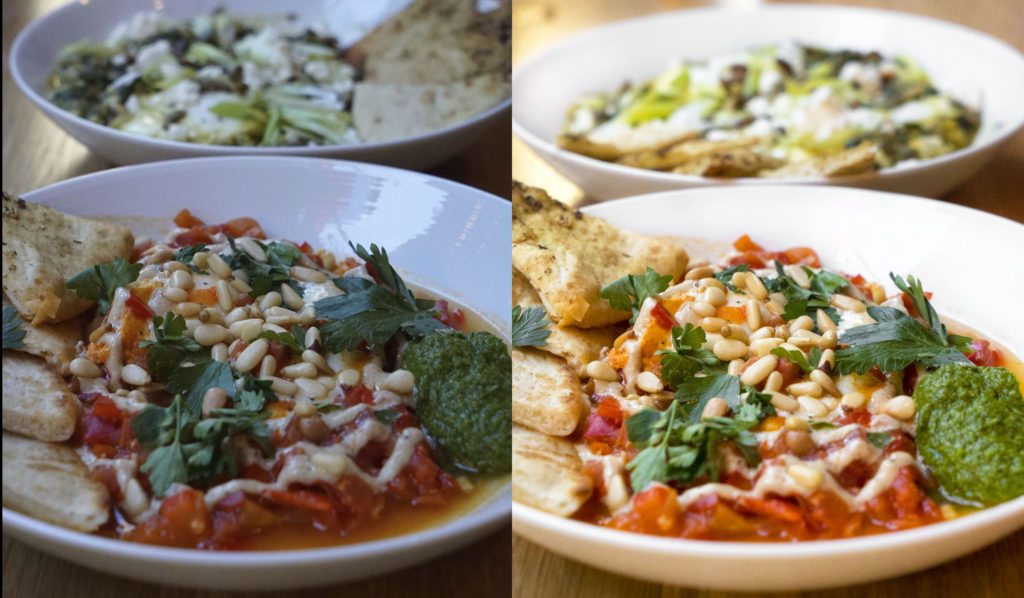
Restaurants are notoriously “warm,” meaning your photos will come out with a yellow, orange or red tint to them if you don’t adjust the white balance, even if you choose “auto.” Auto modes notoriously fuck up the white balance, so a knowledge of some manual tinkering is essential for good food photos.

The second thing I do, after looking at the salt shaker, is to adjust my white balance to meet the “light temperature” conditions of the lighting within the restaurant. Temperature values can range from 2000 to 50000, with 2000 being the most blue or cool, and 50000 being the most warm or yellow. This is different from tint, which varies on a scale from green to purple.

How do you adjust the white balance? Well you can typically choose from a pre-set value setting in the camera’s menu or settings, or you can sometimes do a custom white balance, depending on which camera you have.

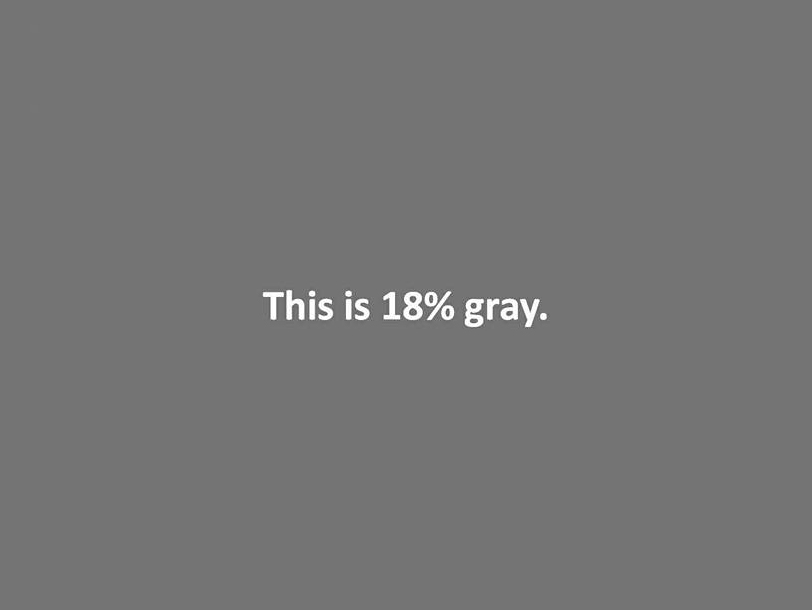
Presets are often made to account for shooting conditions like “cloudy,” “fluorescent,” or “sunlight.” These shift the white balance accordingly, but they are set at a specific number value, in most cases. The best thing you can do is use a custom white balance. Most cameras have this function. Essentially, it means you are telling the camera what a neutral grey is by taking a picture of something that is neutral grey, and from that information the camera will adjust itself accordingly. To do this, I use a white balance card, or an 18% grey card. It fits in my wallet so it’s easy to carry around with me wherever I go.

18 grey

BASIC SETTINGS

The third thing I do, right after setting the white balance, is fiddle with my settings and take a test shot to see how the images look. This section is the bulk of how your camera actually operates, and nothing has really changed here for centuries.
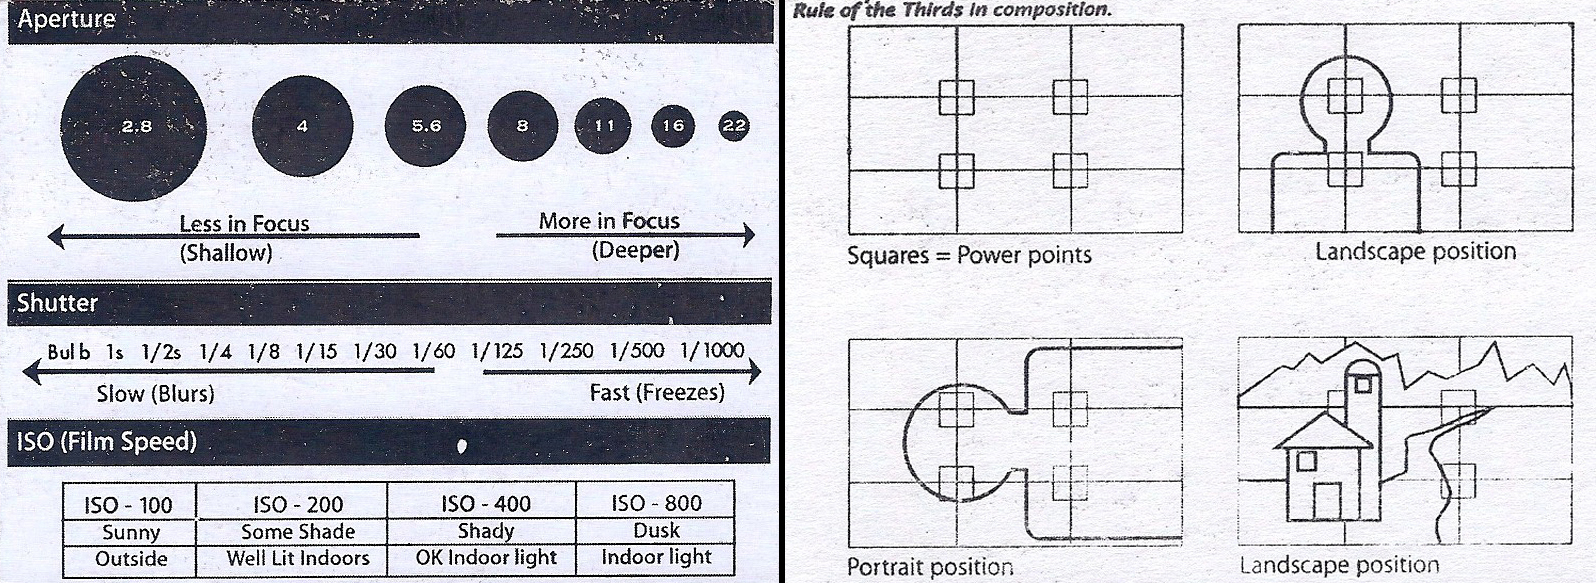
Shutter Speed

Shutter speed is a measure in time of how long it takes for the camera to open the shutter, expose the sensor/film to the light, and then close, completing the photograph. So 1/200th of a second, 1/25th of a second, 1/2 a second, 2 seconds (2″), 15 seconds (15″), 30 seconds (30″), etc.

Generally when shooting food, I want a fast shutter speed so that there is no blur from camera shake. But be careful; in some fluorescent lighting, a fast shutter speed may result in strange color banding on your photos. Terrible. Sometimes you can even see your viewfinder flickering like an old tube television when this happens. A good rule of thumb is to be at about 1/100th of a second for shutter speed. That should eliminate most camera shake, unless you’re Michael J Fox while off his meds, or you’re on a serious caffeine tear. It will also steer you clear of most fluorescent lighting problems. If you happen to still get fluorescent banding, go down to 1/80 and keep your fucking hands steady when you shoot. Now, to be sure, these speeds are generally pretty slow in the grand scheme of photography. To compare, when you shoot outside in daylight, your speeds may be at about 1/1000 of a second. And most cameras will give you a warning to hold still to avoid camera shake at anything 1/125 and slower.

Sometimes, though, you may WANT a little blur, like if you want to take a picture of a waterfall and have the photo give the feeling of motion, or if you shoot traffic at night and want the car lights to be blurred with motion like they are moving fast. On the flip side, you may want to FREEZE the action, like in sports photography or if you want to capture the details of someone splashing in a pool. Faster shutter speeds will freeze the action with no blur, and you will see little globs of water drops frozen in mid air with no blur.

Aperture

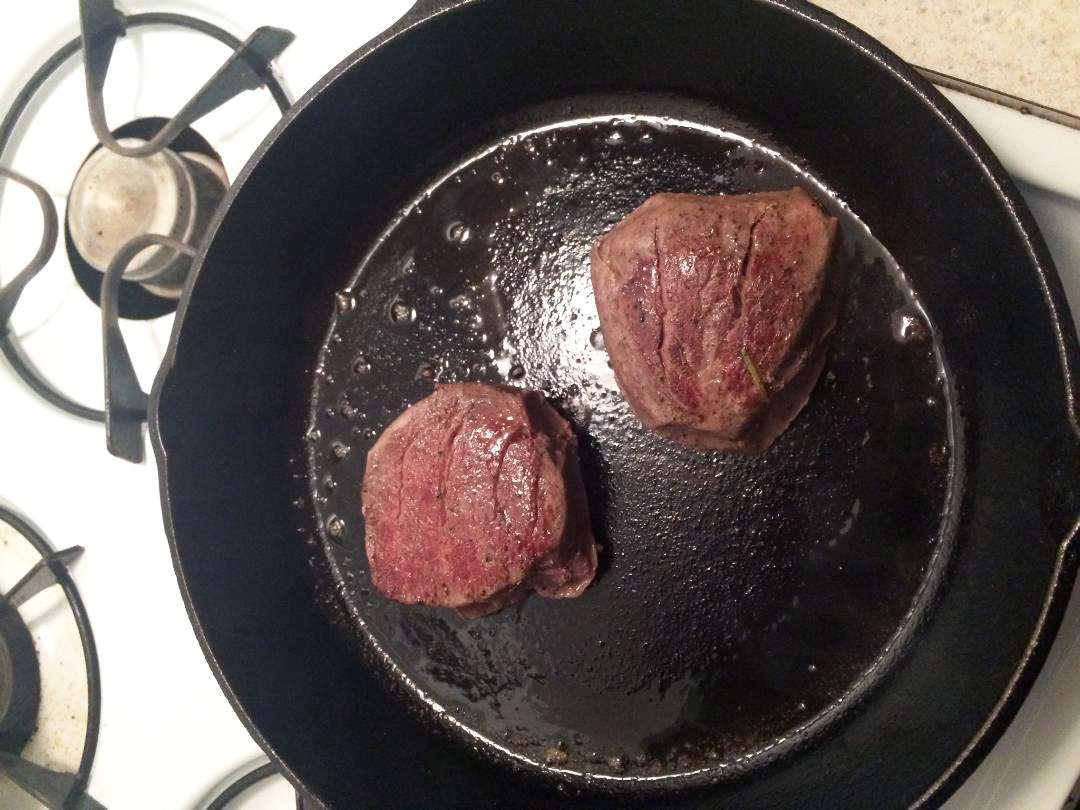
Aperture is how wide the shutter opens during the taking of a photo. The wider it opens, the less will be in focus. This is referred to as “depth of field” in the photography world. For most food photos, you want a larger depth of field, so that all of the food can be seen without losing focus. For example, if you’re shooting a hot dog from one end with a low aperture of, say, f/2.8, then the tip of the dog will be in focus, but the opposite end will not be in focus.

The good thing is that this will generally result in you being able to use a faster shutter speed, since aperture and shutter speed are inversely proportional: meaning that as shutter speed increases, generally you need to open up or decrease the aperture in order to allow the same amount of light to hit the sensor.

In order to achieve those shutter speeds I noted above, you may need to open up your aperture – especially if you’re in a dim restaurant. A word of caution, though, do not open the aperture too wide so that only a little sliver of the food is in focus (like the hot dog example). With food, you usually want to get a good amount of it in focus. I try to be at around f/6.3 and up, with an ideal being at f/8 or f/9, that way all the important bits stay in focus. Try not to go lower than f/5.6 unless you are going for a specific effect or style of image.

Sometimes, for artistic reasons, you may want your aperture lower than f/5.6. For example, in portrait photography, the backgrounds of photos are often nice and blurry. An appealing blur in the background is called bokeh. On some cameras, you can actually see the shape of the aperture opening that is made by the diaphragm blades. Here, you can see 8-sided polygon bokeh blurs that were made by one of my lenses when I shot this Christmas ornament with the Christmas tree lights on in the background, out of focus. Generally, better lenses tend to have more diagram blades (7 or more these days), and they are often rounded blades, that way the polygon blurs are more like circles than geometric shapes.

Photos can end up looking very artistic and the blur causes the viewers attention to be focused on a particular spot. That is usually done with a wide aperture, meaning a larger hole, which means a lower “f-stop” number like f/3.5, and then zoomed in to make the background separate even more drastically.

ISO

ISO is the camera’s sensitivity to light. Higher numbers means higher sensitivity. Each time you increase the ISO by an increment, you increase the sensor’s sensitivity to light by 2x, doubling the exposure. Think of this sensitivity measure like people. A sensitive person will pick up on things better, emotionally. But if they’re too sensitive, then they break down and cry like pussies. The same thing happens with camera sensors. You want the sensor to be sensitive to light, but if it is too sensitive, then the resulting images will break down and lose quality.

I’ve found that Sony offers some of the best camera sensors on the market when it comes to low-light shooting. You can crank up the sensitivity really high and the pictures won’t break down. This is great for shooting in low light, dim restaurants. And by increasing the ISO, you can achieve better apertures and shutter speeds for shooting food, as you are allowing more light to reach the sensor.

Most cameras produce images that have lots of grain when shooting in low light situations at high ISOs (upwards of 3200 or 6400). You also lose detail when that happens. Not good. Even Sony’s entry level cameras are better than some of the top line cameras from competitors in terms of eliminating image noise and grain. But even if a new camera isn’t on the horizon for you, you can still probably bump up the ISO to about 3200 if need be. With my Sony, I can go to 12800 or 16000 without any huge concerns on image quality.

Generally I would just stick to these ISO guidelines unless you are experimenting:

  • 100: outdoors in sunlight
  • 200: outdoors with clouds
  • 400: outdoors in shade; indoors with good lighting
  • 800: indoors with less light; outdoors at night with decent light
  • 1600: indoors with poor light; outdoors at night with less light

Anything higher would be for very dark stuff, or if you want to get fast enough shutter speeds because you are limited by the aperture of the lens. I always like to use the lowest ISO I can get away with, so that there is no possibility of image noise. Again, newer cameras are getting much better at removing noise so you may be able to adjust upward with confidence.

Aperture Shutter ISO Card

COMPOSITION

Okay – now you’re almost ready to take the fucking photo! There are just a few more things to think about while you are framing the image. Why? Because a photo is boring and dull unless it has an interesting composition. This is the difference, essentially, between art and mere documentation. Anyone can snap a plain-ass photo with the proper settings, lighting and white balance. But to make it visually evocative and appealing, a rudimentary knowledge or innate understanding of composition is essential. So here are a few things to think about while shooting.

Background

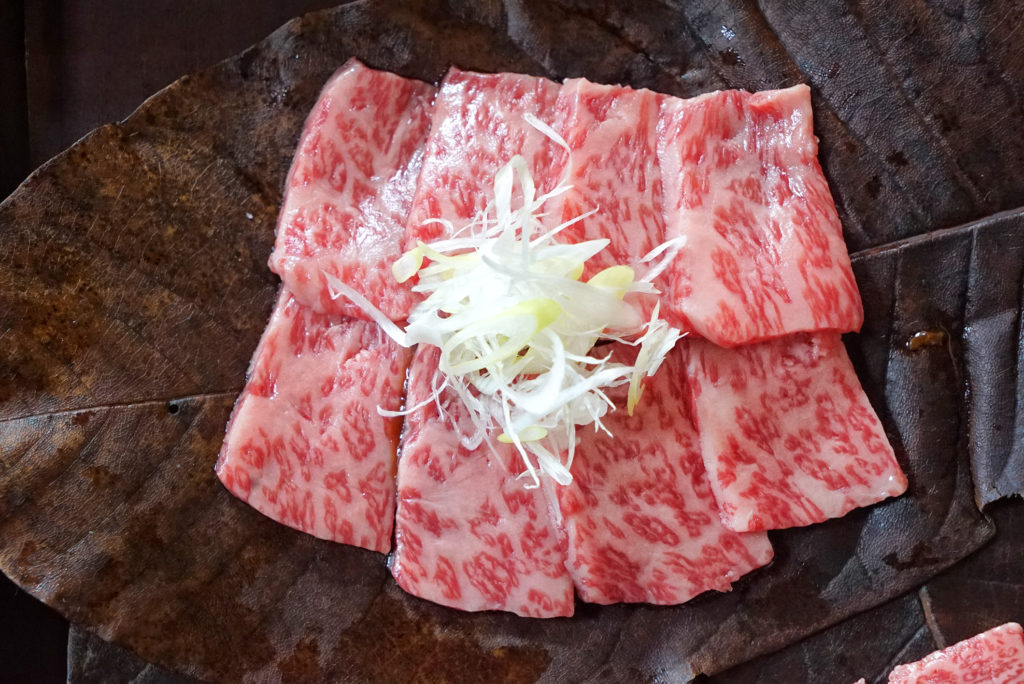
Be mindful of what is behind the subject. Lots of times I see people take pics of their friends and there is a big tree behind one guy’s head, and it looks like his head is sprouting oak. For food, it can be as simple as moving napkins, water glasses and silverware from the frame. Perhaps a decorative place-mat or the wood grain of the table is more appealing as a back drop behind your food.

DSC04181

DSC02806

Viewing Angles

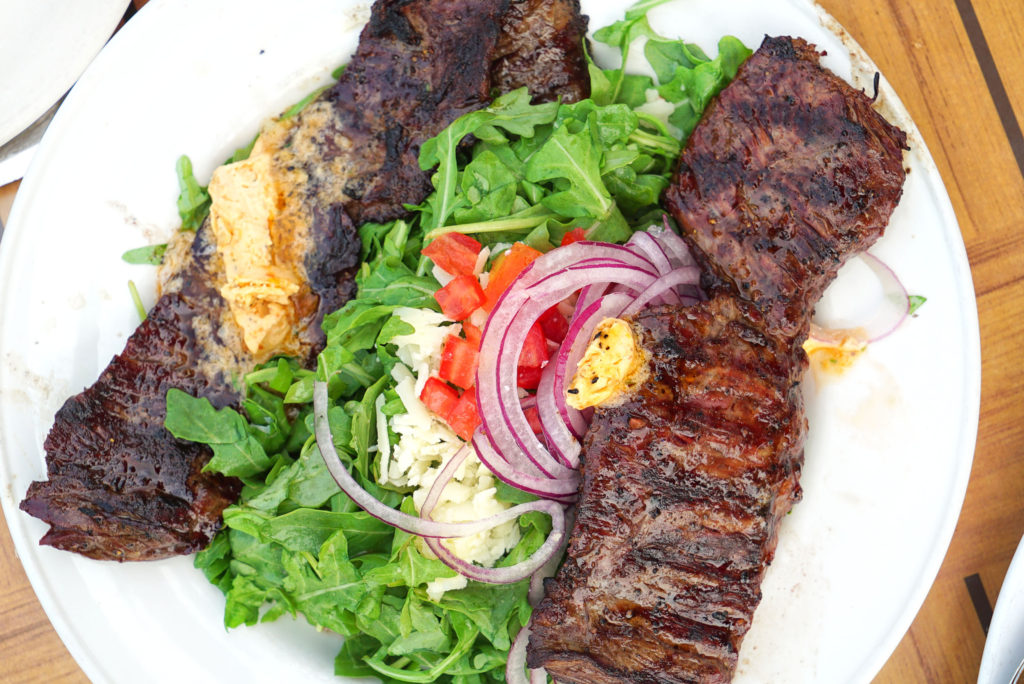
Many food people like the overhead shot. But sometimes I like a low angle better, especially for sandwiches or burgers.

While I like this next photo here, let’s use it as a way to critique my angle choices. Technically I am about 90 degrees off to the wrong side. If the restaurant weren’t so crowded and crammed, I would have positioned my camera from the angle where the French fries are creeping into the frame on the right. Then I wouldn’t have any shadows on the left side of the burger.

DSC01666-2

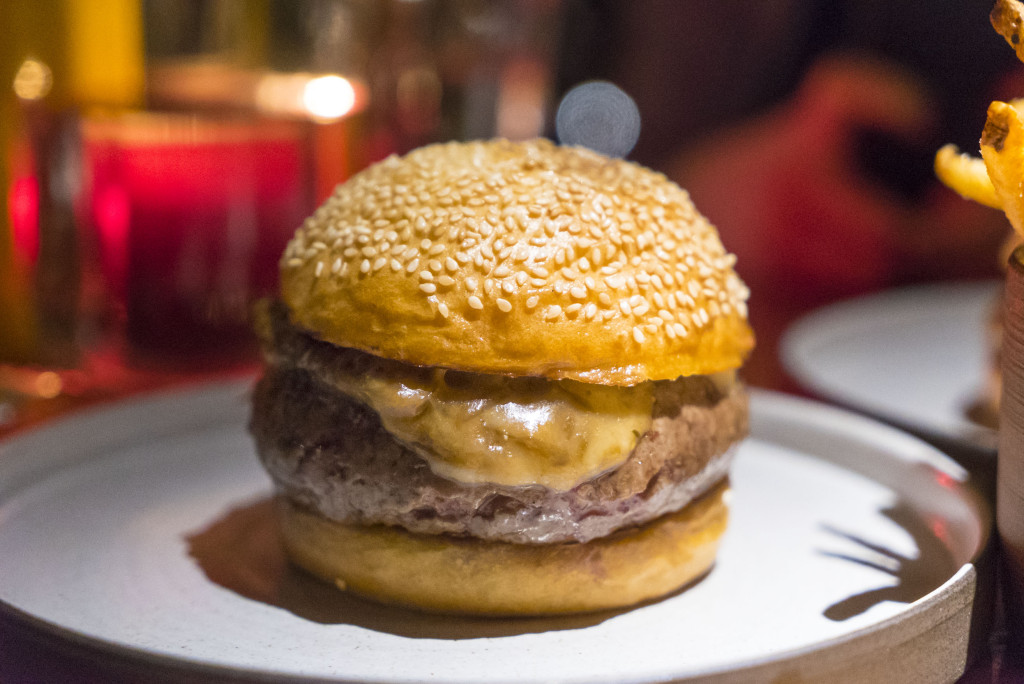
A shot from where your head is positioned as you are sitting there generally isn’t the best view. That’s what everyone else sees and likely what everyone else who isn’t shooting good photos will also shoot. You want to stand out, so do something different. Also: get close sometimes. People like to see the nooks and crannies of food as well as the overall presentation.

DSC03777

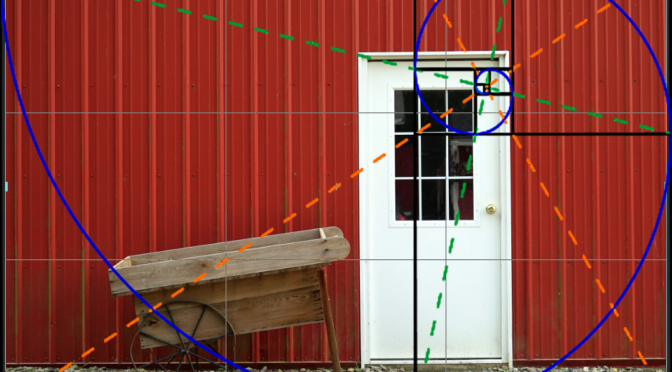
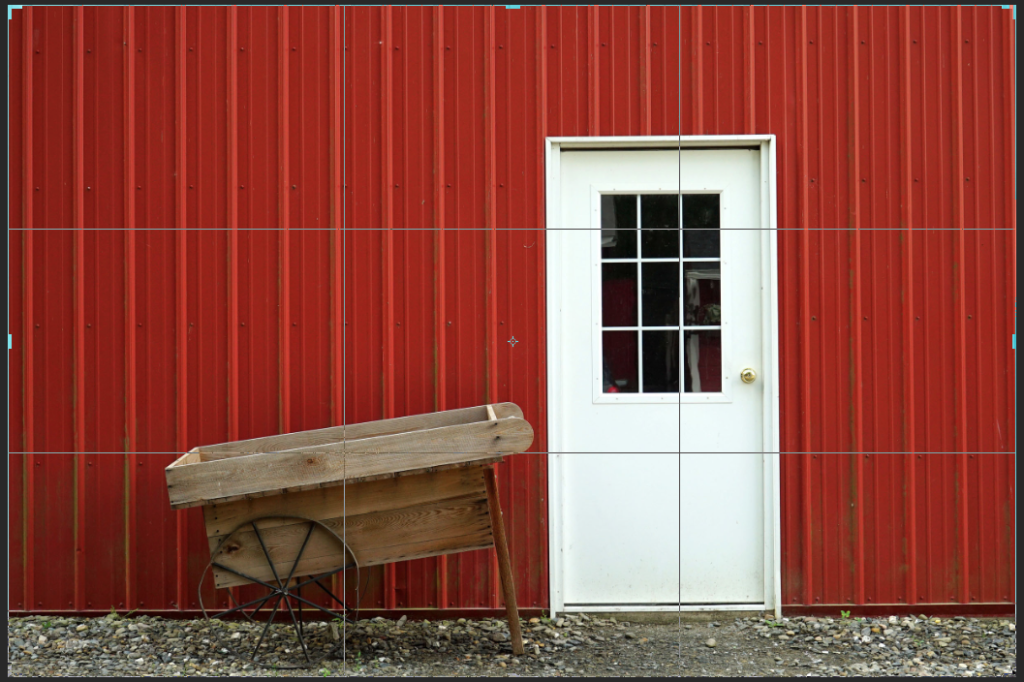
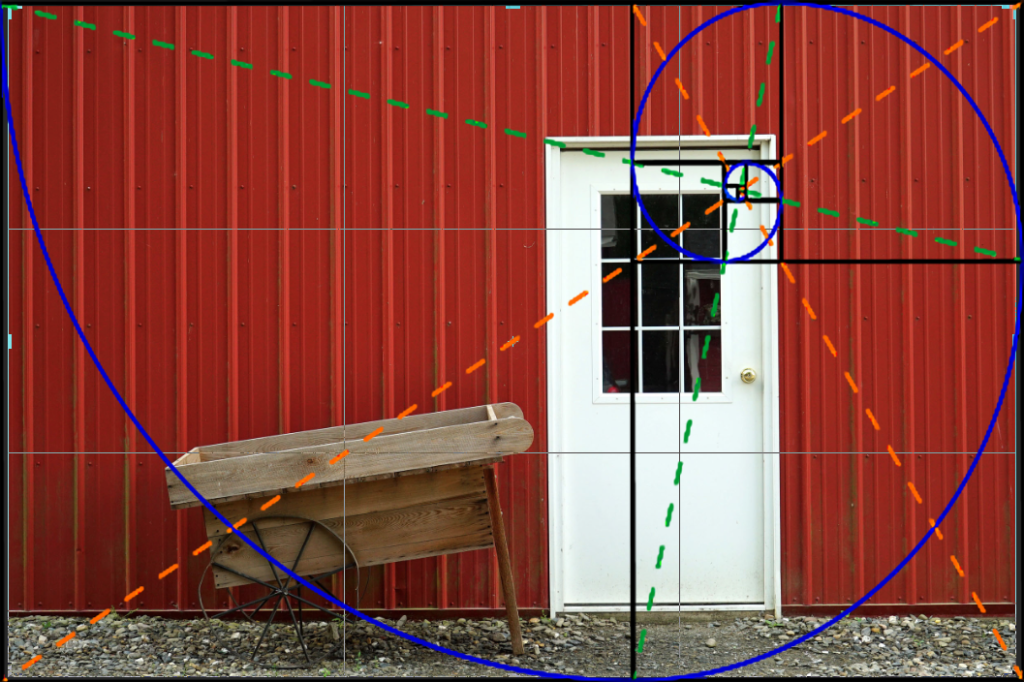
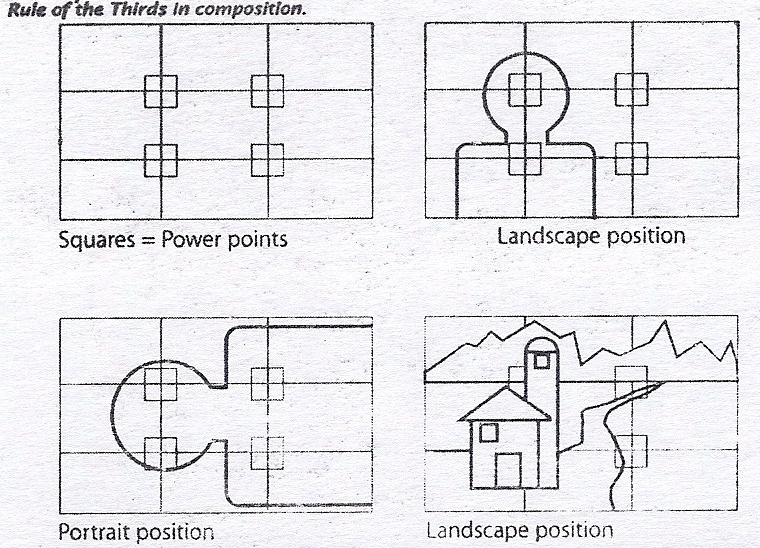
Rule of Thirds & The Golden Spiral

It has been shown that use of a certain amount of negative space in a photo draws the eye to the subject more effectively, and this ends up creating a more appealing and visually dynamic image. The idea here is to frame your subject to take up a certain position within the frame. Most cameras have grid lines that you can superimpose over the viewfinder to guide you for the rule of thirds.

Screen Shot 2016-06-09 at 6.30.20 PM

The Golden Spiral is a curved, visual representation of the Fibonacci sequence in mathematics. The termination of the spiral is said to also coincide with a naturally pleasing location for the focal point of the image.

golden spiral overlay

Composition Rule of Thirds Card

EDITING AT HOME

So you get home, extract all your photos, and realize that they arent what you hoped. Some are dark, or the colors don’t pop. Some are slightly warmer or cooler than you expected, even when following all the parameters set forth above. Don’t fret. It happens. I edit almost every photo, at least a little bit, after I pull them from my camera.

For food, there are a few specific controls that usually elevate the photo a bit more before I am ready to publish. I use Photoshop, but most of these are available universally across all photo editing programs, even on free apps for cell phones. So worst-case you can just transfer the files from your camera to your mobile device. If you see these controls, play around with them to learn what they do and how they make your photo better or worse.

Brightness/Contrast

This is pretty basic. It will make whites whiter and darks darker.

Shadow/Highlight Adjustments

The reverse here, this makes darks lighter and whites darker. Sometimes there is detail in those shadows and highlights that you want to bring out.

Structure/Detail

Similar to sharpness, this will make details and grain or texture stand out better as you add more, but don’t go too far or else it will look like shit.

Further Color/White Balance Adjustments

Sometimes you just need to tweak the color and white balance some more, even after following all the guidelines I outlined above. Warmth or coolness can add mood, and with these editing controls you can even create cool shit like vintage effects as well.

SUMMARY

Taking good photos is NOT easy. That’s why us real photographers get so pissed off when people say some bullshit like this:

“Oh wow! Your camera takes great pictures. What kind of camera are you using? I wish I had a good camera so I could take good pictures.”

Fuck you. As if spending money on a good camera means you will have better a photography portfolio… Nope. It doesn’t work like that. Some of my best photos come from an old camera that I wouldn’t be able to sell for $50 right now on Craigslist.

Photography is a weird mix of art, skill and science. The science parts are the camera optics that are made by genius engineers. Learning how to use the camera properly is like developing and honing any other skill. It takes practice, patience and dedication, like martial arts. And knowing how to achieve the desired image that you have in your mind to convey a mood or feeling to a viewer is where the art aspect comes into play.

As I said above, anyone can take a technically good photo. But not everyone can make it art. Now, I’m not saying that all of my photos are “art.” That would be ridiculous; especially in the world of food photography. Many are just a more appealing documentations of the meal. The real artists in the food photography world, in my opinion, are the ones cooking the food and composing the plates.

Lastly, don’t be dissuaded by this info if it seems daunting. Keep at it. Read it again and again. Eventually the mechanics of camera operation will all sink in and click for you. After that, you’re set.

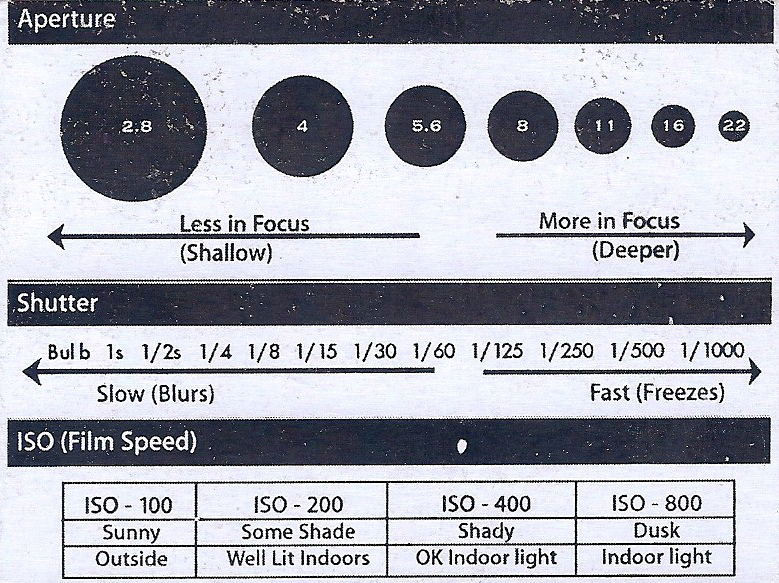
If you want, feel free to take this handy tip card:

Camera Basics Card

And print this 18% grey card from a black and white printer to hold you over until you get an actual card:

18 grey

Grass v. Grain

All cattle are grass fed. The difference is how they’re “finished” before they go off to be slaughtered into burgers and steaks. “Grass-finished” means they continue to eat grass until the day they die. “Grain-finished” means they get a mix of grains to fatten them up quicker before they are consumed. This “finishing” period lasts a few months, from what I understand.

Typically, a farm or feed yard won’t send an animal off to slaughter until it reaches a certain weight, that way the producer can pull the most value out of the animal. More pounds = more money.

As you might guess, it takes much longer for an animal to get big enough to go to market if it eats nothing but grass. Thus, the grass-finished animal that you see at the market or butcher was older and leaner when it was slaughtered. Older animals produce a darker red meat color in the muscle, with much less marbling within. This can lead to a more tough end product.

DSC04741

Grain finishing allows the fattening process to happen faster, which means the consumer is eating a younger animal. Don’t get all weepy-eyed about the ages of the animals either. Grain-finished animals aren’t babies; they’re 1400 pounds! Besides, eating older animals means you are generally eating tougher meat, potentially from an animal that may have been exposed to more illnesses during it’s lifetime. So young is good. And since grain imparts more fat, the meat is generally more tender and has more marbling. That translates directly into flavor for the consumer.

Depending on what you’re looking for from your beef, you’ll have to decide if grain-finished is your thing, or if you prefer grass-finished. Some people who are concerned about fat content (the difference isn’t huge, by the way), or who like some game flavor, may lean towards grass-finished beef. If you’re like me, however, flavor and tenderness rule the day. That means you should avoid grass-finished and stick to grain.

I find grass-finished beef more difficult to cook properly (it cooks faster). Also, the small difference in fat content isn’t going to stop you from being a fat fuck if you are an over-eater who doesn’t exercise or eat a balanced diet.

Grass-finished animals produce meat which also contains more Omega fatty acids Conjugated Lineolic Acid (CLA). This has been linked to long term weight management, and is thought to have health benefits that help combat a host of diseases, including cancer and heart disease. You just have to be careful with some of the research here, as many proponents of the grass-fed trend are very quick to bash anything that has to do with grain feeding without having the full picture. While I generally don’t particularly fancy the flavor of grass fed beef, the nutritional benefit of CLA is something to consider, and it just further strengthens the argument for consuming beef.

One caveat to this Omega business: The difference in content between grass and grain -finished beef isn’t really big enough to justify excluding grain-finished beef from your diet. If Omegas are what you’re after, maybe work some salmon into your diet, as that seems to contain more. But don’t forget to eat that yummy and nutritious beef either!

One final tip I’ll give is this: If you’re cooking or ordering a grass-finished steak, cook it or order it one temperature step less than you normally prefer, to preserve some nicer texture. If you typically order medium rare, then go with rare.