This year, I kept it pretty simple at the New York City Wine & Food Festival. Instead of snapping a billion photos, I only whipped out the camera for a few items that I wanted to remember in particular. I do wish I recorded some video of the kitchen staging tour we got behind the scenes of some of the ShopRite booths. But anyway, three pics. First, a mountain of beef bones that served as a stage for holding baked clams.
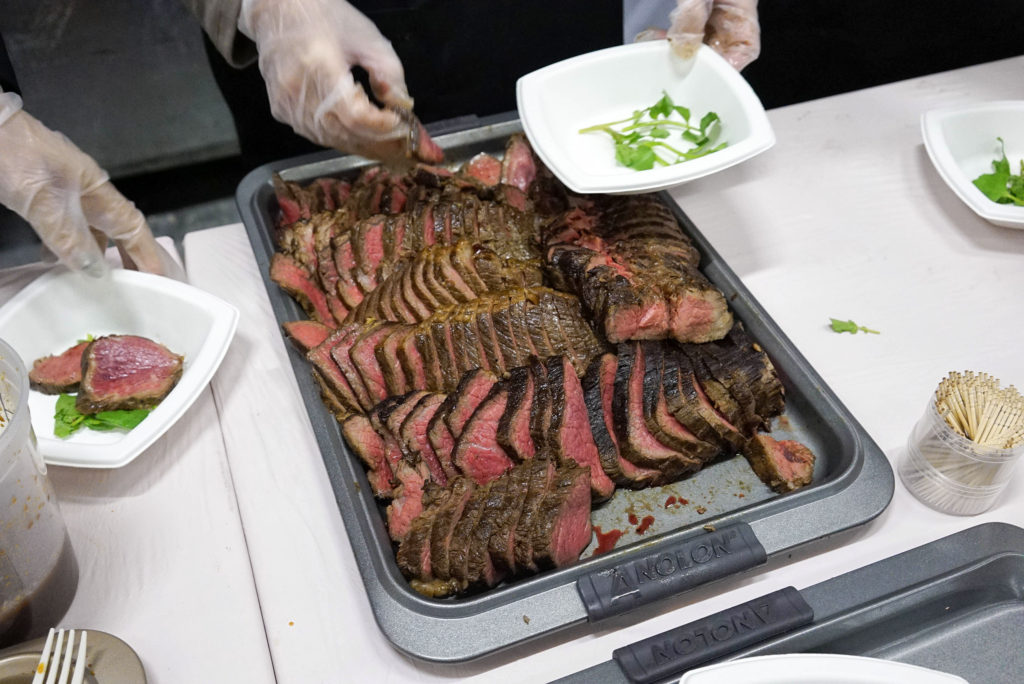
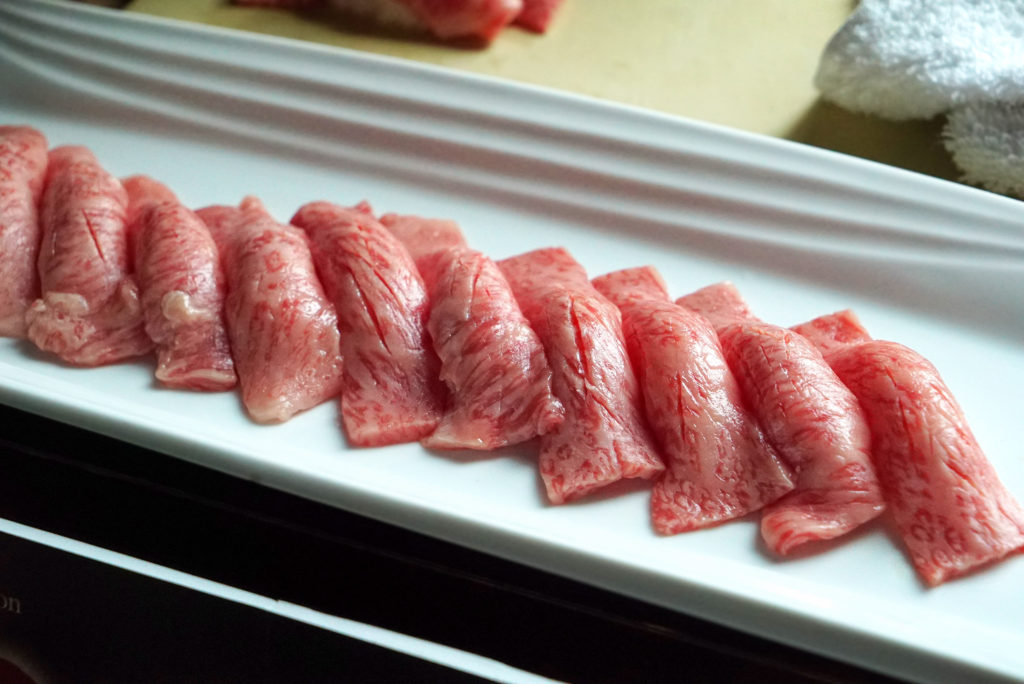
Next, wagyu beef. This was a tray of rump roast.
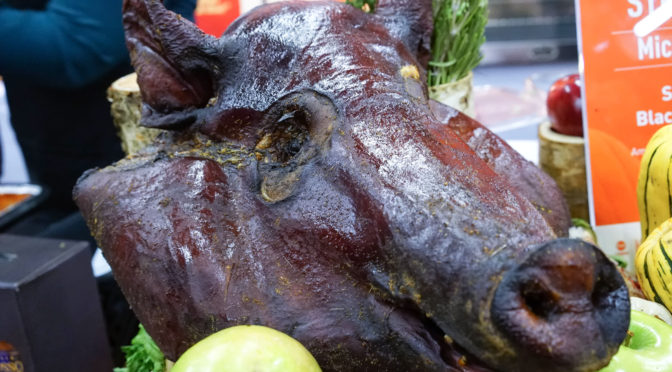
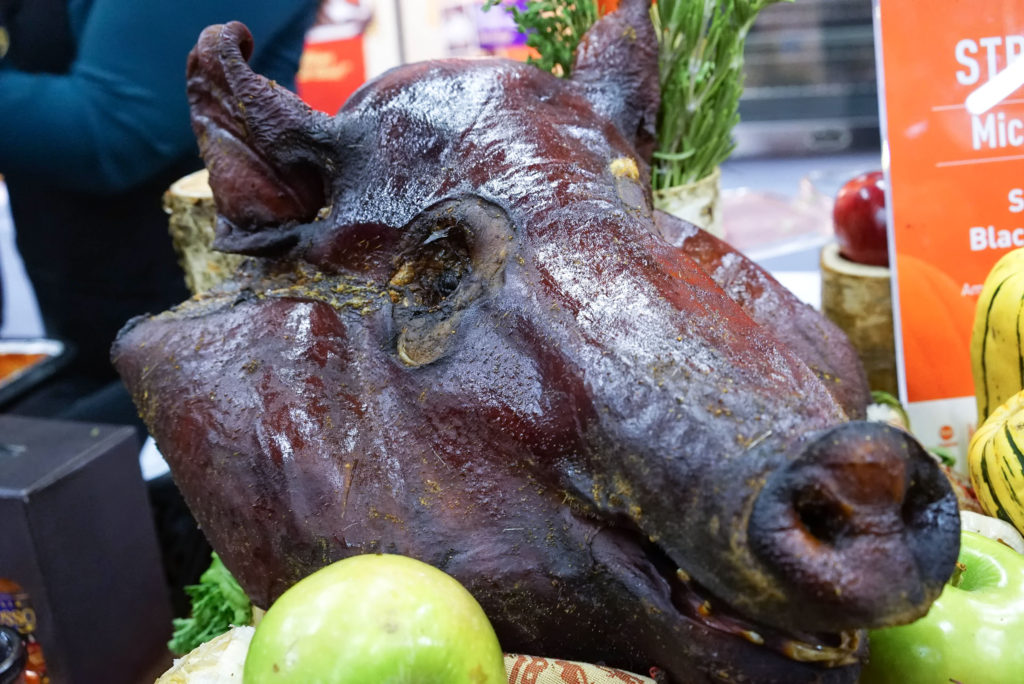
And finally, Strip House’s table had these awesome pig heads on display, where they were serving delicious bacon with fresh apple.
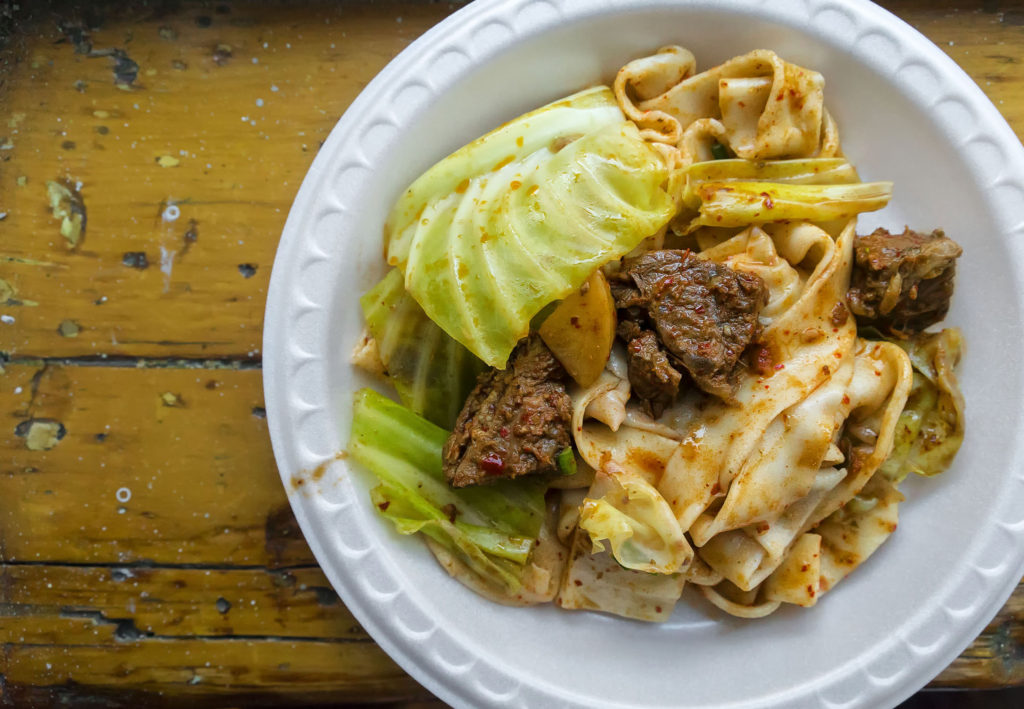
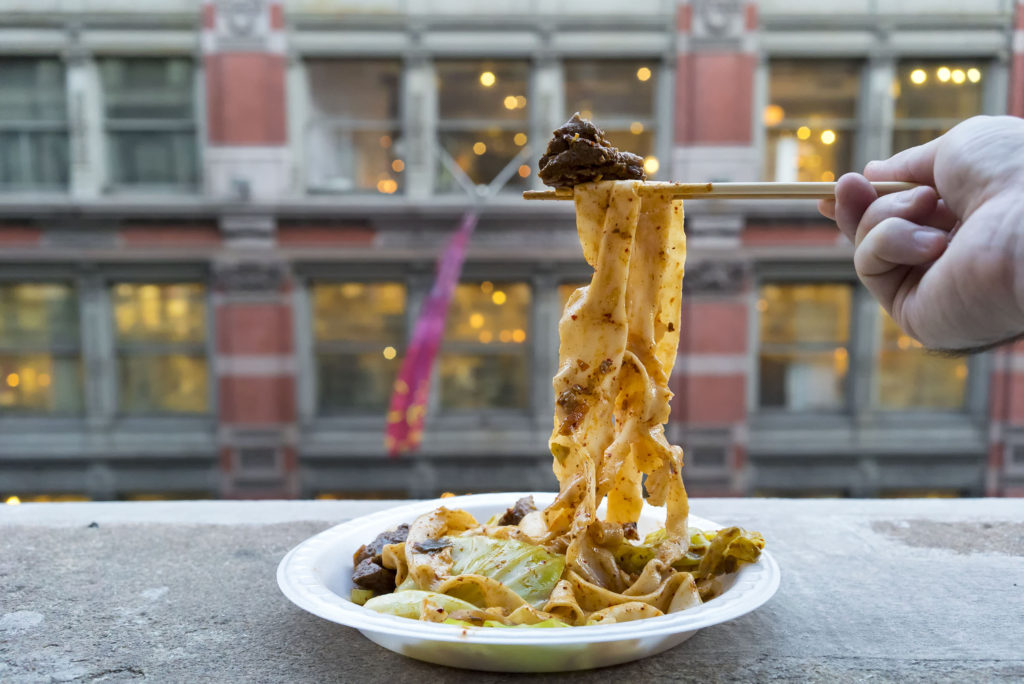
My buddy scored some tickets to this cool Xian Foods noodle pulling class at the New York City Wine & Food Festival, and he was kind enough to bring me along.
Basically, they taught us how to make dough, and then gave us some pre-made dough and all the ingredients to make some delicious tingly beef noodles, which has become so popular at their restaurants. Here is the man behind the brand, along with some wheat flour noodle dough:
And here is a video of me pulling my noodle:
And then some all-important final photos, and behind the scenes action of us taking photos.
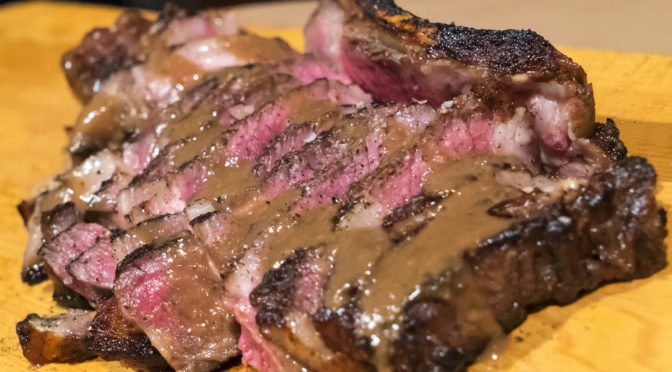
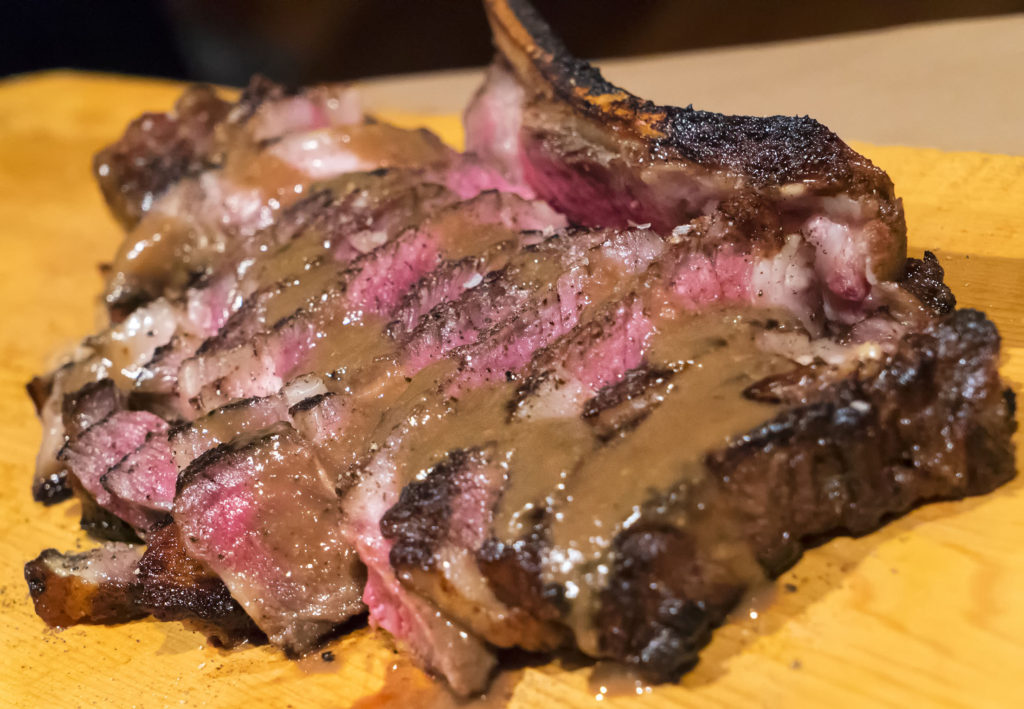
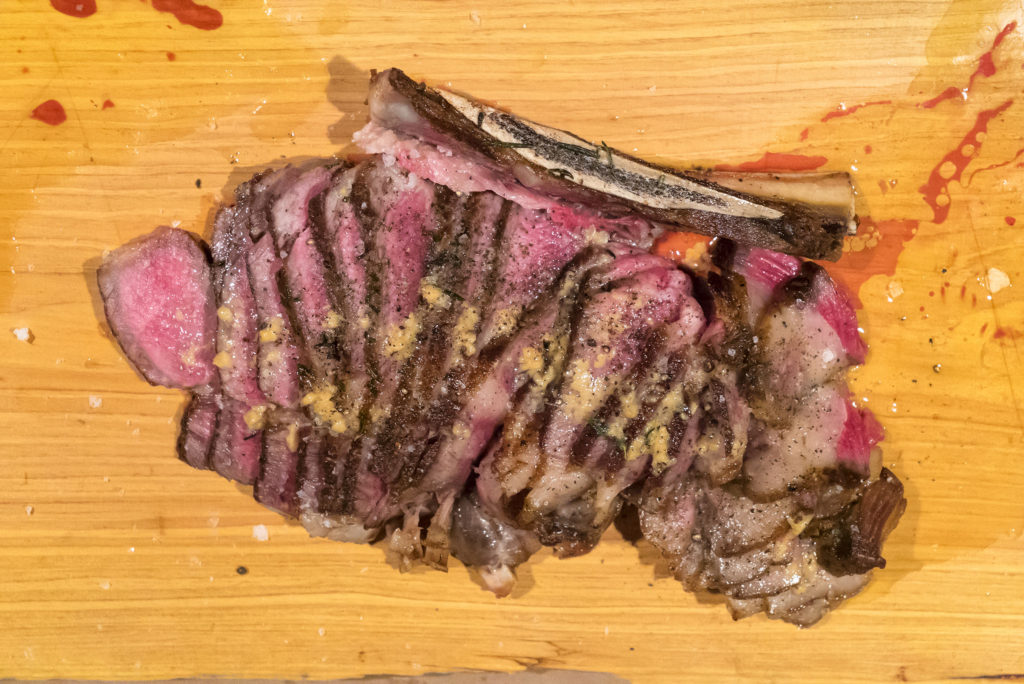
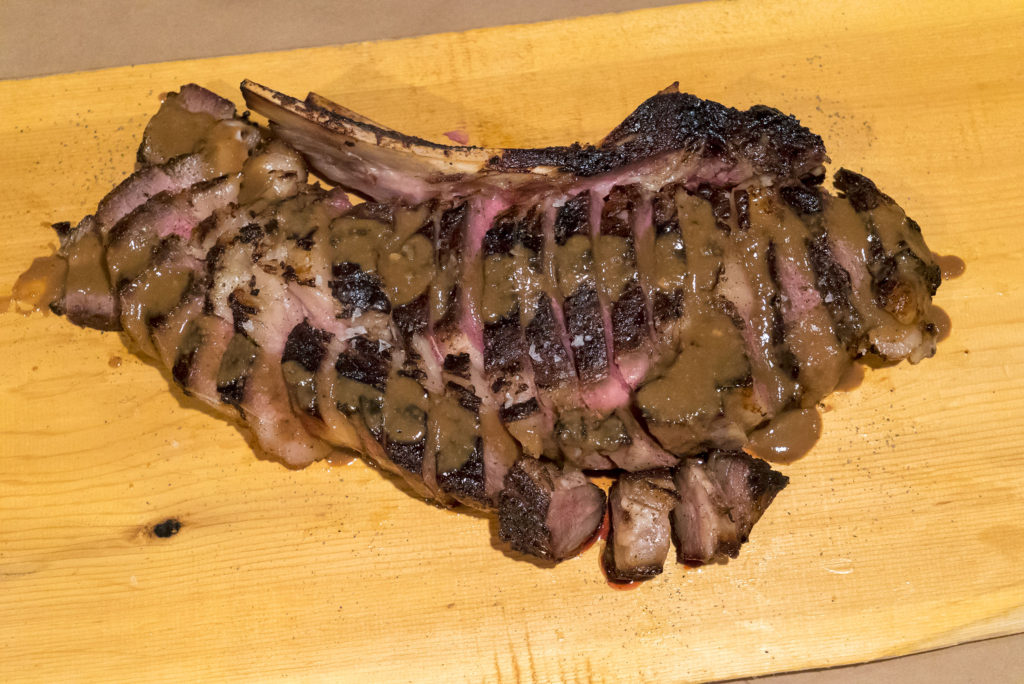
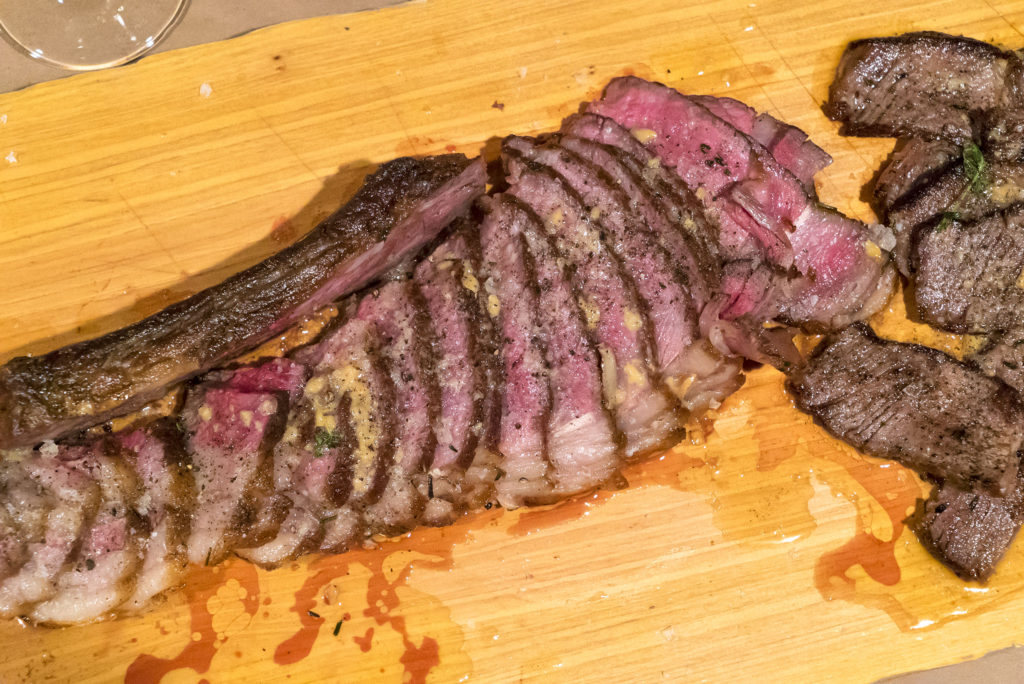
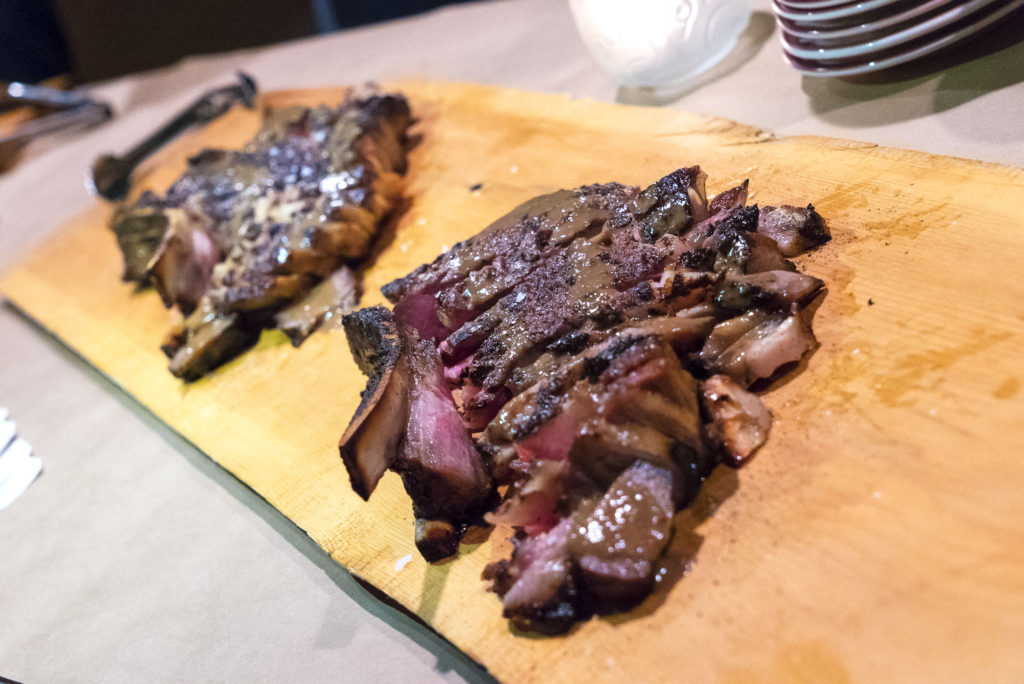
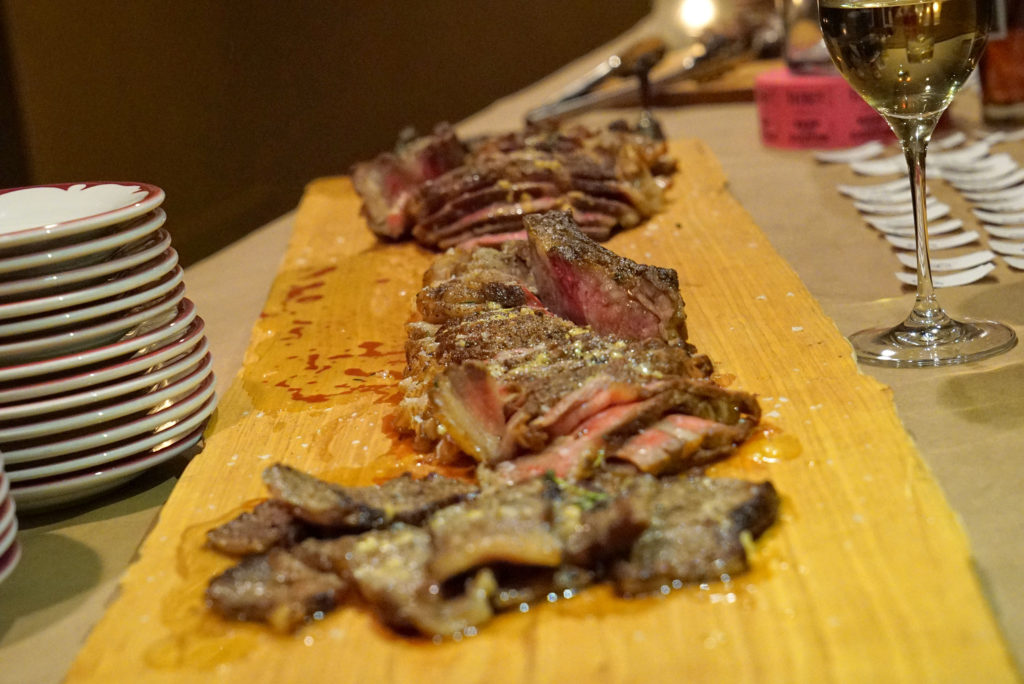
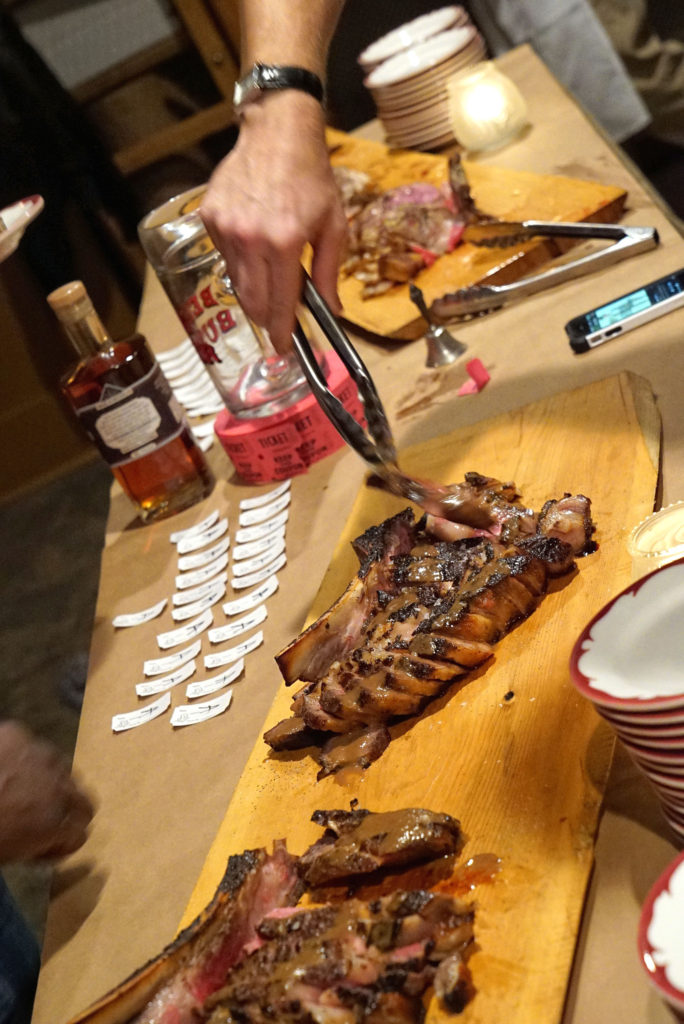
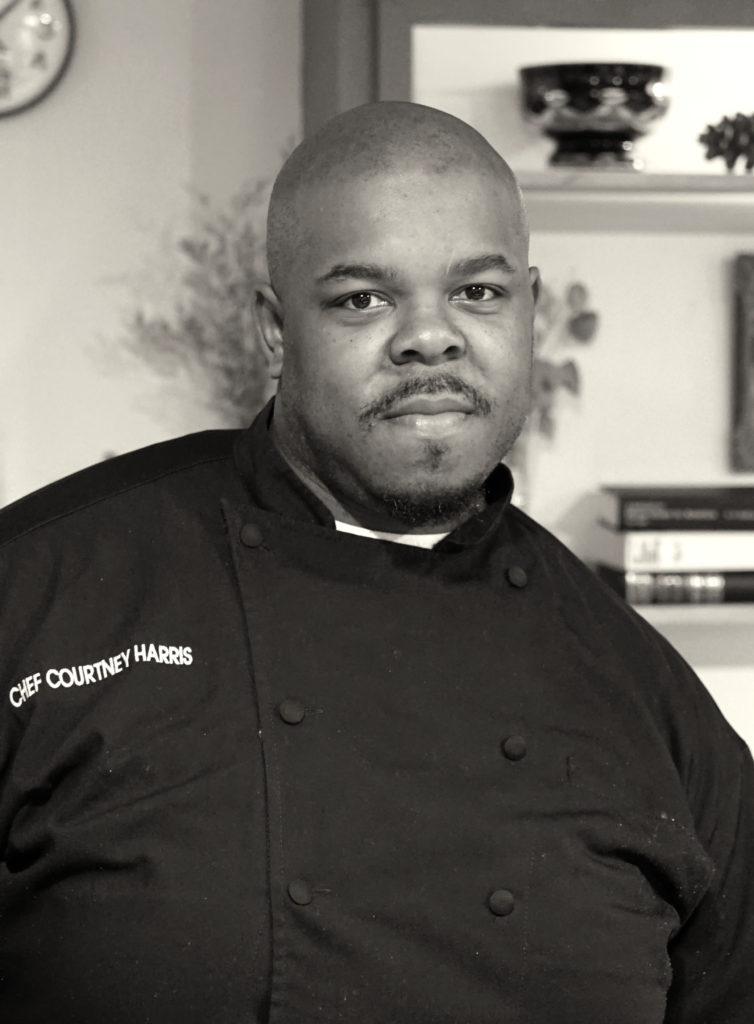
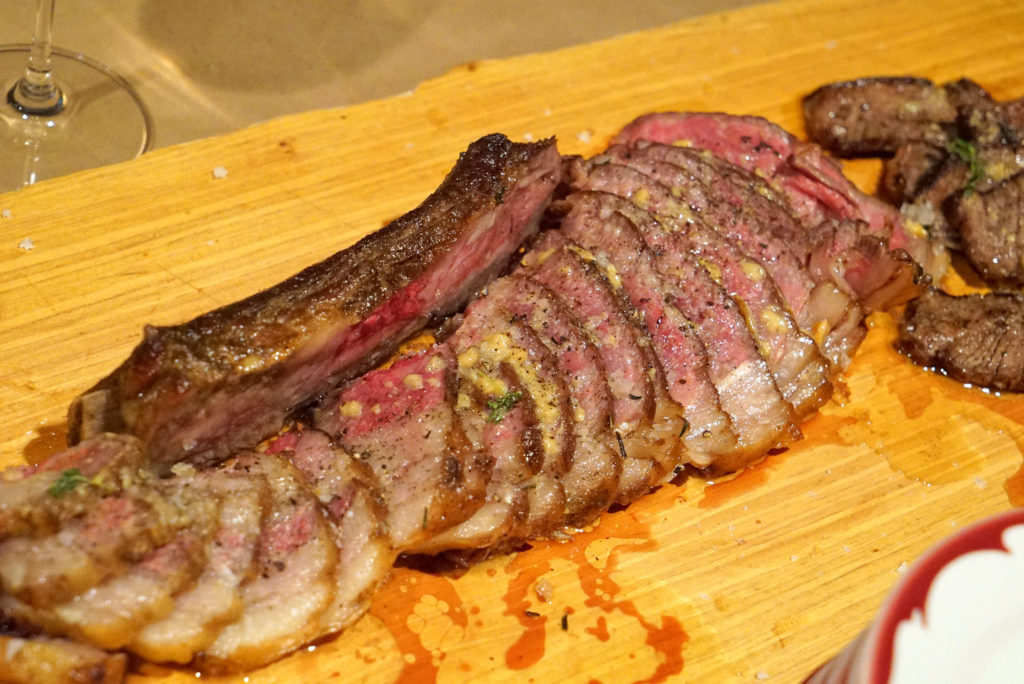
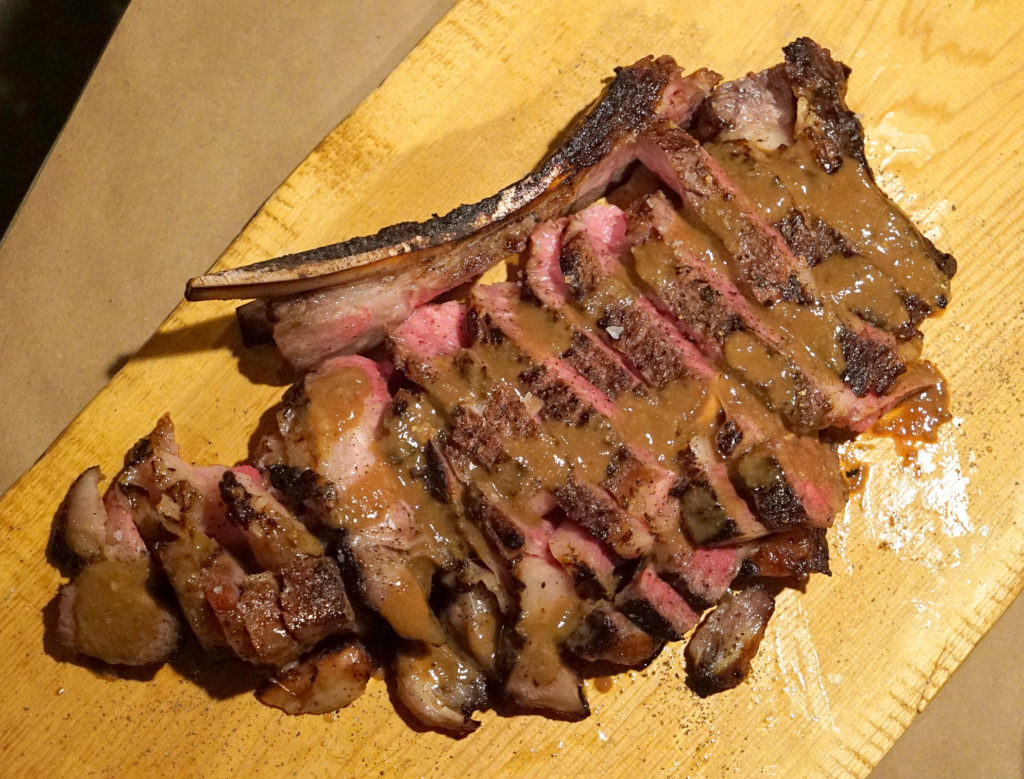
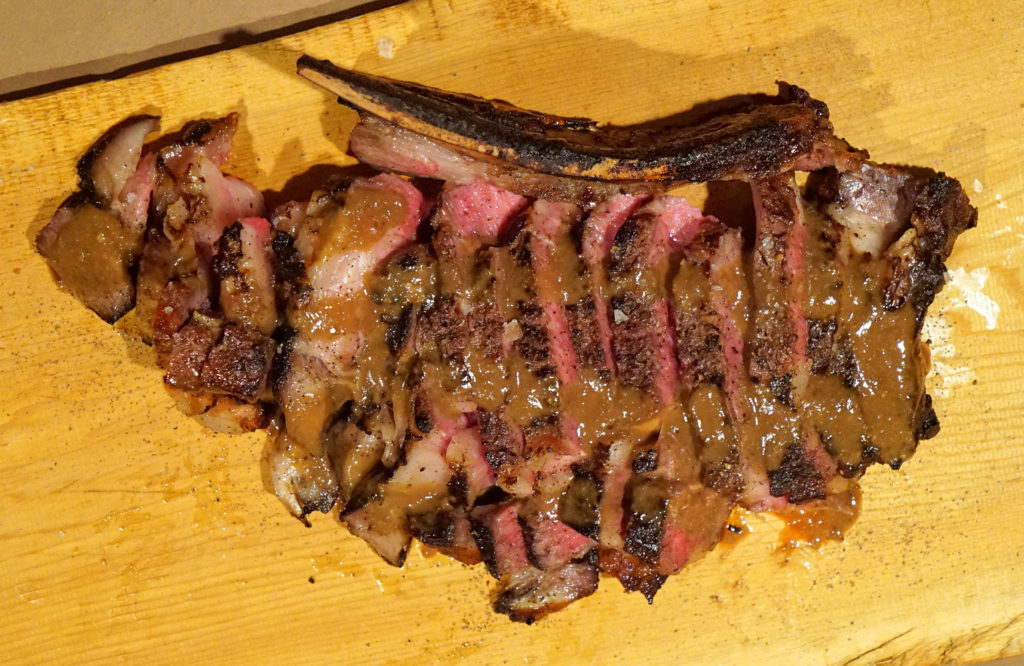
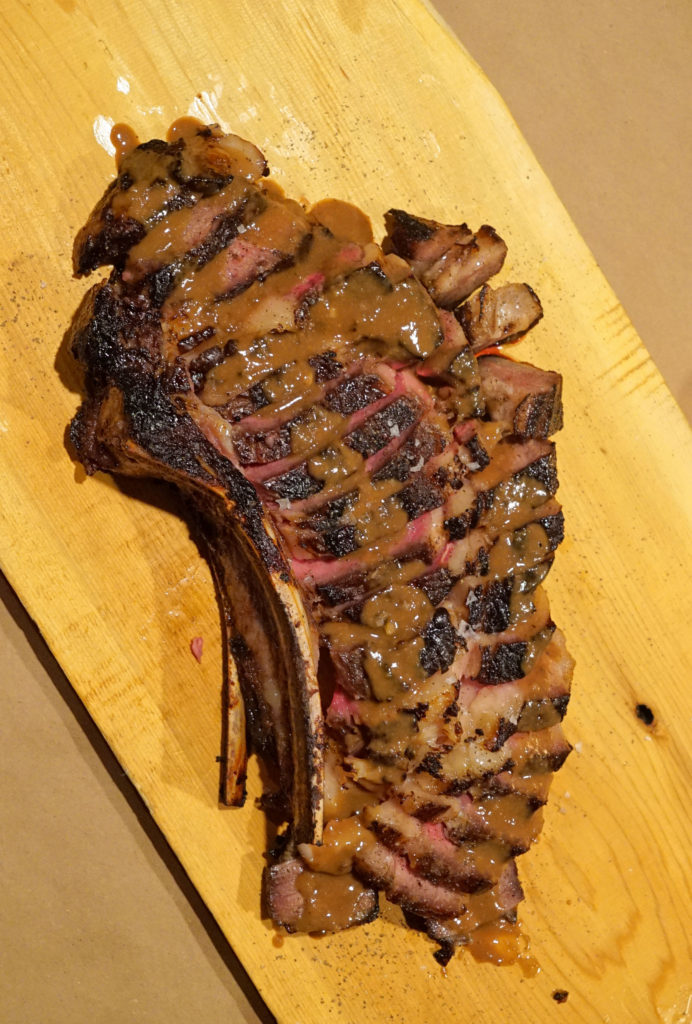
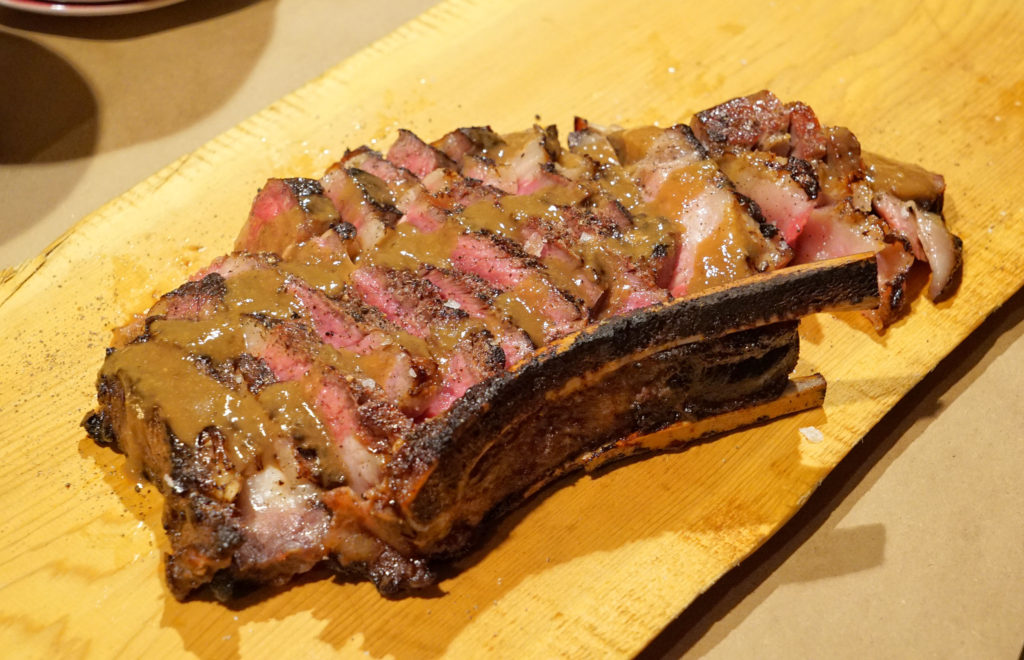
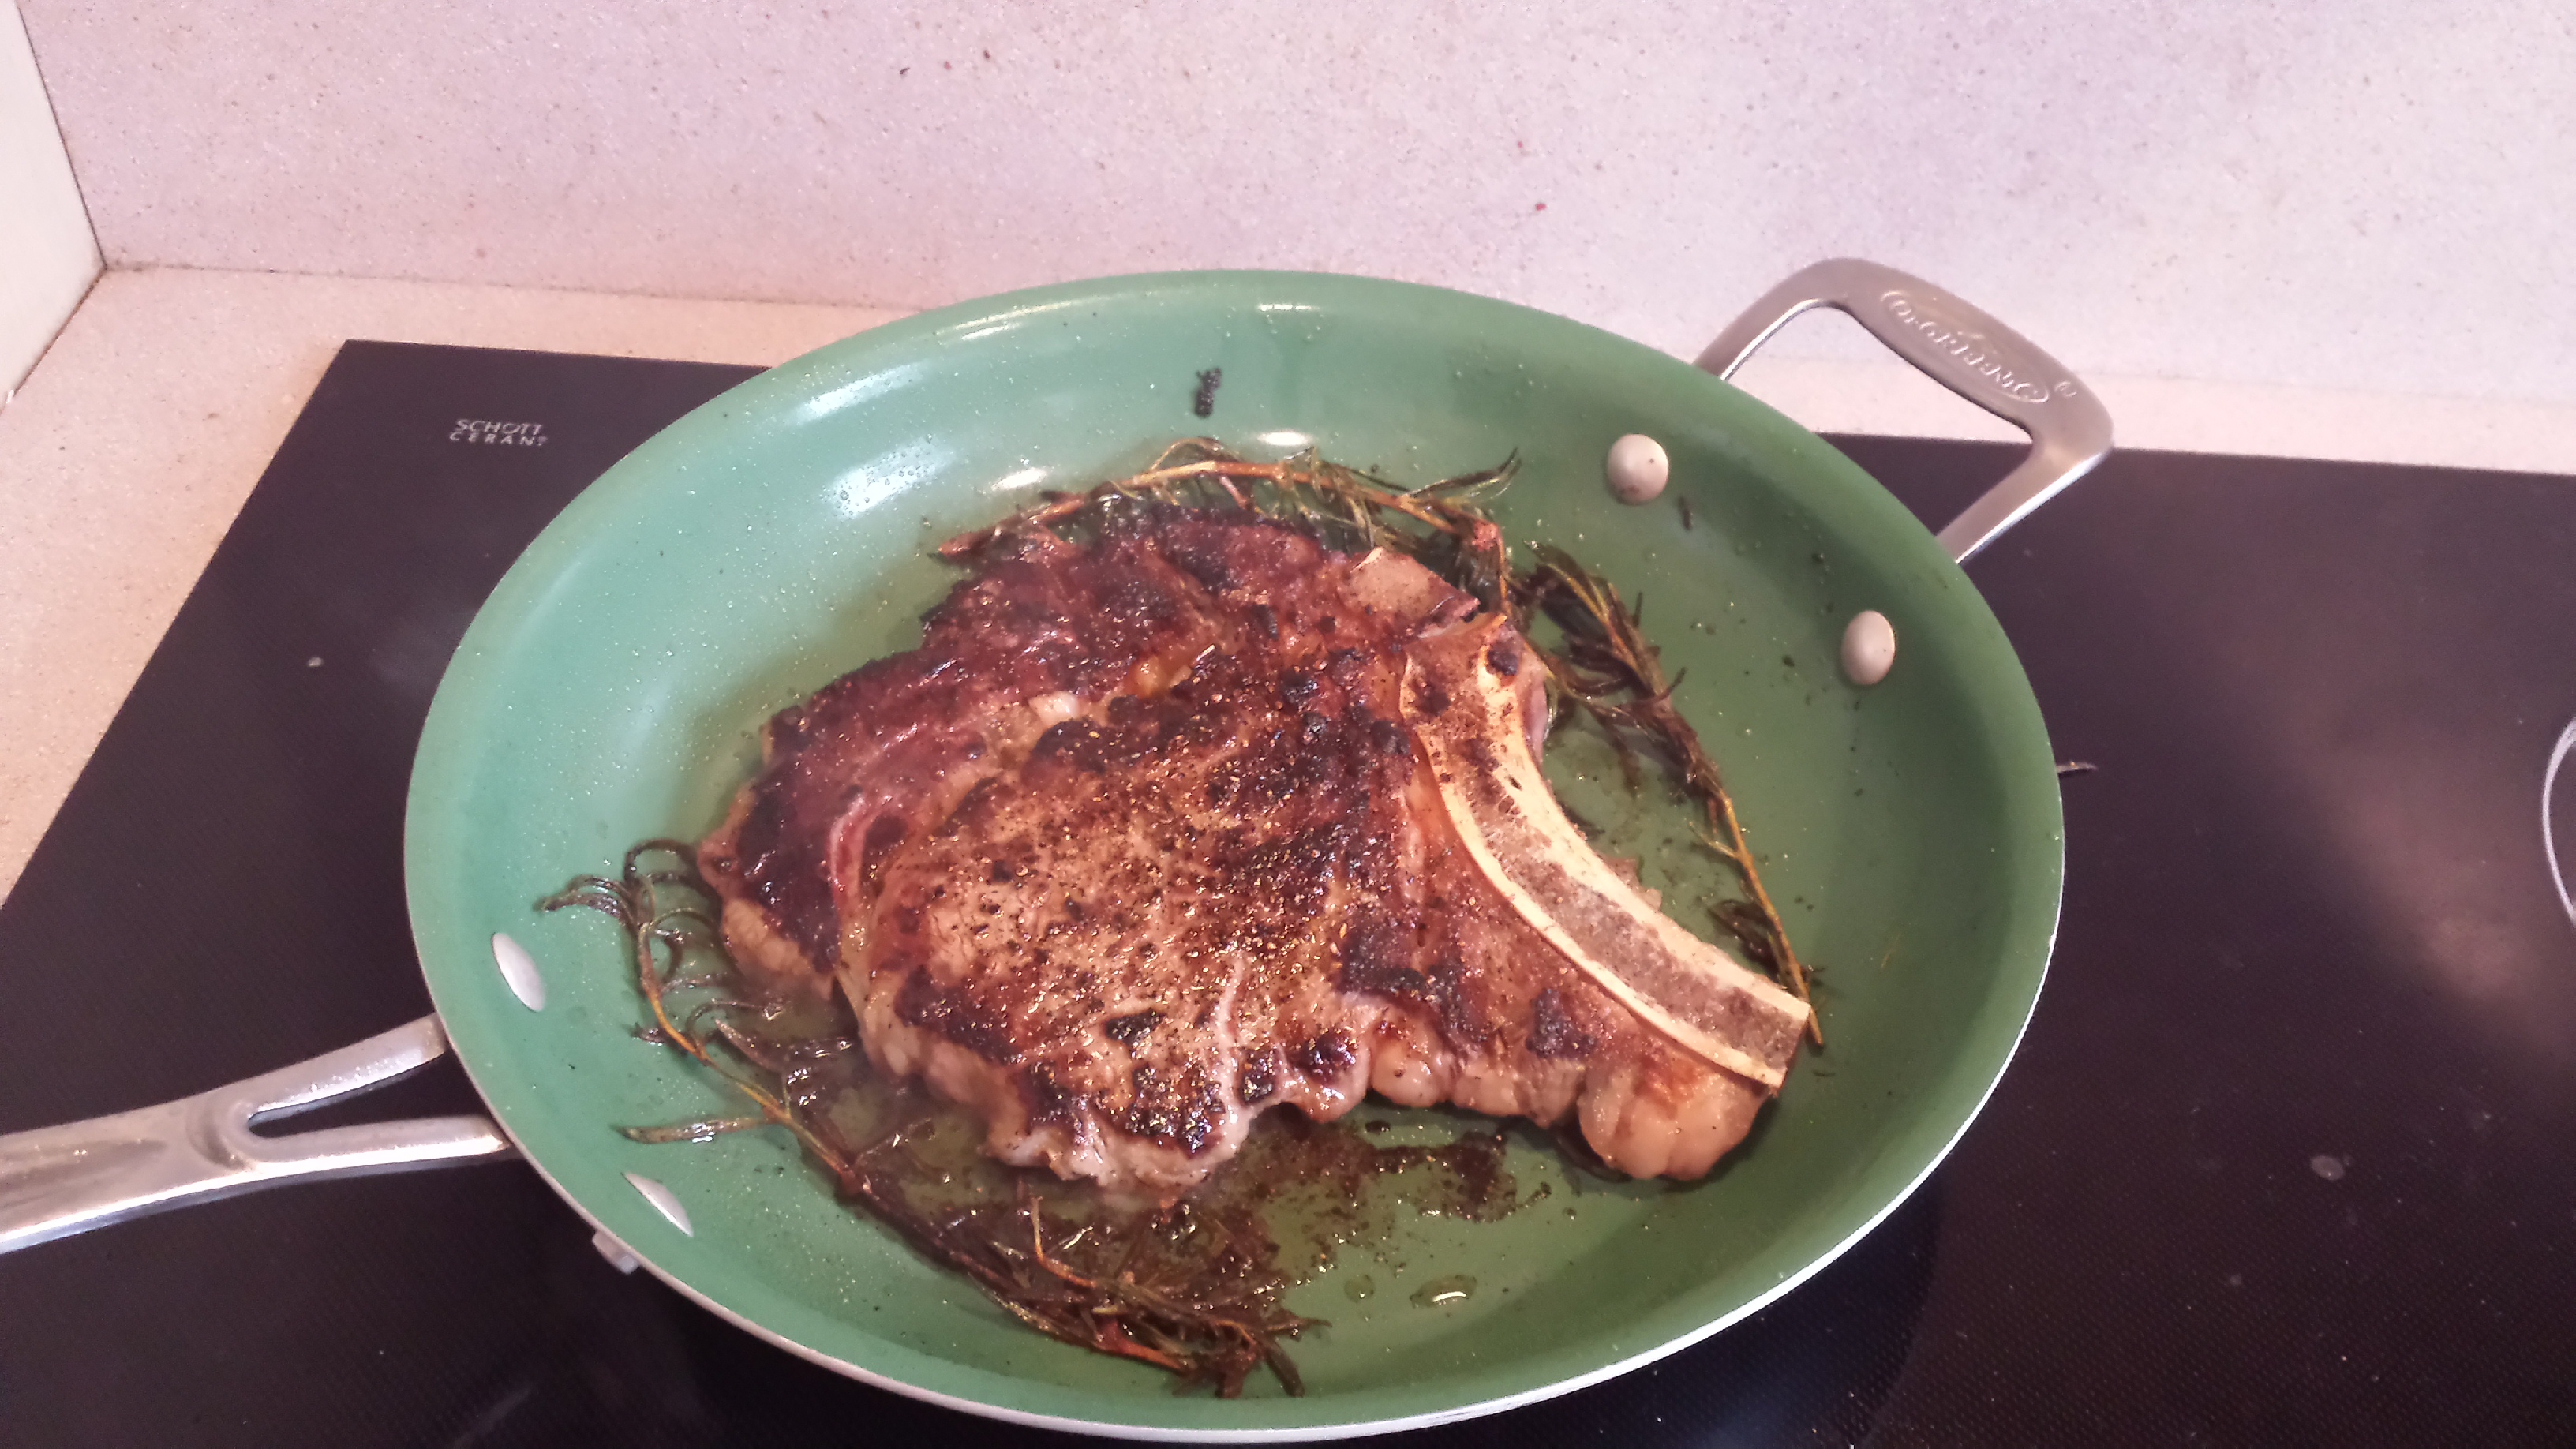
I was recently invited out to Humboldt & Jackson to judge round 11 of an ongoing, late night steak battle cooking competition, pitting Chef Courtney Harris of Chef RLI (defending champ) against Harry Rosenblum of The Brooklyn Kitchen (challenger). Both bovine brawlers were given two-bone rib eye steaks that had been dry aged for 60 days after being raised out on Niman Ranch.
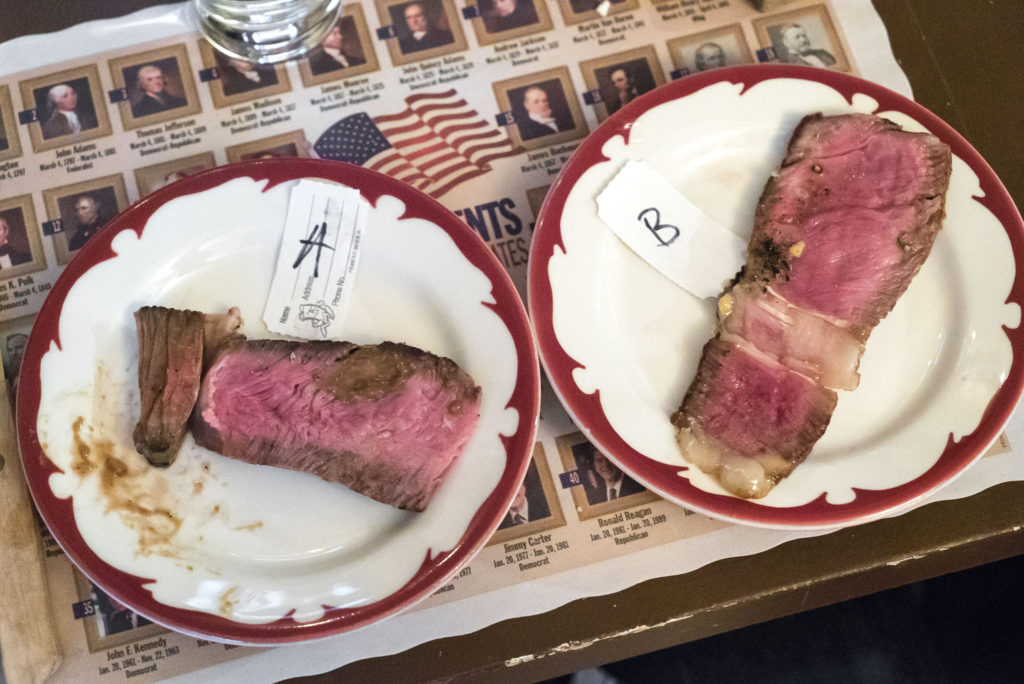
The chefs’ rules were simple: cook it and serve it however you want, to whatever temperature you want, to be judged blindly by 25 ravenous carnivores who lie in wait.
We cast our votes and the decision was made: steak B was the better of the two preparations. It turned out to be the nice, simple salt, pepper, garlic, thyme and rosemary preparation by Chef Courtney Harris that won the crowd over.
But that didn’t mean Harry Rosenblum’s steak was bad, by any means. In fact, I really liked the flavors he had going on. He took influence from Japanese preparations, where they use koji rice bacteria and fungus to mimic the dry aging process and flavors. It may sound nasty but it’s not. Check out my article here, where I mention koji toward the bottom. Anyway, he also used citrus like yuzu with miso and fermented bean pastes to make a dynamic sauce. I loved it, and, for me, the decision was tough between the two.
H&J is doing this for one more week before switching over to lamb battles. Be on the lookout for more!
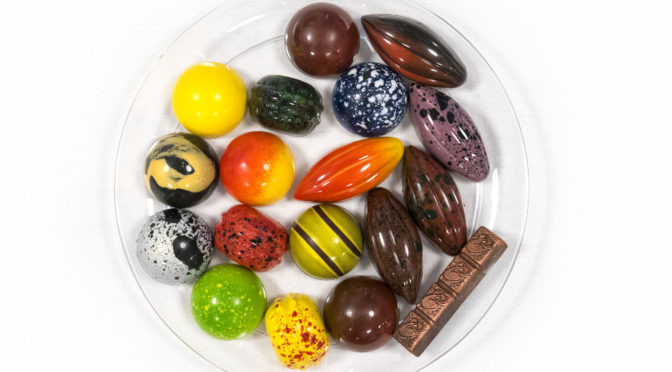
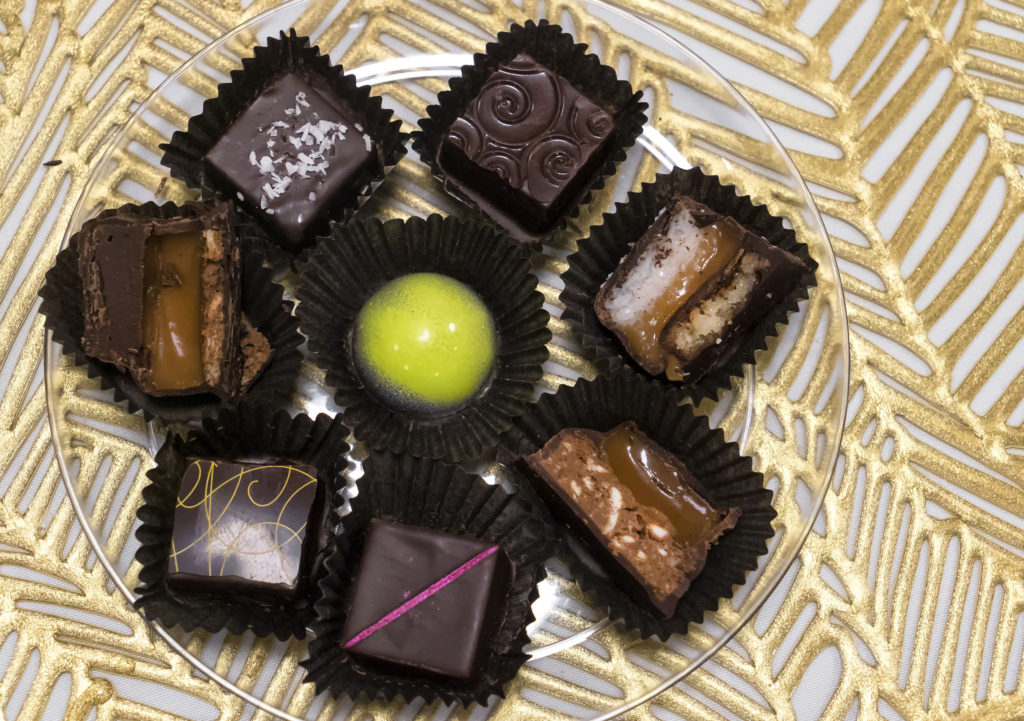
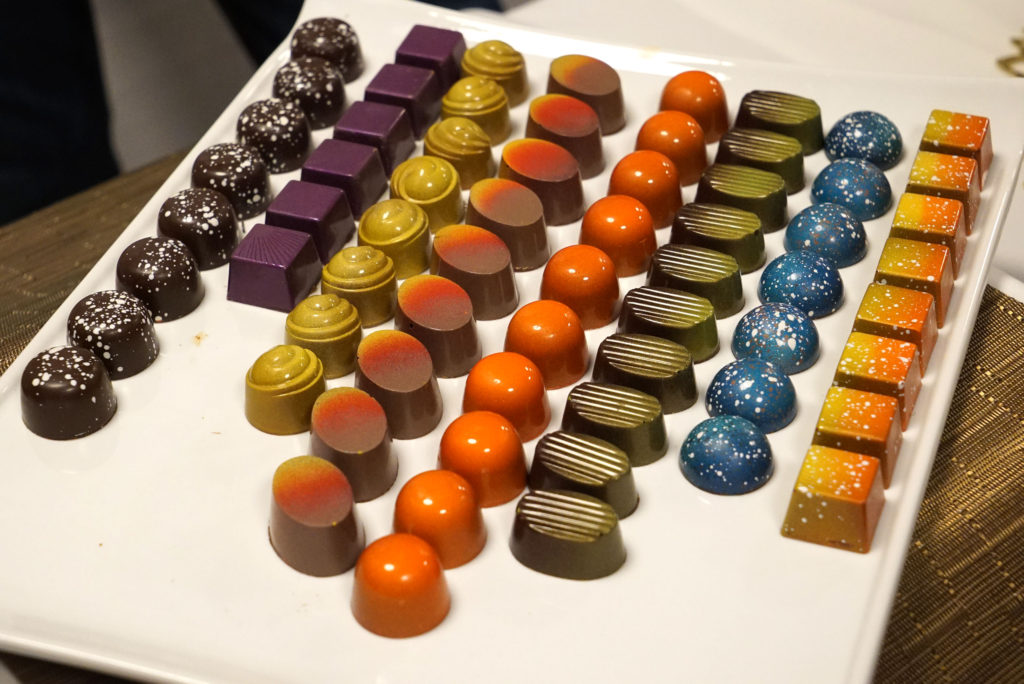
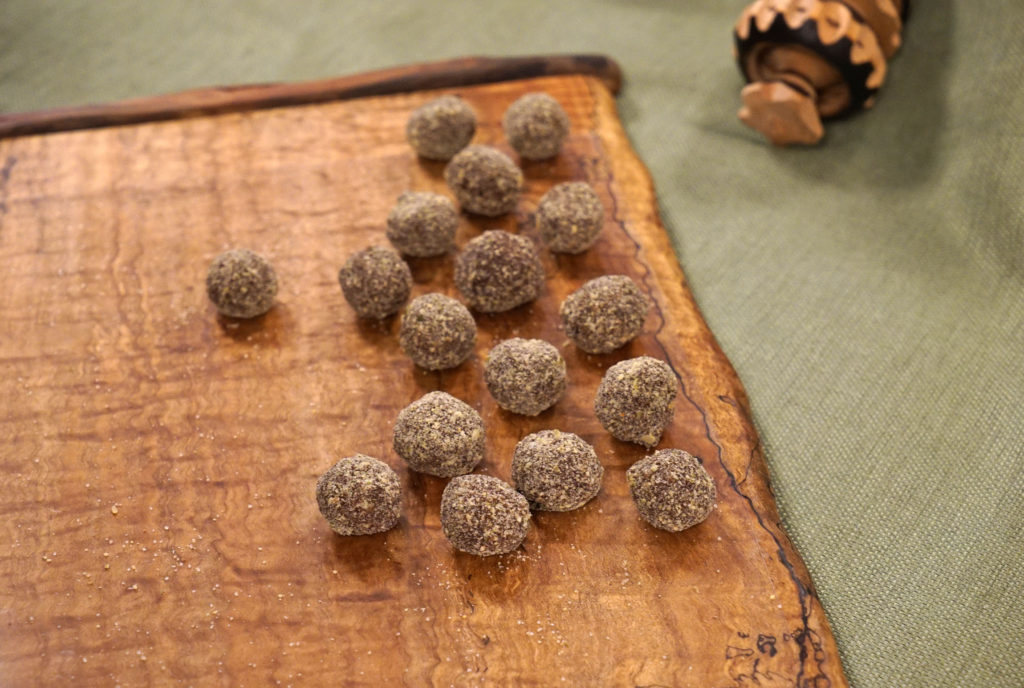
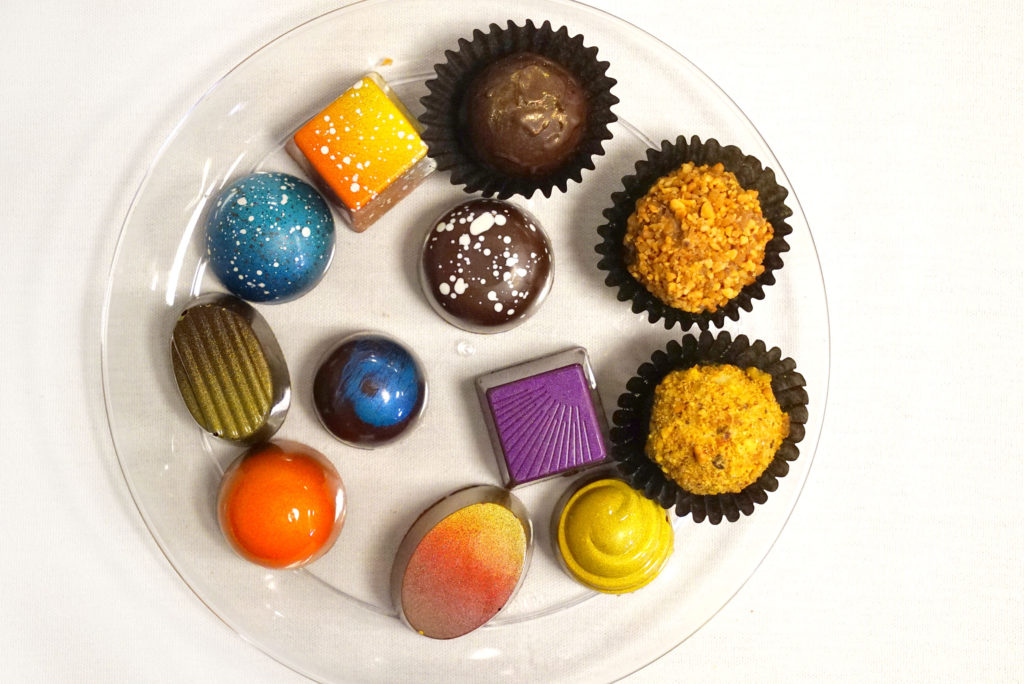
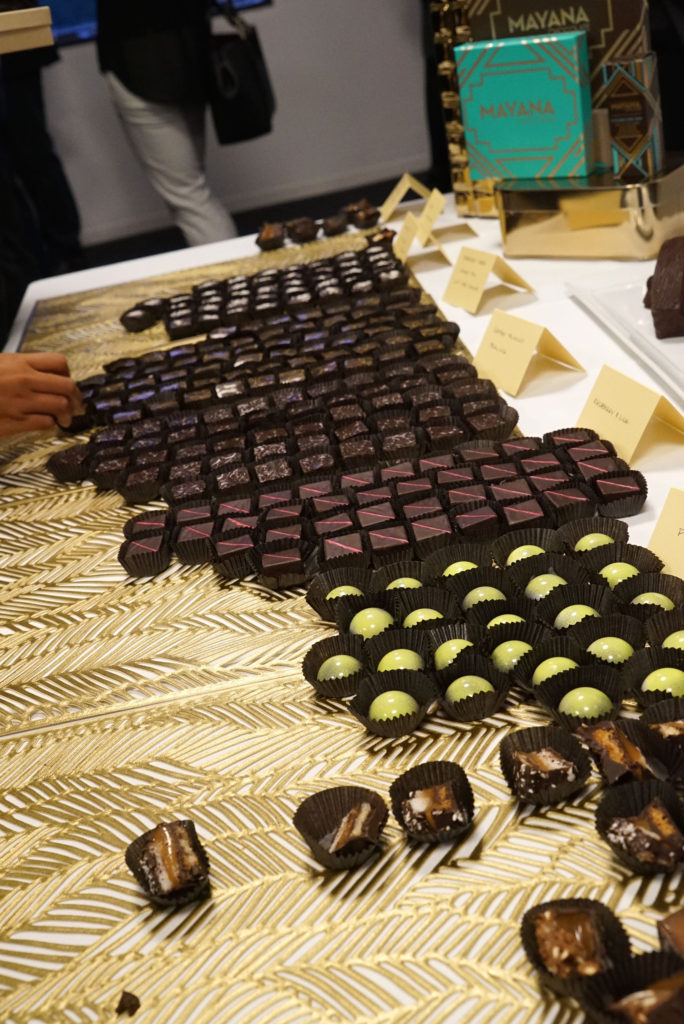
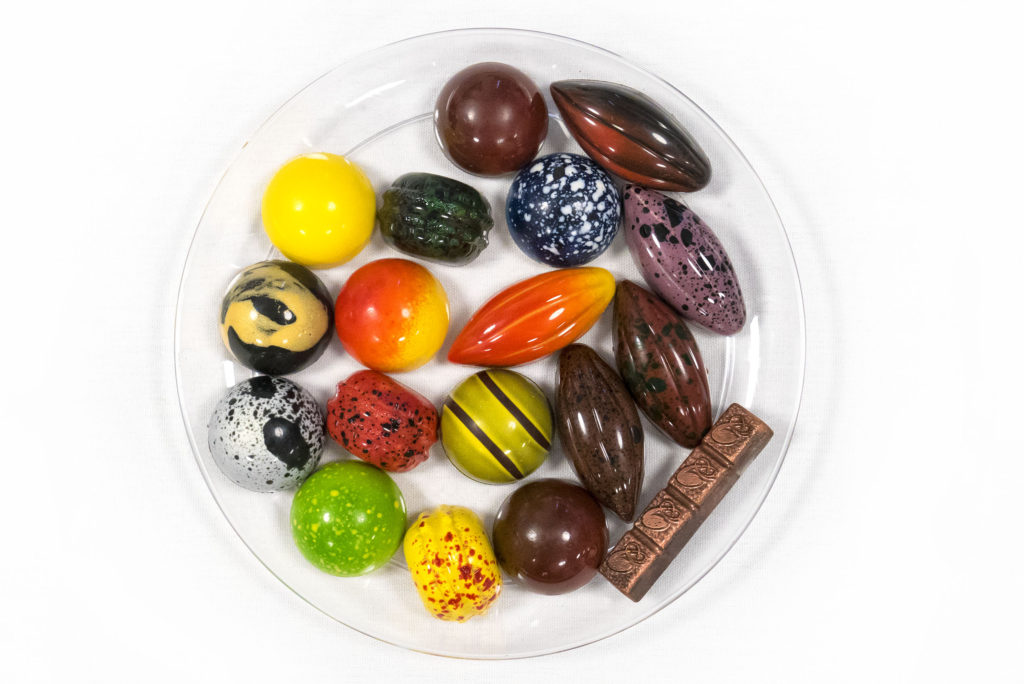
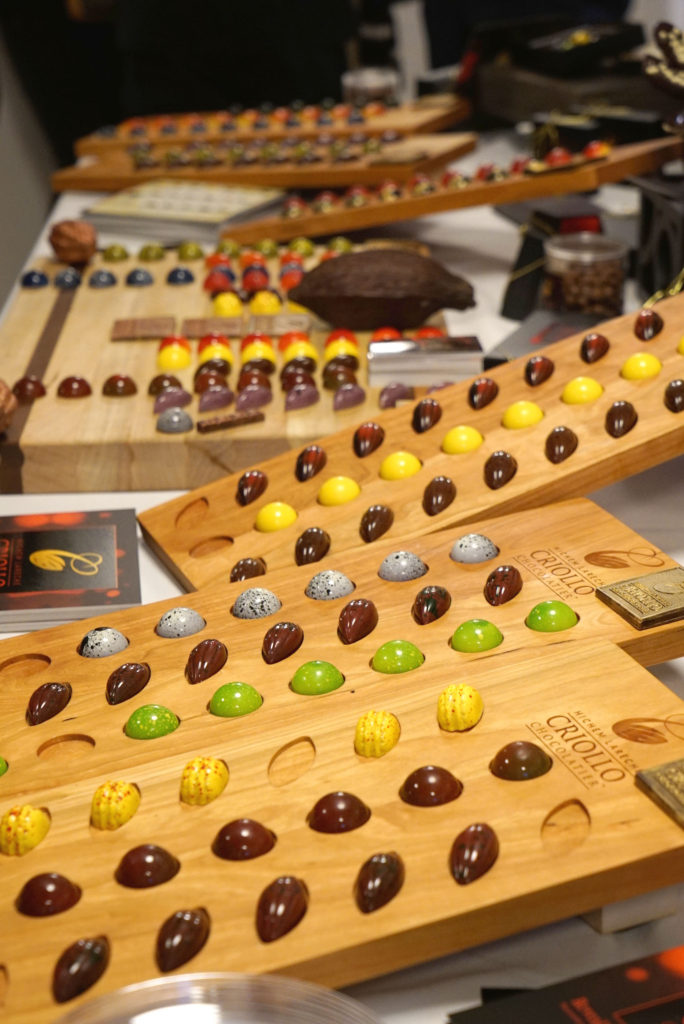
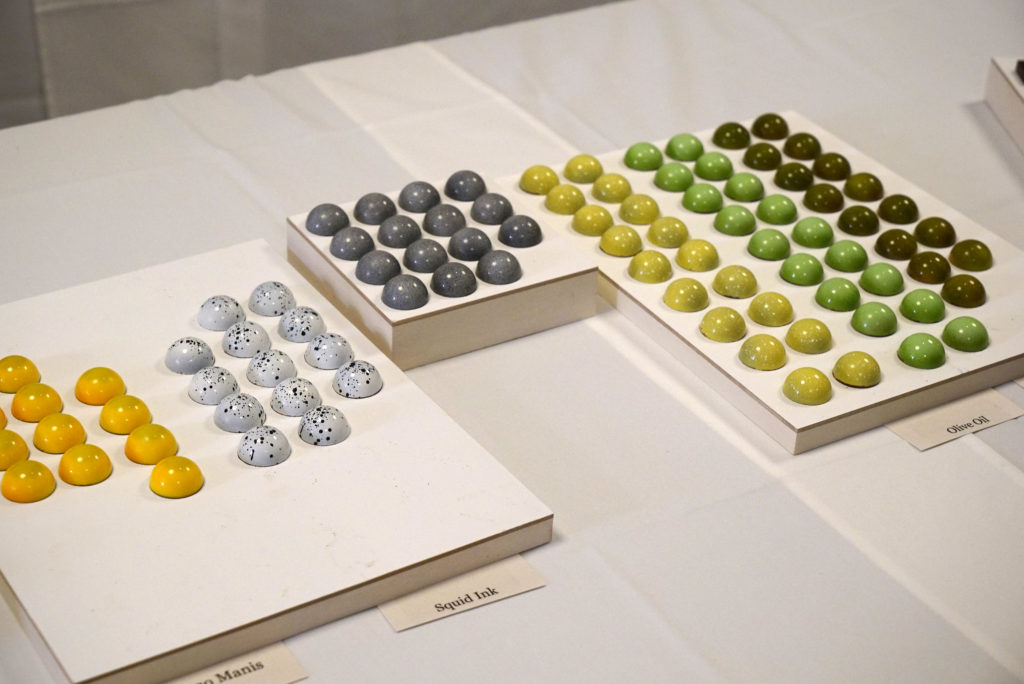
Dessert Professional Magazine held an event at ICE to honor the ten chocolatiers they recently named as the best in the country. This meant copious amounts of chocolates and along lasting sugar high for those of us that were tasting.
A few of the stand out items I tried were the candy bars, roguefort cheese, a squid ink, sesame, Vietnamese iced coffee, ghost pepper and pumpkin chocolates. In reality, everything was amazing. I mean we are talking about the country’s ten best chocolate purveyors, one of whom was the famous Jacques Torres. Take a look at all this chocolate!
Before we get further into the “meat” of these advocacy posts, it’s important to lay out a few basic terms and concepts that you might run into if you’re anywhere near the beef industry.
Animal Gender Terms
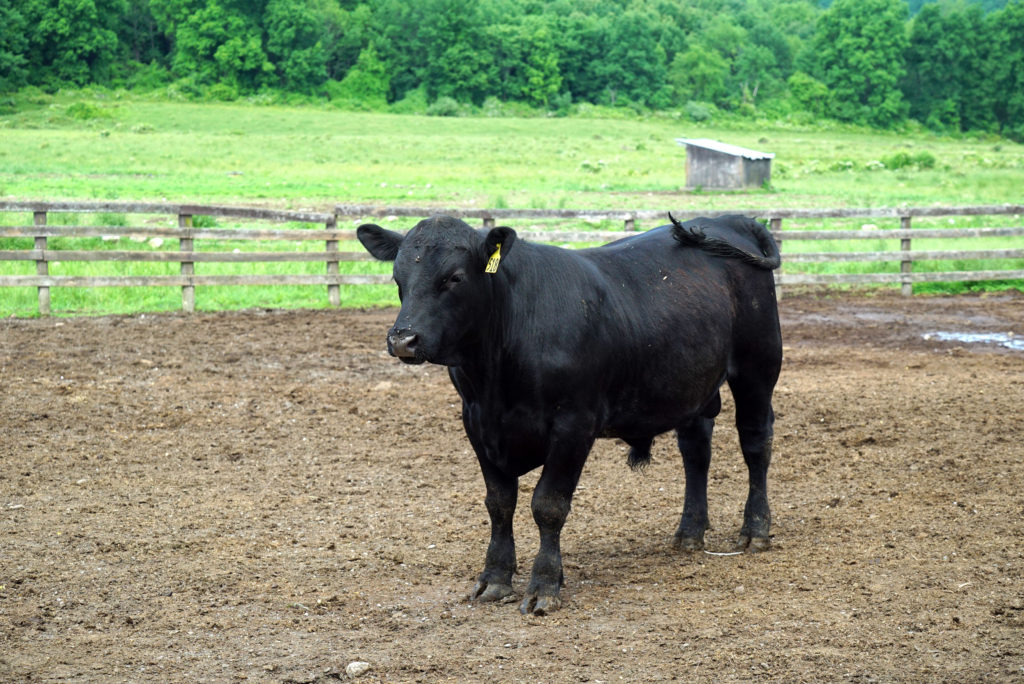
Heifer: A female that has never given birth to a calf. Cow: A female that has given birth to at least one calf. Bull: An intact male that still has his family jewels. Steer: A castrated male.
Why do cattlemen castrate males? Well, it is one of three techniques used in herd management.
Herd Management Techniques
Castration: Cutting the gonads off a bull is done for two reasons: (1) to control temperament; and (2) to improve meat tenderness. This process lowers testosterone. By lowering testosterone, farmers can reduce animal aggression as well as meat toughness. Castration is normally done within the first three months of life.
De-Horning: Both males and females can grow horns unless they are genetically unable. By removing horns farmers can protect themselves and the herd from injury.
Branding: The reason farmers brand their animals is to keep better records of individual animals, and to protect and identify their herd in the open range or at the marketplace. In the old days, this would also deter cattle theft.
Generally, if things are timed correctly with calving season, these three herd management techniques are done all at once, in one quick procedure, which results in less stress for the animal.
Calving
Calves need colostrum, a nutrient-rich version of mother’s milk, because it’s packed with beneficial vitamins and natural immunizations. But after some time, it becomes prudent to ween them off their mother’s milk and send them out to eat in the pasture. In most cases it’s as easy as putting the calves on the other side of a split-rail fence from their mother; they will still be in contact with one another, but the calf will eat grass instead of milk.
Contrary to popular myths, calves are not born and then immediately rigged up to some bio-mechanical factory farm machine where they can’t move and are force-fed until the moment they are slaughtered. These are myths.
Animal Health
Just like humans, animals need help every so often to fight off a bug. When sick, their ears droop, they cough, have runny noses and they separate from the herd and go off by themselves. Some diseases can be avoided through the use of vaccines, and illnesses can be prevented and combated with the use of vitamins and antibiotics.
Beef Quality Assurance guidelines limit the location of vaccination shots so that the process doesn’t harm the meat by piercing valuable muscle groups. In addition, beef safety laws require no trace of the stuff to be present in meat prior to slaughter (you must wait a certain number of days before sending the animal to slaughter), and that little to no antibiotics that are given to the herd are in the same class as human medicines (to prevent a reduction in the effectiveness of antibiotics needed to treat human diseases).
Last, grain finishing allows for the animals to go off to slaughter sooner, when the animals are healthier and younger than grass finished animals.
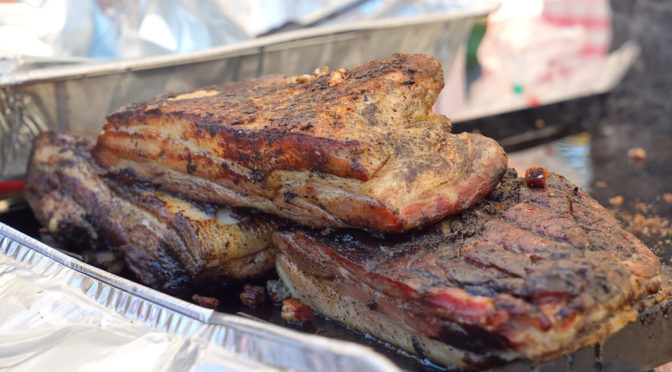
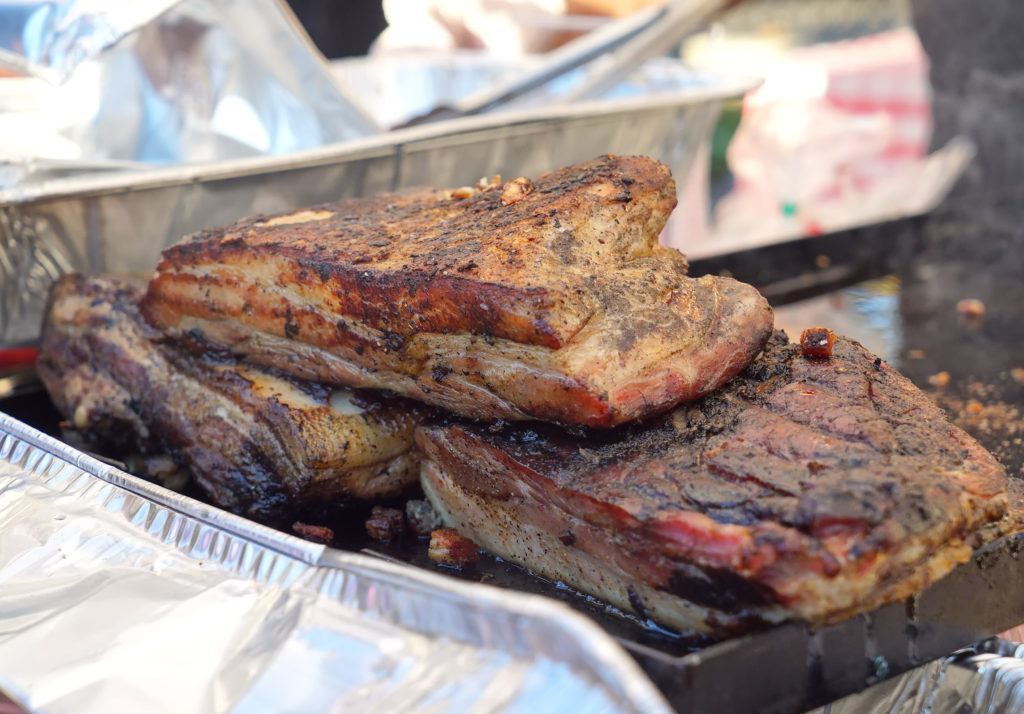
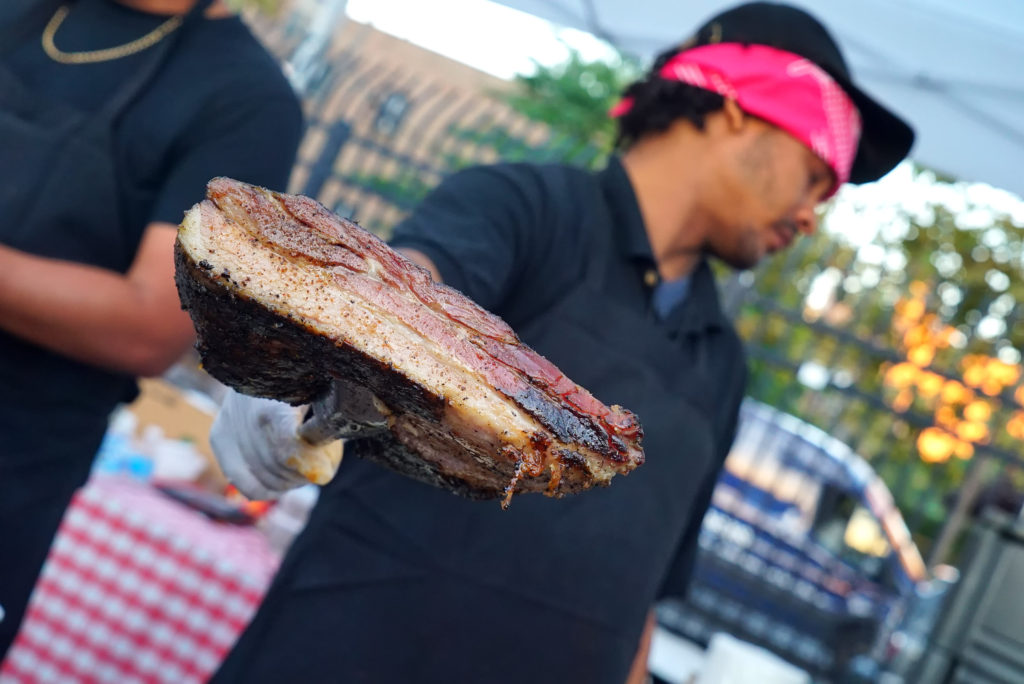
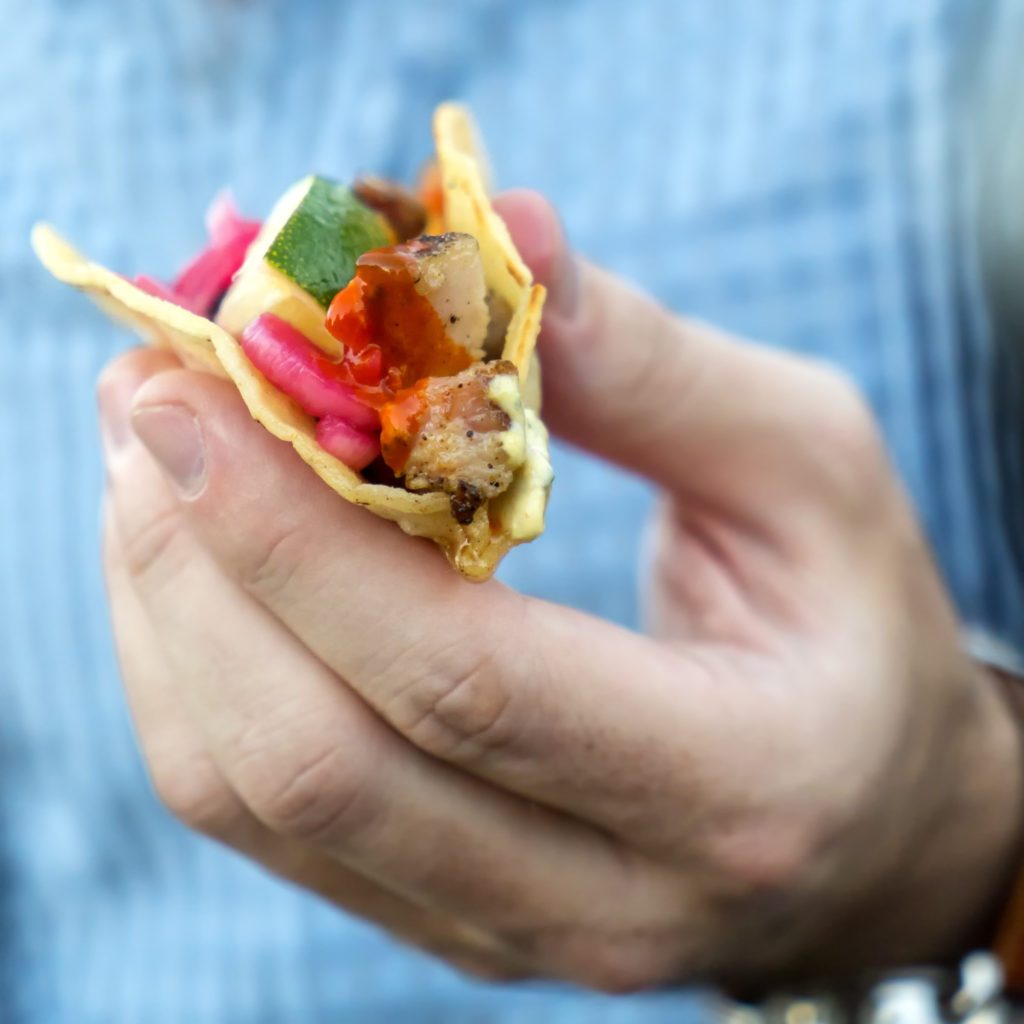
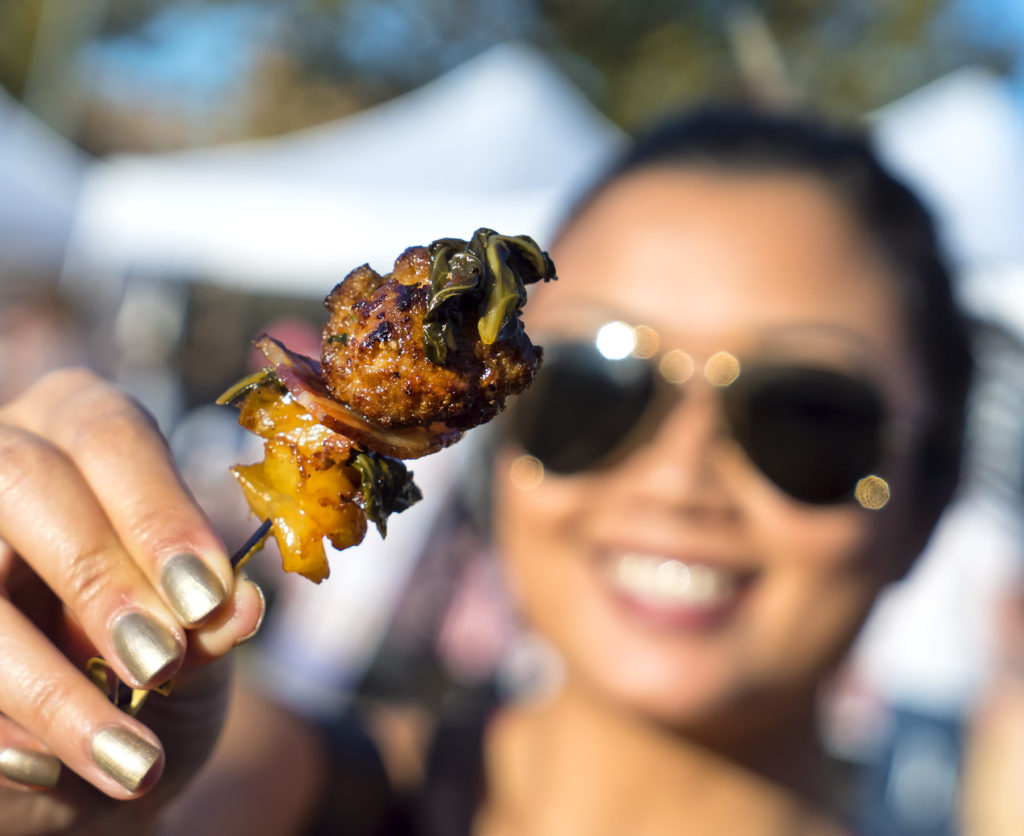
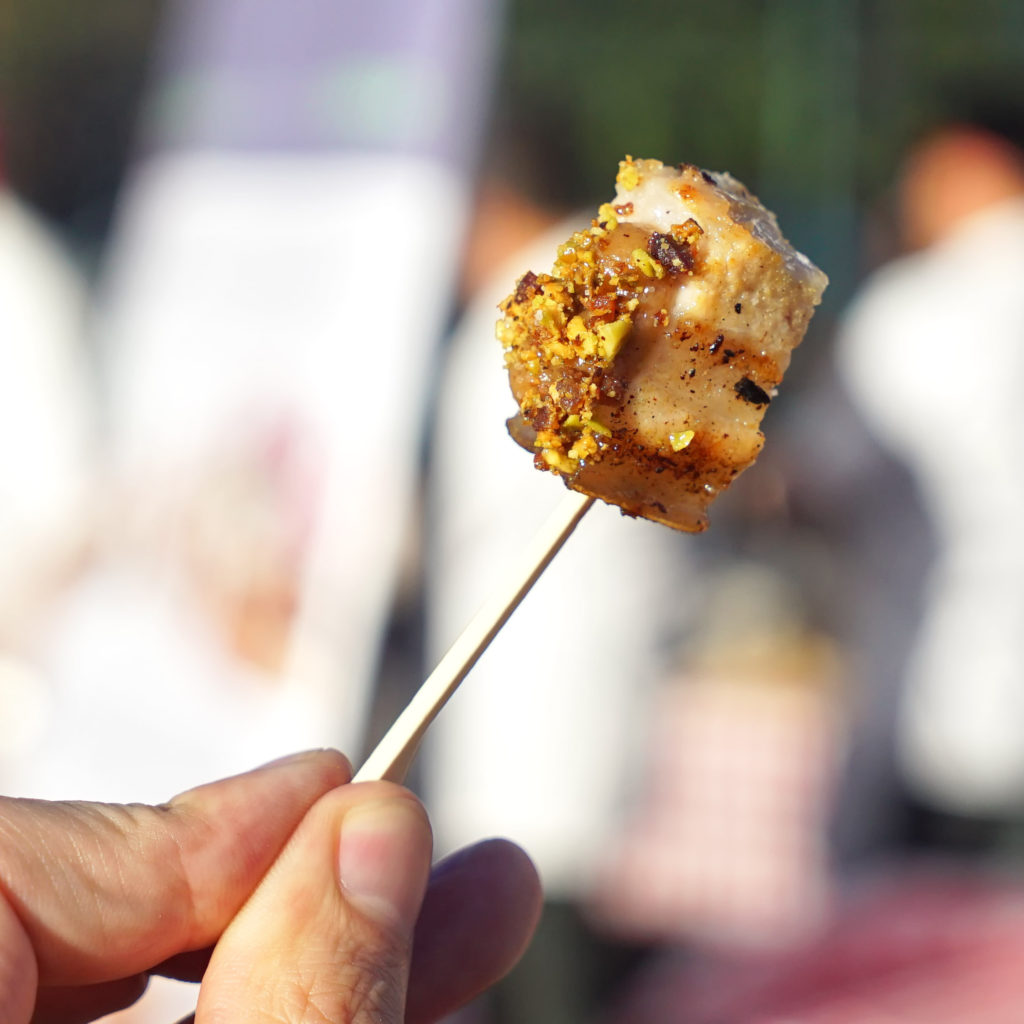
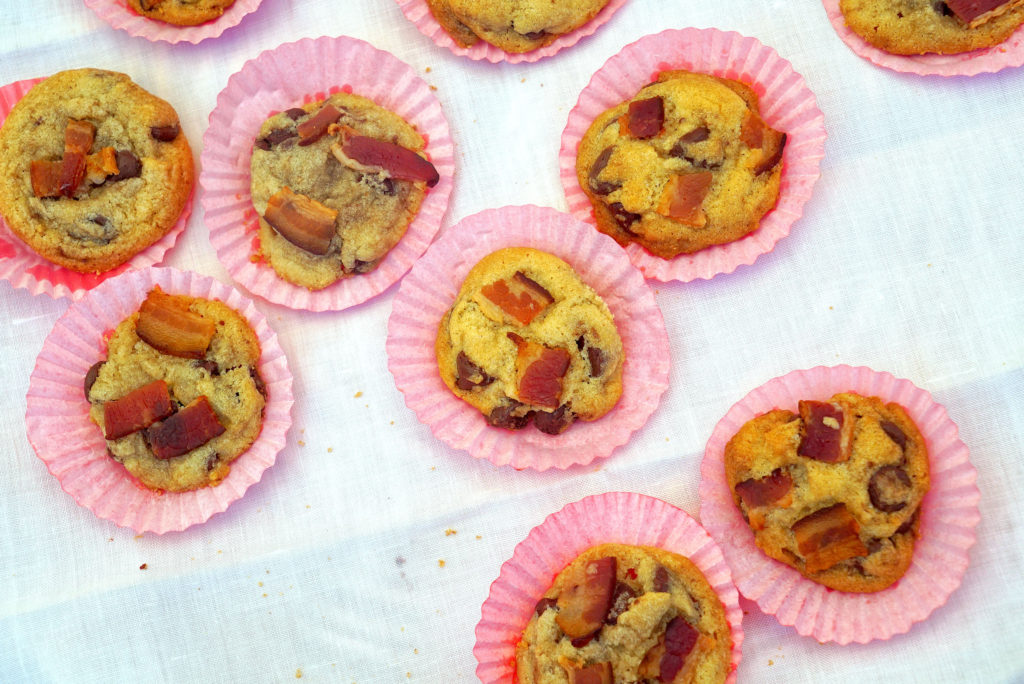
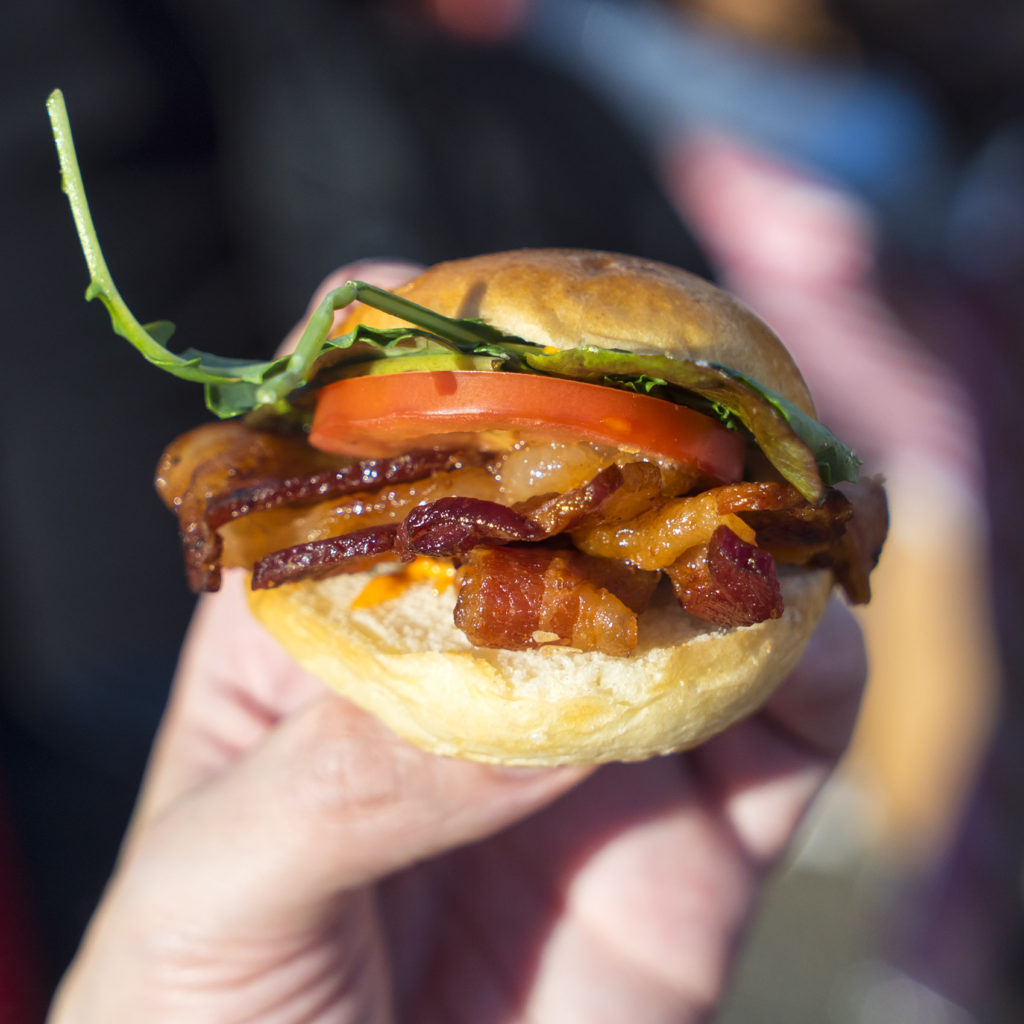
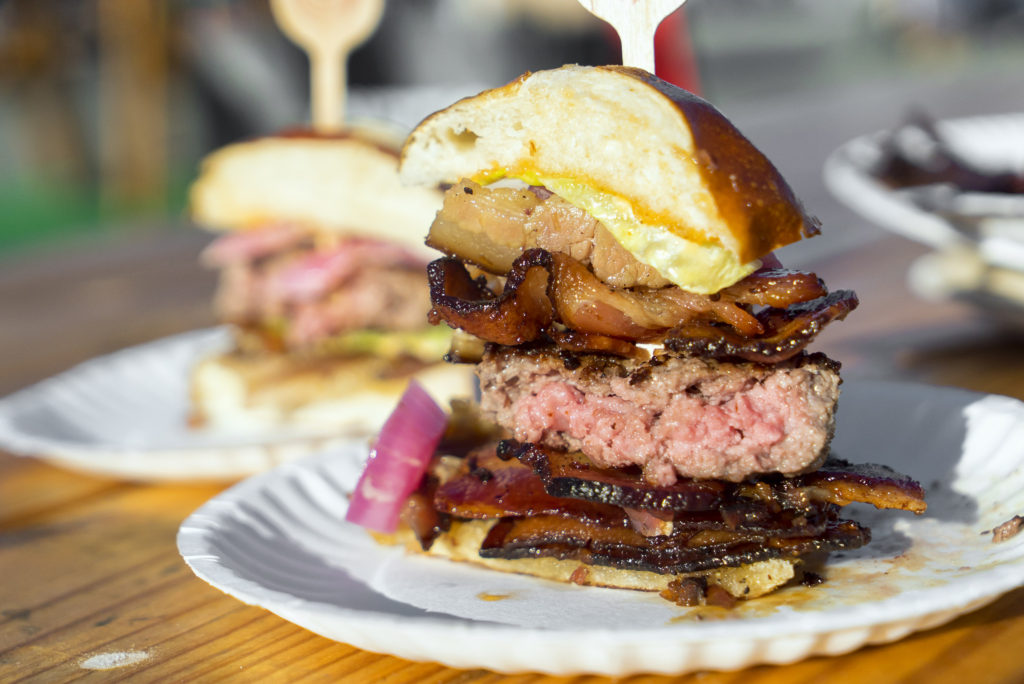
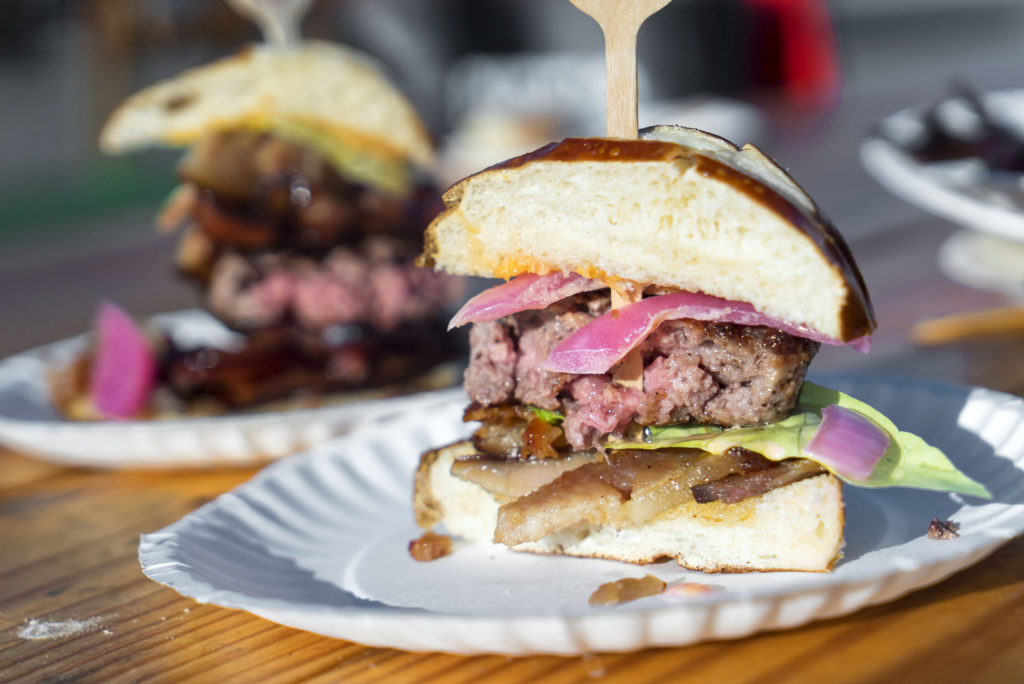
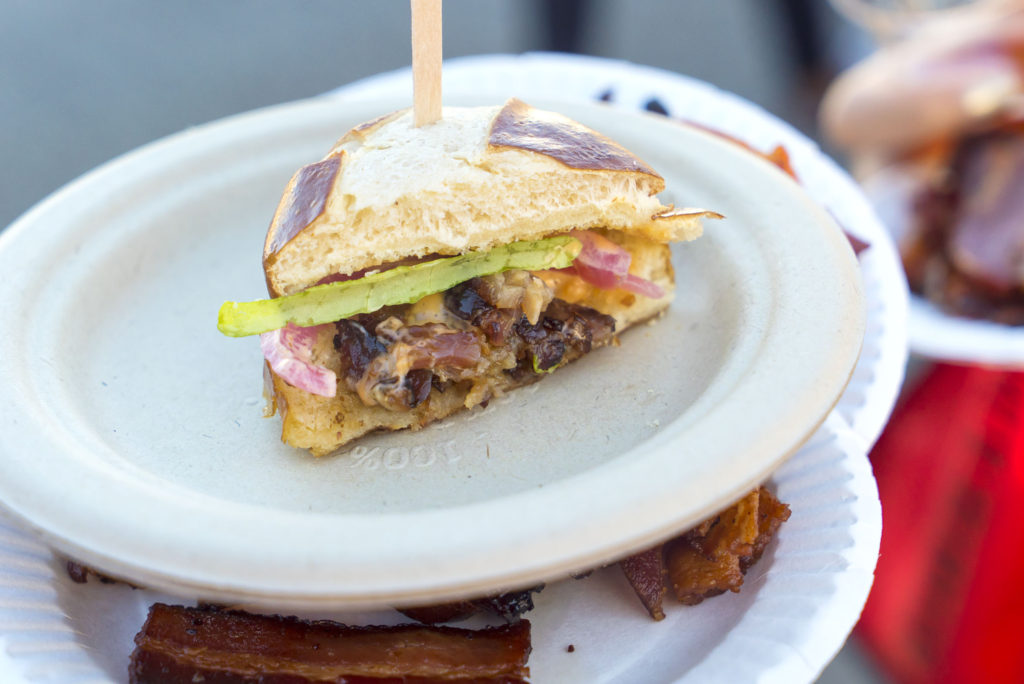
I’m going to keep this short and sweet so you guys can get right down to the food pictures. The Great Big Bacon Picnic is an awesome multi-day event that was held in Brooklyn at the old Pfizer factory to celebrate the awesomeness of bacon. There were tons of businesses and restaurants there, so we got to try a ton of shit. I will highlight the good stuff and give a few extra words here and there. Enjoy.
Best bite of the day was at Tres Carnes, a pork belly taco. Nice and simple, super delicious.
Meatball with bacon and collared greens from Handcraft:
Bacon bananas foster with peanut butter:
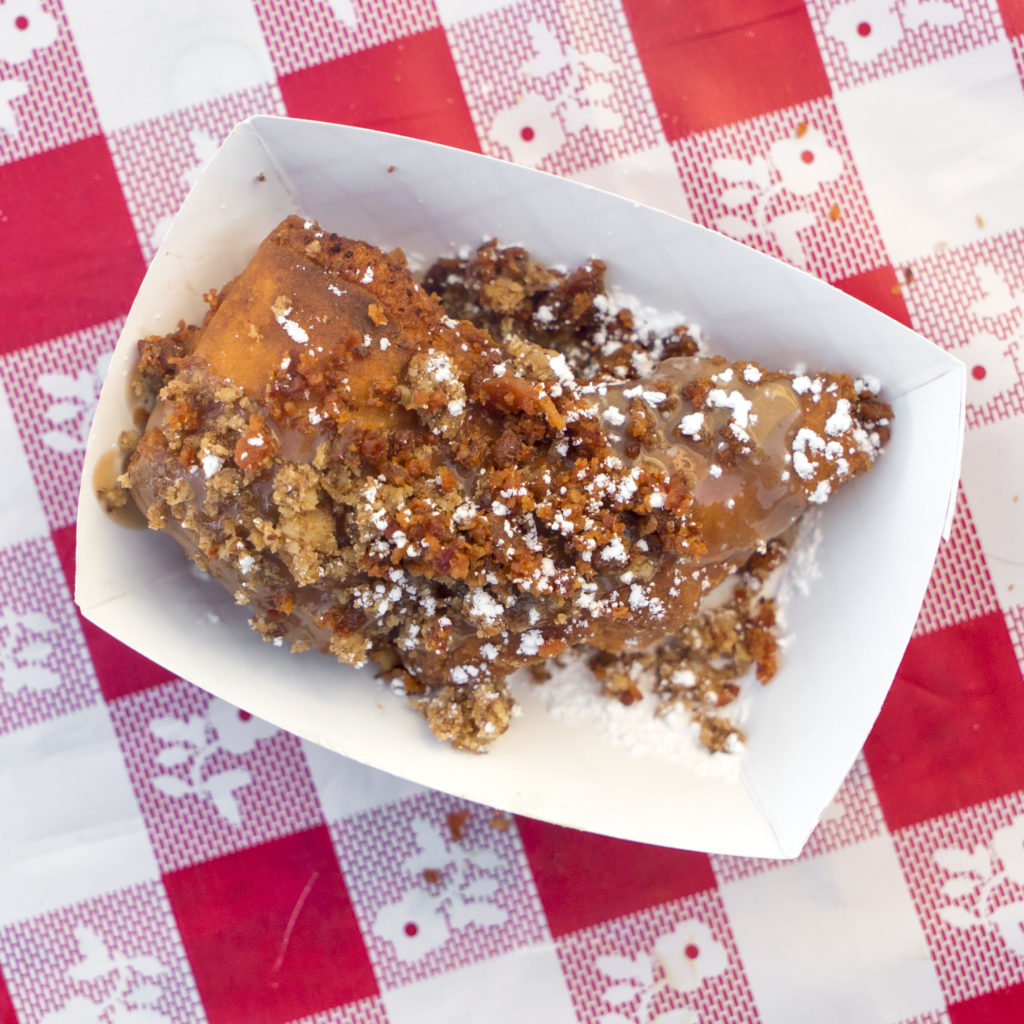
Bacon bread pudding from The Brooklyn Tree:
Some varied flavor selections from the bacon bar:
Lots of fun to be had with fellow foodies:
Bacon chocolate chip cookies and Rhoda of Rhoda Cookies:
Various sliders and mini BLTs were all over the place, all delicious:
Bacon dust beignets!
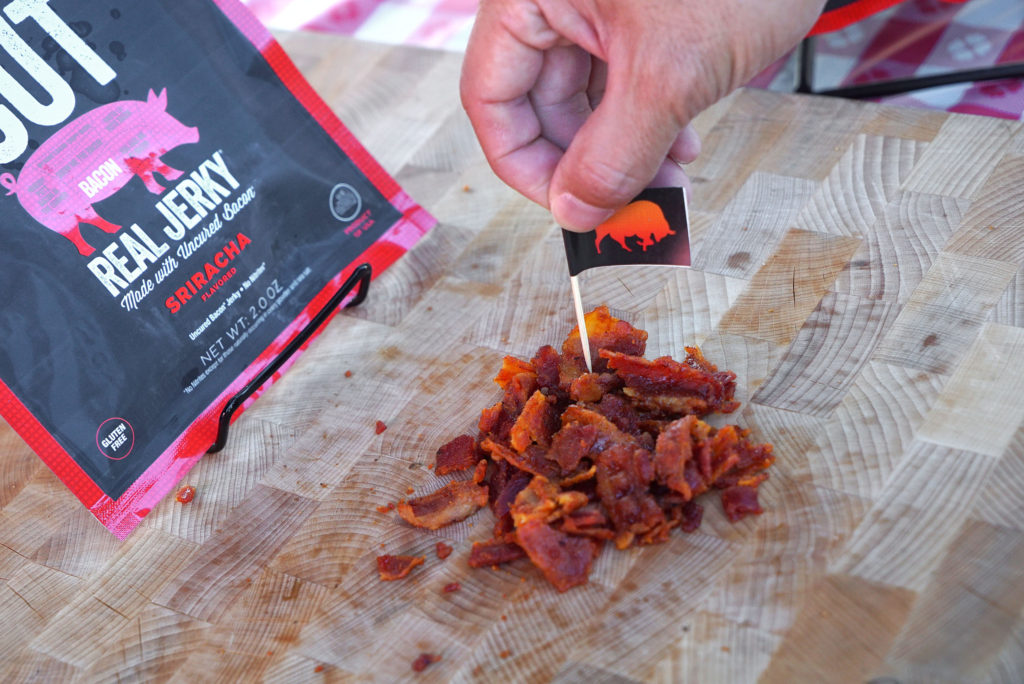
And sriracha bacon jerky from Chef’s Cut. Awesome. I’ll be doing a separate jerky review for this product with more info.
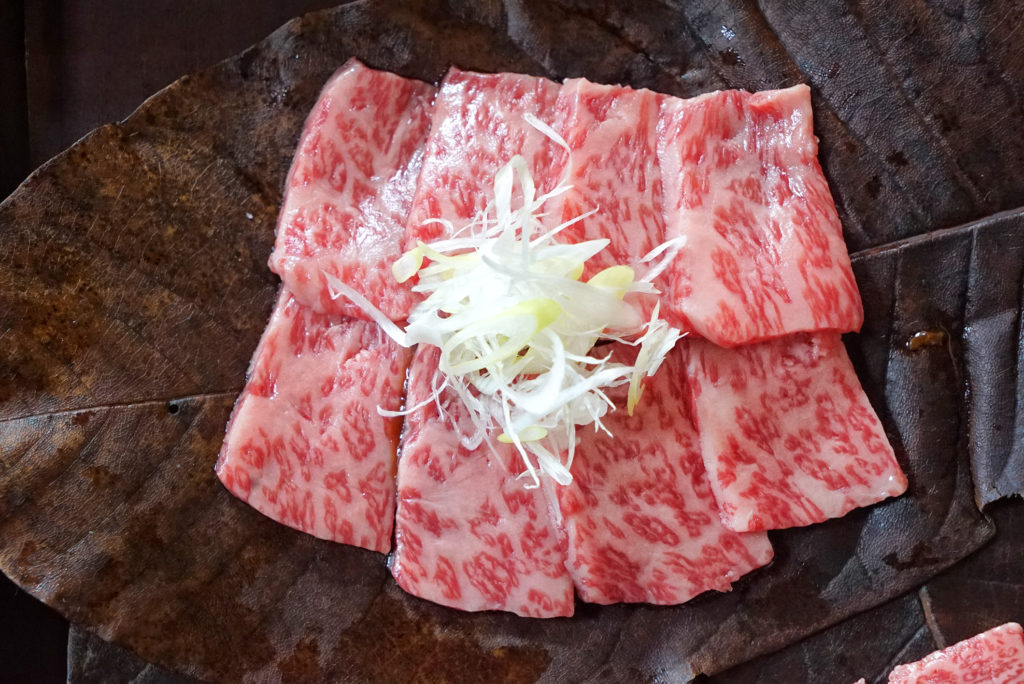
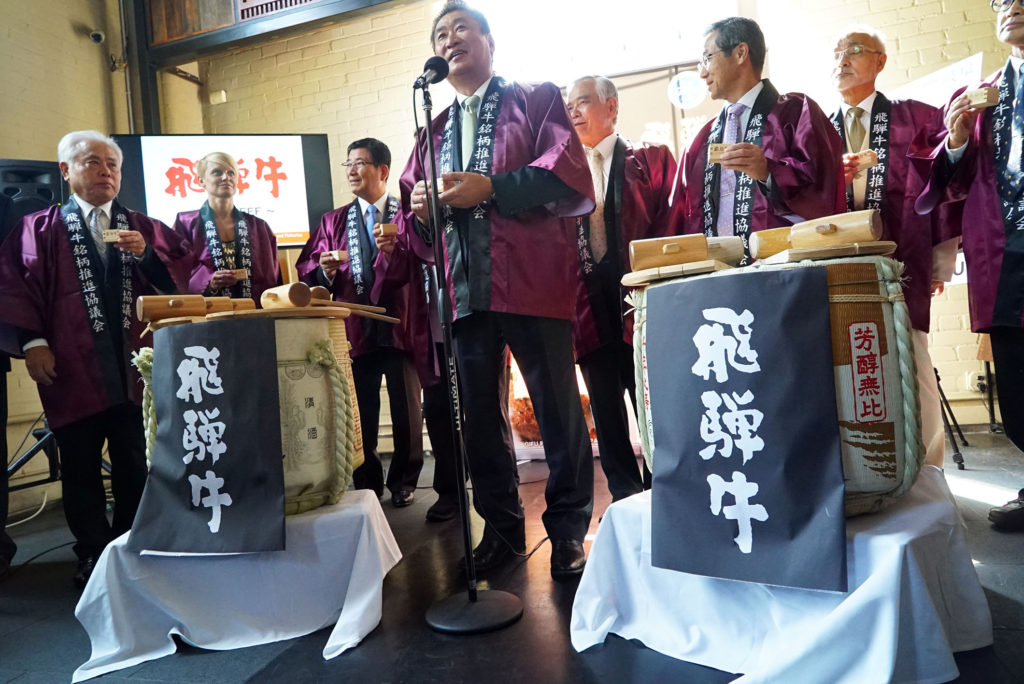
Hida is a region in Japan, located in the northern part of Gifu prefecture on Honshu island. That’s west of Tokyo, but not quite as far as Kyoto or Osaka. While I’ve never been there, I can tell it’s a place that I’d definitely want to visit.
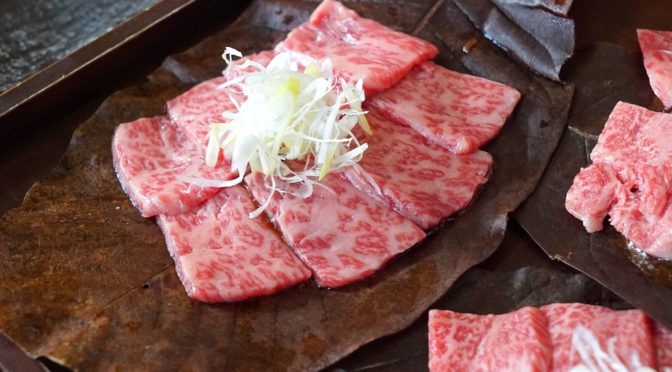
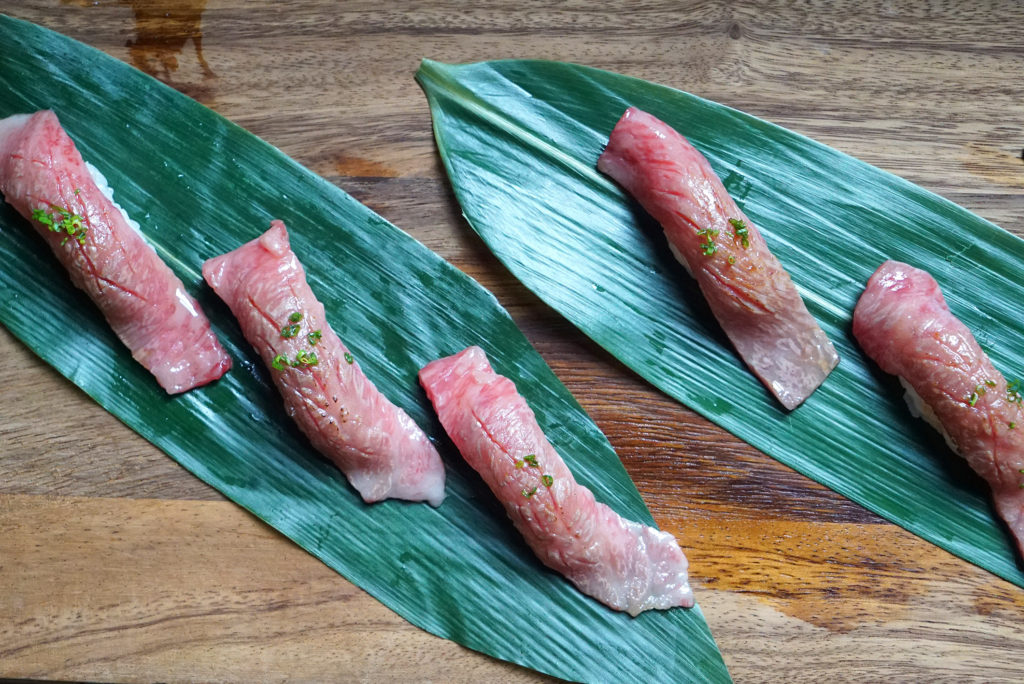
Hida is known for it’s outstanding beef (Hida-gyu), which is derived from a black-haired Japanese breed of cattle. Laws are such that, to quality as the Hida brand, the cattle has to have been raised in Gifu prefecture for at least 14 months. The beef is characterized by intense, beautiful, web-like marbling with a buttery, smooth texture that melts in your mouth. The flavor is both rich and delicate at the same time. It can be likened to the top percentiles of wagyu beef, rivaling kobe and matsusaka in quality, with marbling grades of A/B 3, 4, and 5.
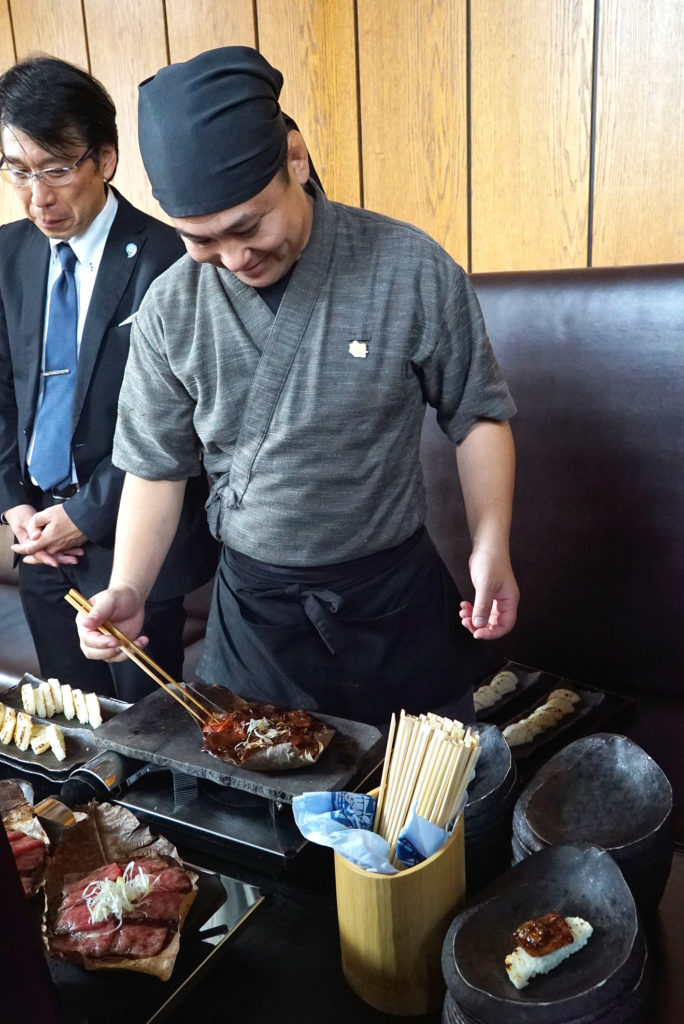
I was invited to a Hida beef tasting event at EN Japanese Brasserie, one of the seven restaurants in the area that will be serving Hida beef on their menus. The other six are Brushstroke, Hakubai, Hasaki, Sakagura, Shabu-Tatsu and the Members Dining Room at the Metropolitan Museum of Art. This is the first time that Hida beef is available here in the States, so if you’re a meat aficionado like me, you should definitely hit one of these places and give it a try. This stuff is expensive though, so make an occasion out of it.
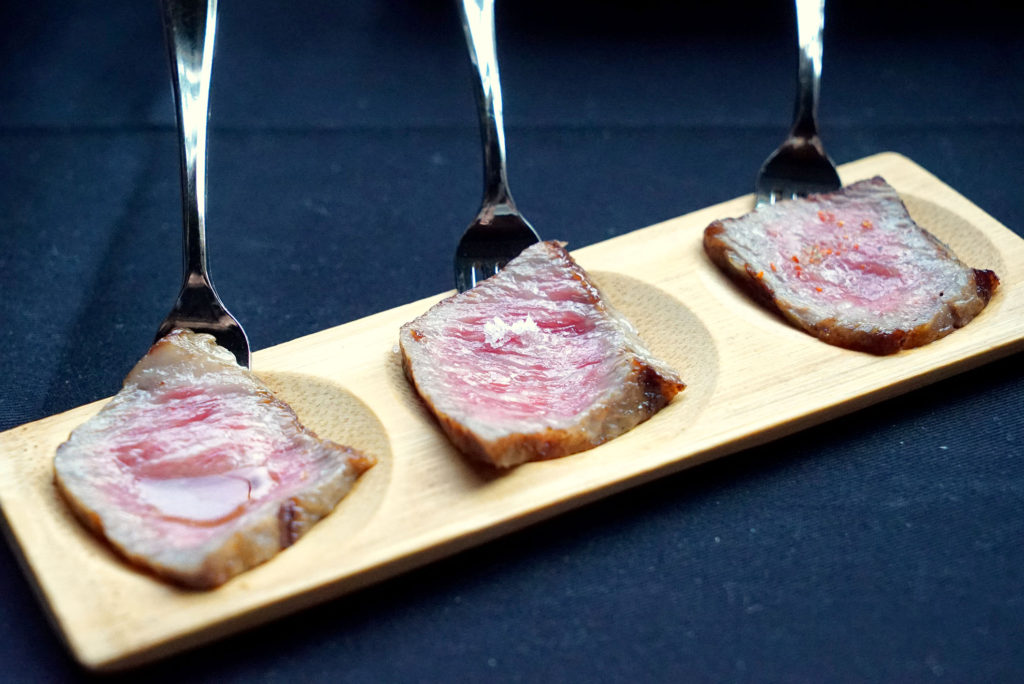
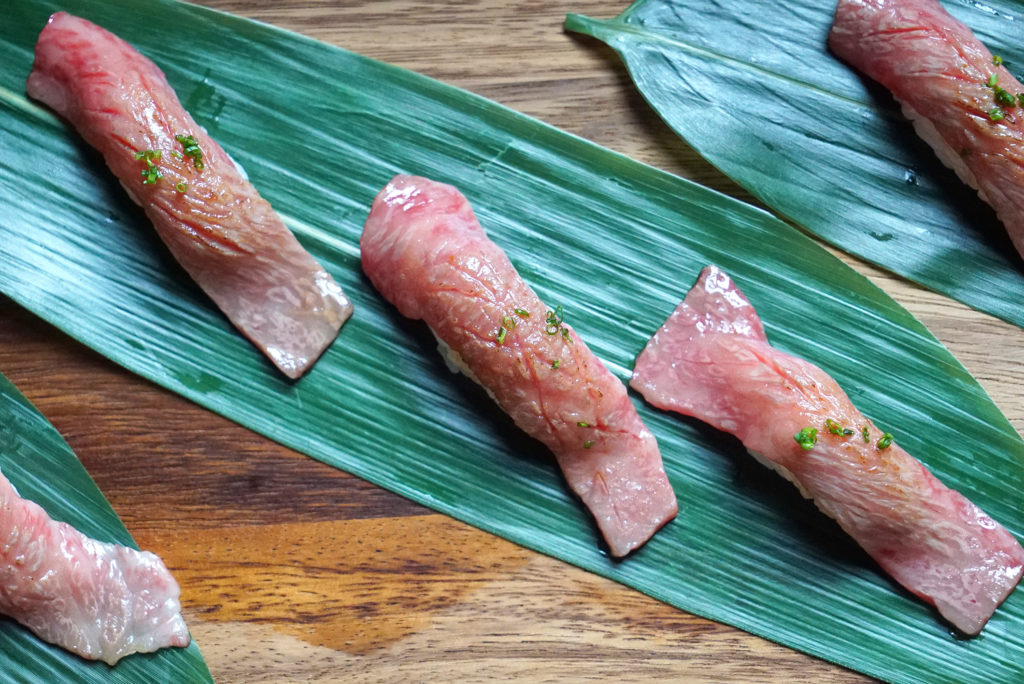
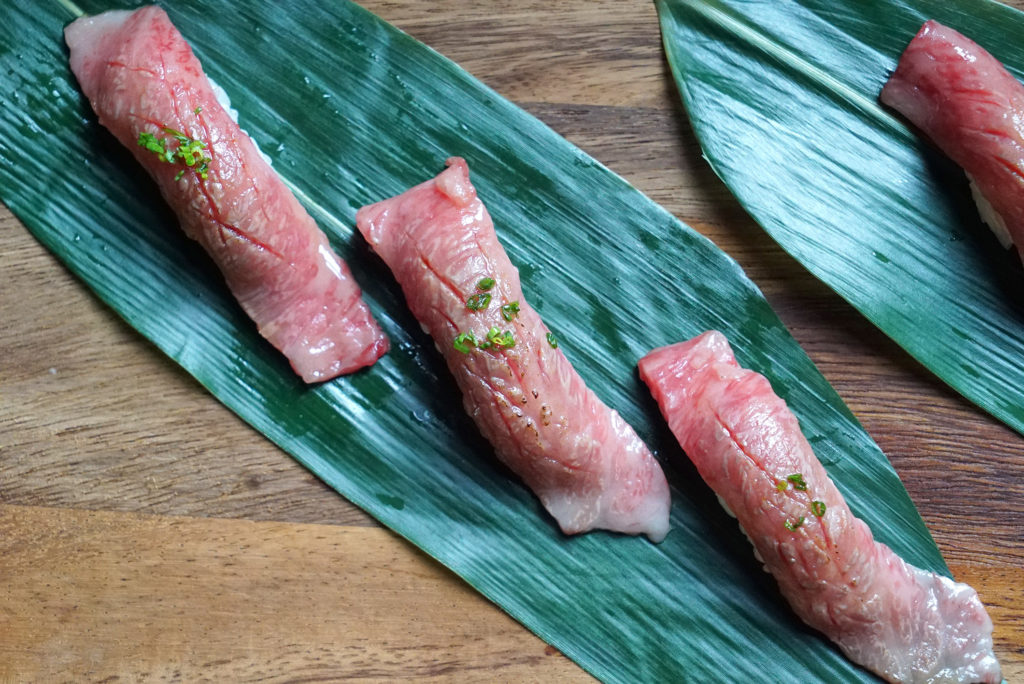
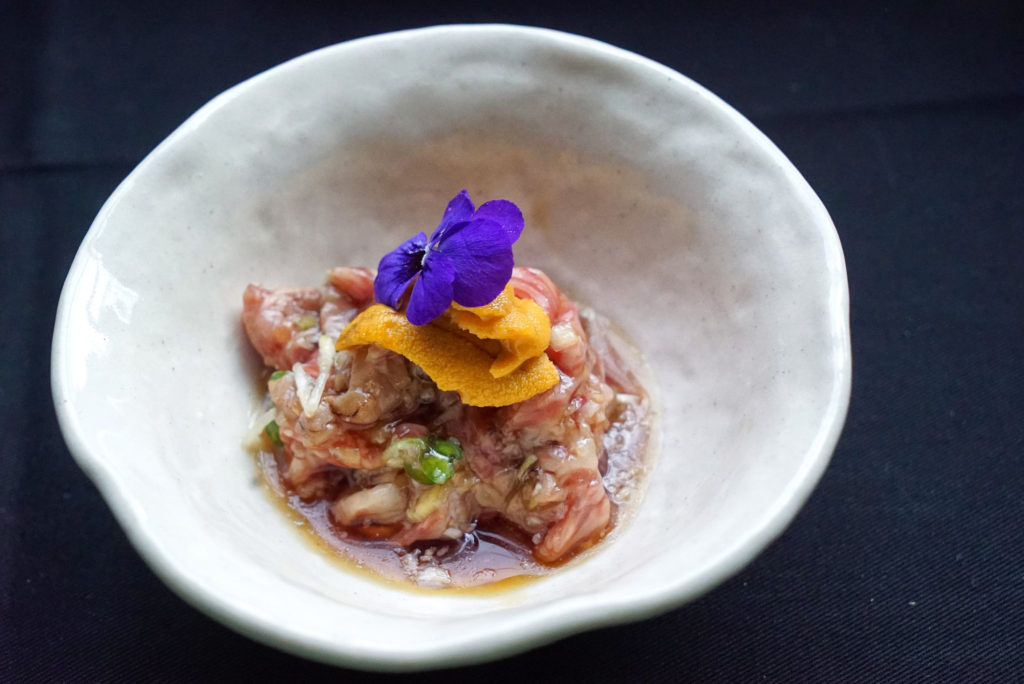
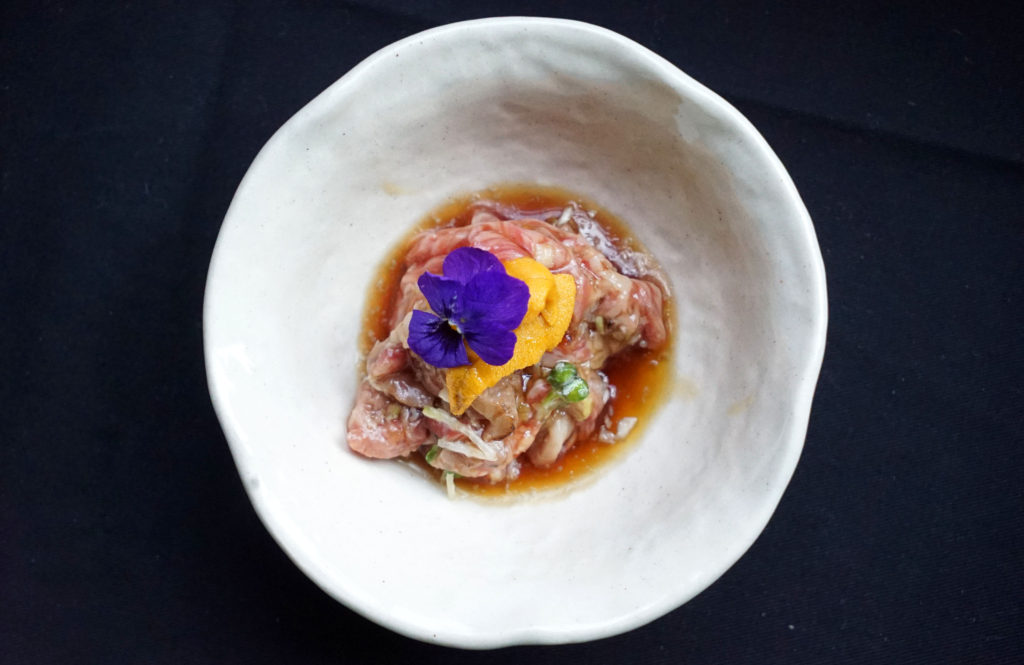
I tried the beef in four different preparations: (1) sliced raw, nigiri sushi style, and then kissed with the scorching flame of a blowtorch; (2) seared edges, a tatami trio, with three different kinds of salt; (3) “Hoba-miso” style, stone grilled with miso sauce; and (4) chopped raw, tartare or ceviche style, with citrus and uni. Despite all the marbling, the meat doesn’t come off tasting very fatty, like some highly marbled cuts do. It didn’t leave a coating of waxy or fatty residue on my palate like certain cured salamis with high fat content. And it didn’t cause the flavors of whatever I ate next to change or taste different due to that fat, which is sometimes the case with aged beef and cured salami. In short, it was really a very pleasing experience.
I’ll start with my favorite preparations: (2) and (3). The tataki trio was essentially three slices of Hida beef (strip loin), each dressed with a different salt element: yuzu soy sauce, sea salt and a special red salt that had hints of spice to it. All three were great, but I think I liked the classic sea salt topper the best.
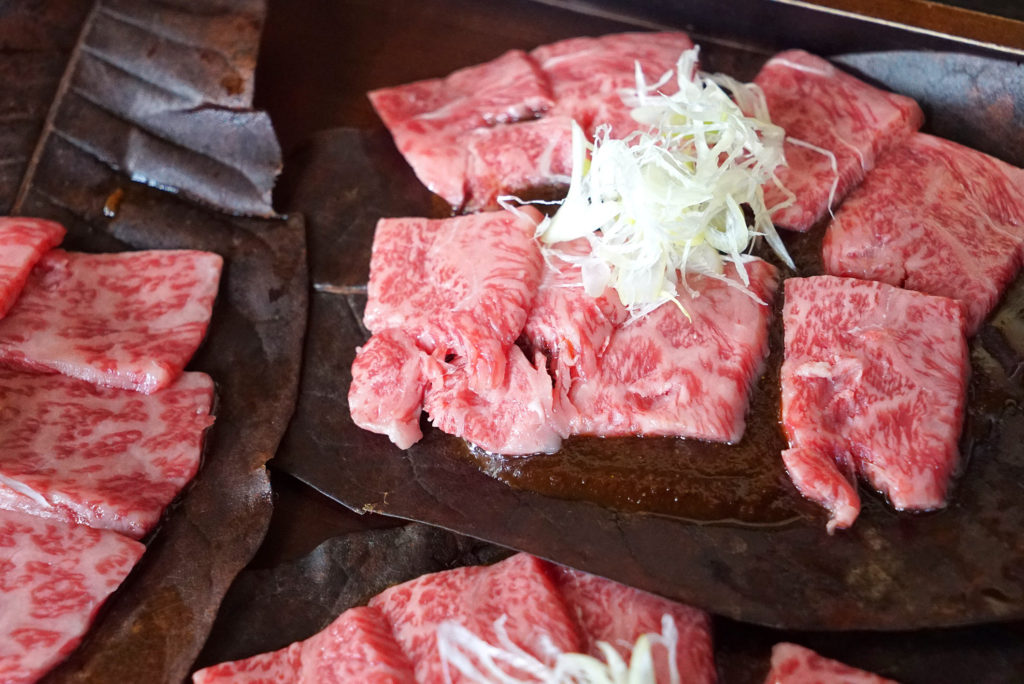
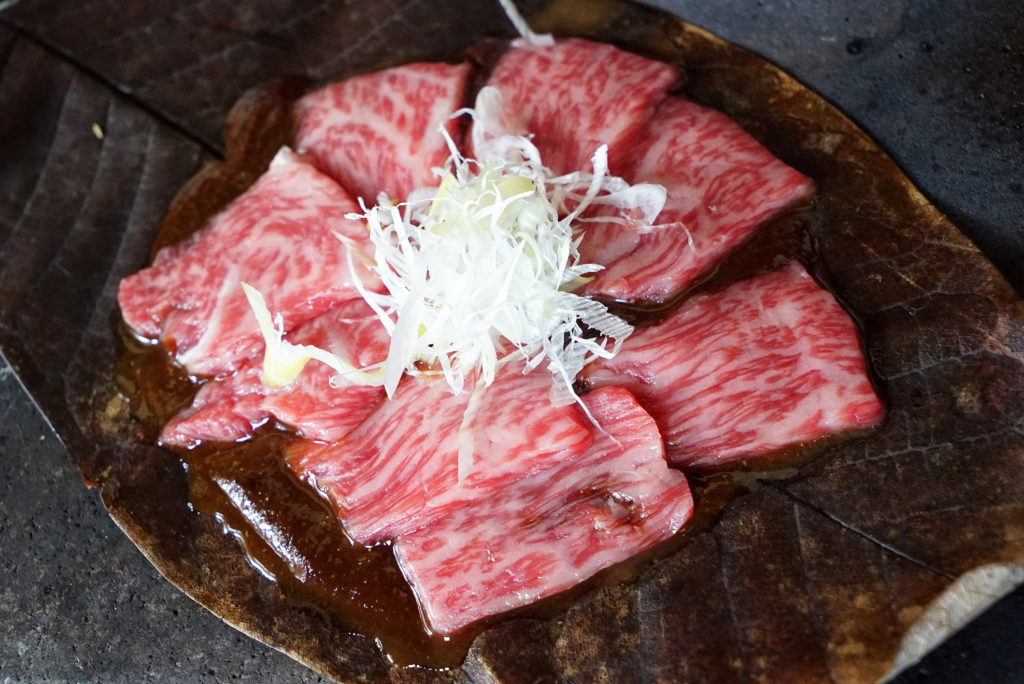
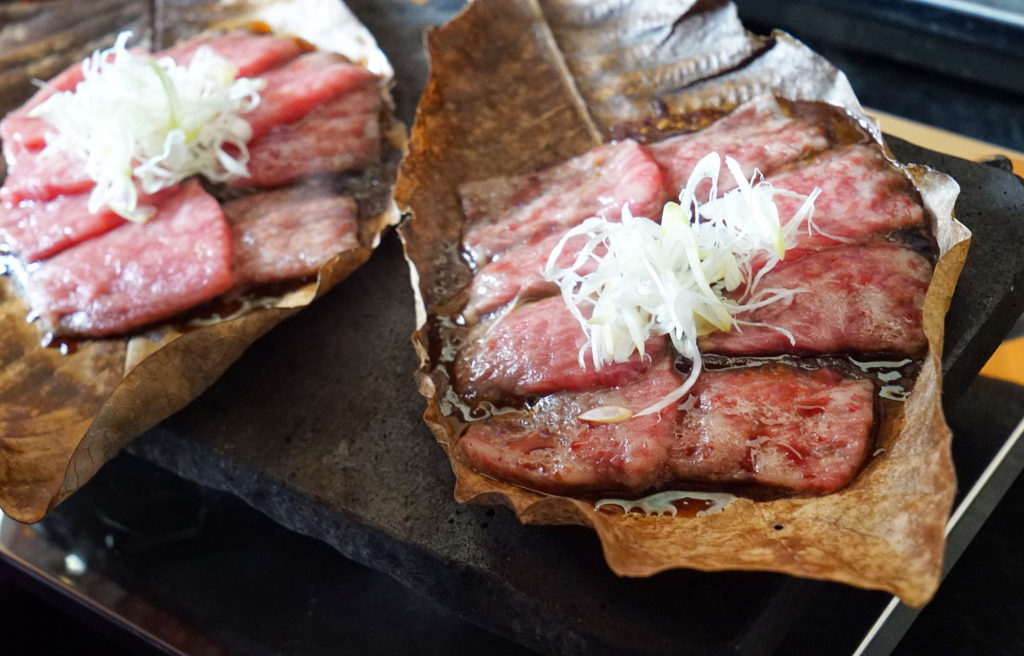
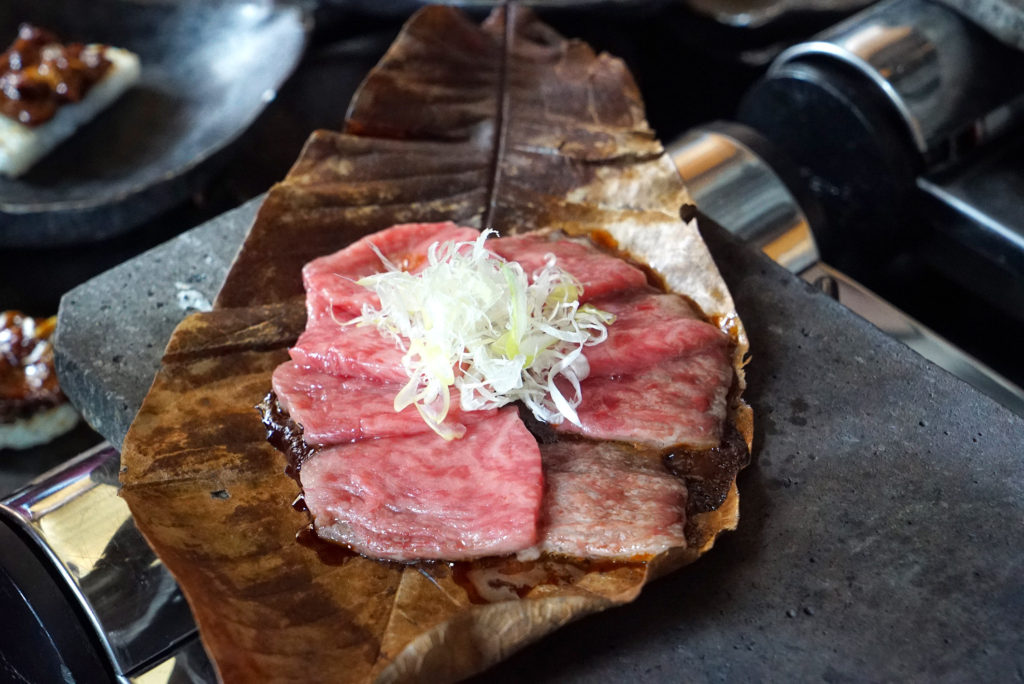
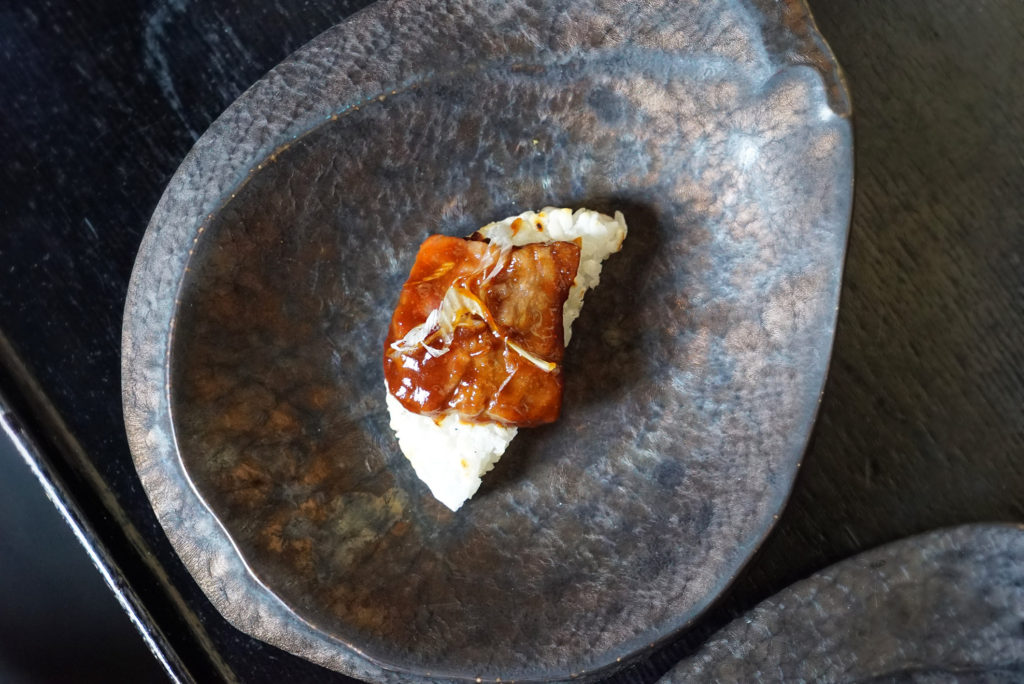
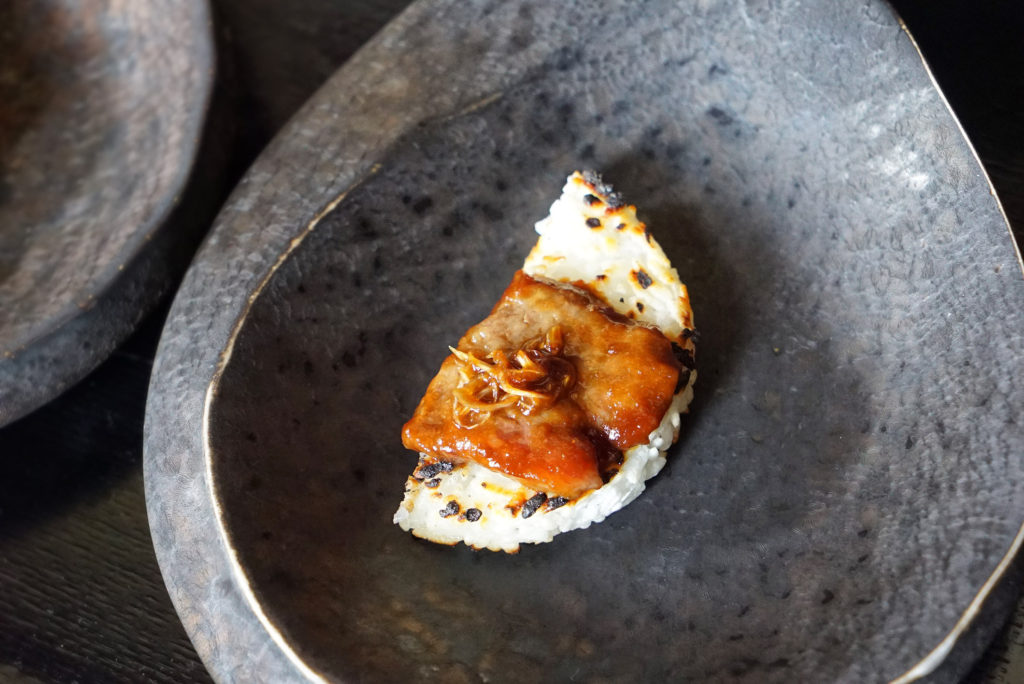
The hot stone grilled preparation, Hoba-miso, was the only one in which the beef was cooked through. This dish is local to Hida. The sliced beef is placed on Hoba (a big Magnolia leaf) with miso and scallions, which then sits directly on the surface of the hot stone. As you can see, the before and after photos of this method indicate that this beef can be thoroughly enjoyed fully cooked if you’re one of those puss-bags who is afraid to eat raw or under-cooked meat.
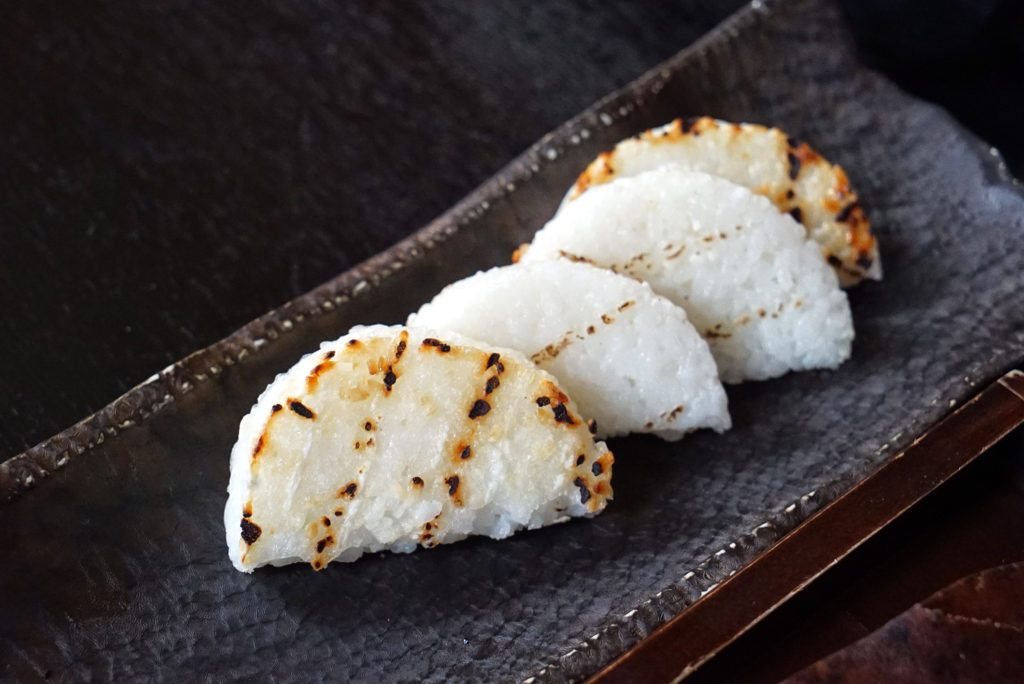
Fully cooking the beef did not take anything away from the meat. You still get that buttery smooth texture and melt-in-your-mouth flavor characteristics. In fact, the leaf and miso bring nice flavor accents to the beef that compliment it well. This, too, was a strip loin cut of beef, and it was presented to eat on grilled sticky rice patties.
Here’s the chef, Abe Hiroki, who was grilling these delicious morsels to absolute beef-paradise perfection:
The torched nigiri style reminded me slightly of spam musubi, for the sole reason that it was a warm meat item served atop sushi rice. Here, you can get a real, unadulterated taste of the beef in all its marbled glory. It truly is spectacular.
I’ve been eating aged beef for so long that something this pure and clean really blew me away. This was strip loin as well.
This was the sushi master behind these perfect pieces of nigiri:
Finally, this tartare or ceviche style came dressed with a citrus yuzu sauce and was topped with uni (raw sea urchin). Absolutely stunning and decadent. The reason I am interchanging tartare with ceviche is that, typically, ceviche involves fish and citrus, while tartare features meat and egg yolk. Since this dish had elements of both but not all, I figured I’d split the baby. Tarviche? Why not. Also strip loin.
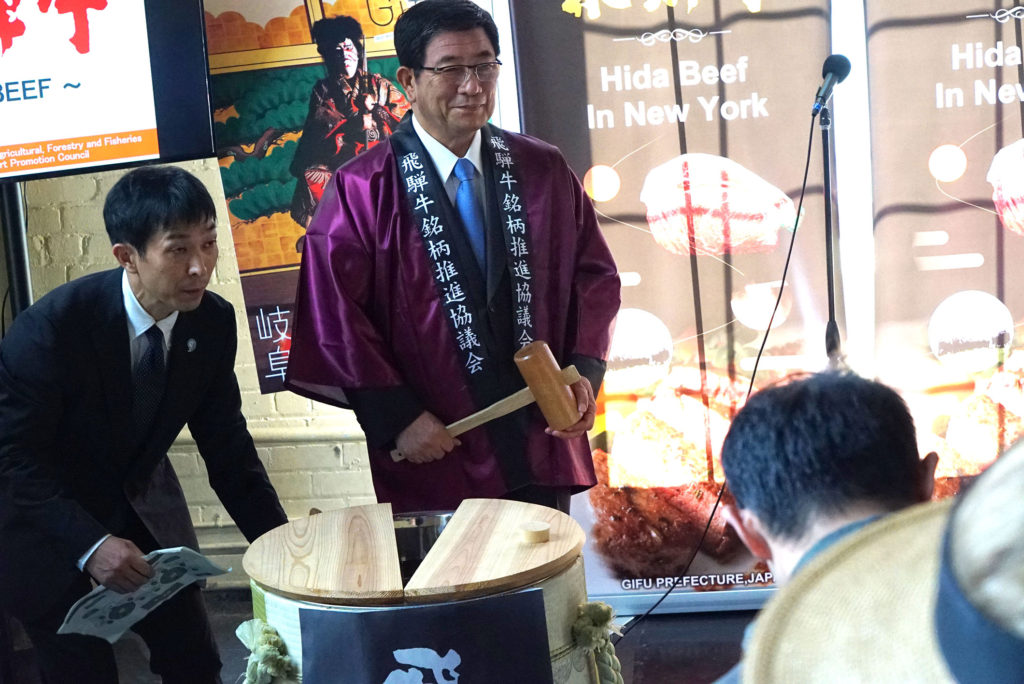
The event also showcased some nice sake selections with flavors ranging from dry to sweet, traditional to aromatic and fruity.
In fact, the event began with a “breaking the mirror” ceremony on the casks of sake, as well as a sake toast.
The governor of Gifu was even in attendance, introducing the beef, the region and the customs to the audience.
The restaurant itself is beautiful, and I look forward to coming back to try some more of this amazing beef. Every preparation was 10/10 for flavor, and I highly recommend it.
EN JAPANESE BRASSERIE
435 Hudson St
New York, NY 10014
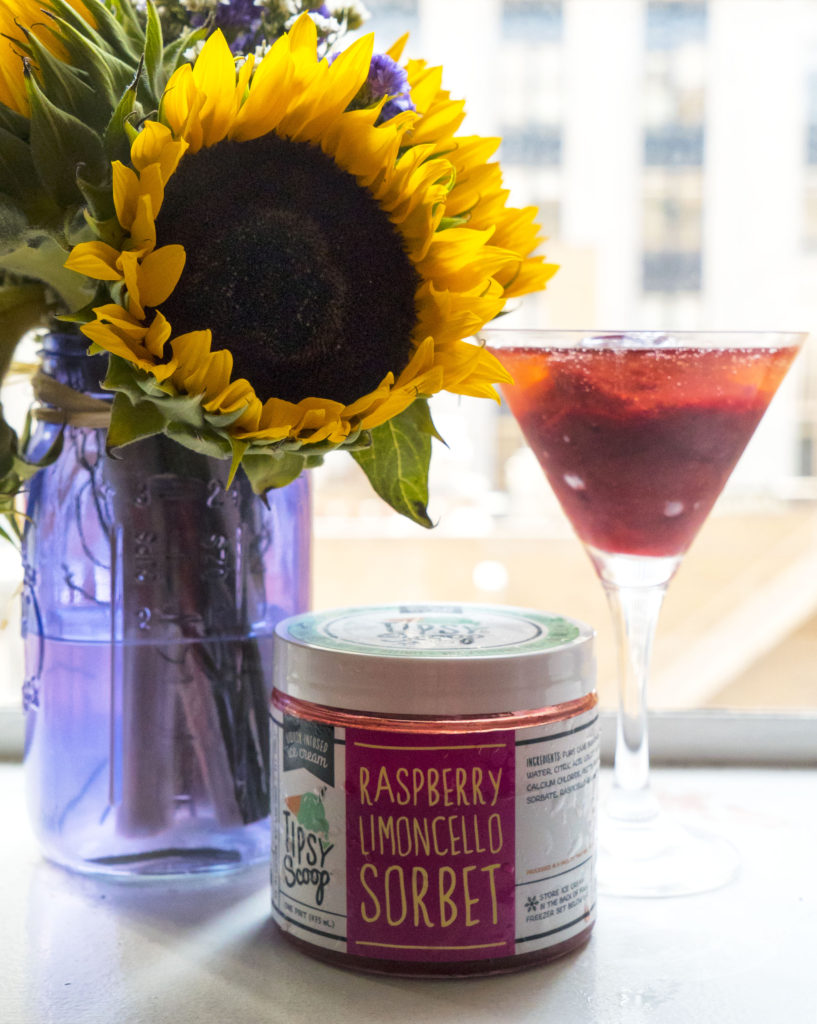
This post will serve as a triple hit review of the Fresh Direct food delivery service, Tipsy’s boozy ice cream and Saveur Select wines.
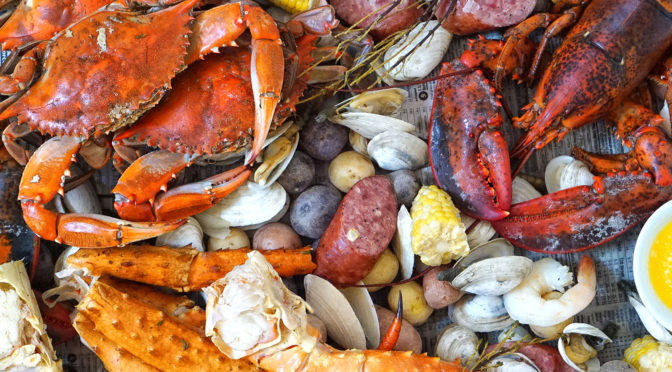
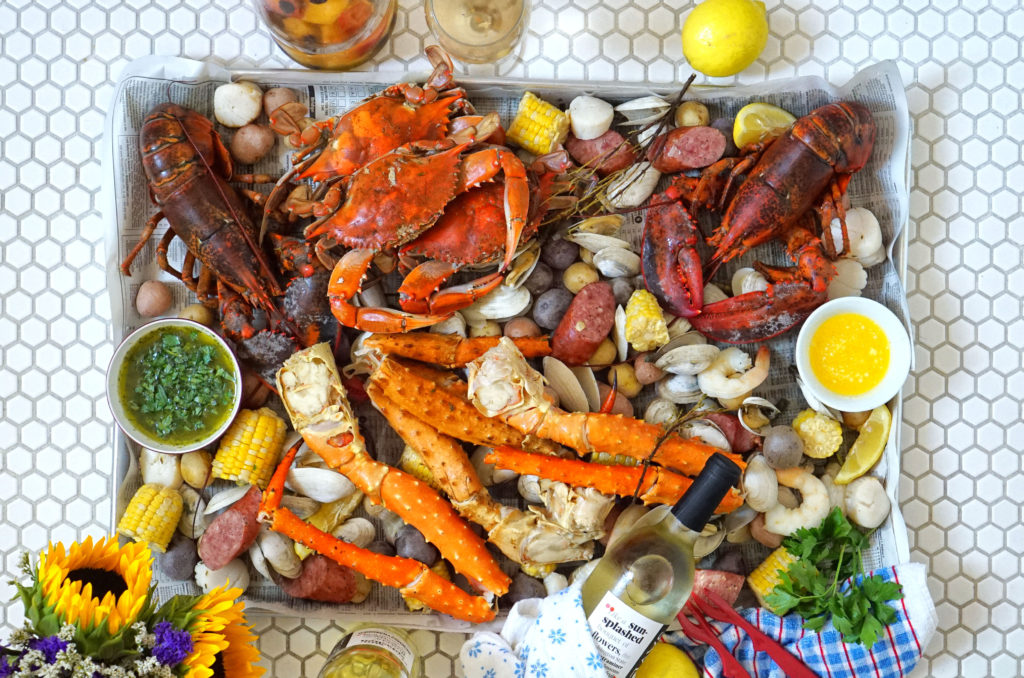
My wife and some of our food friends were planning to do a Labor Day seafood boil on the rooftop of our building. It turns out, a few of the ladies managed to get the entire thing sponsored by the three companies above, provided that we post a few pics on Instagram.
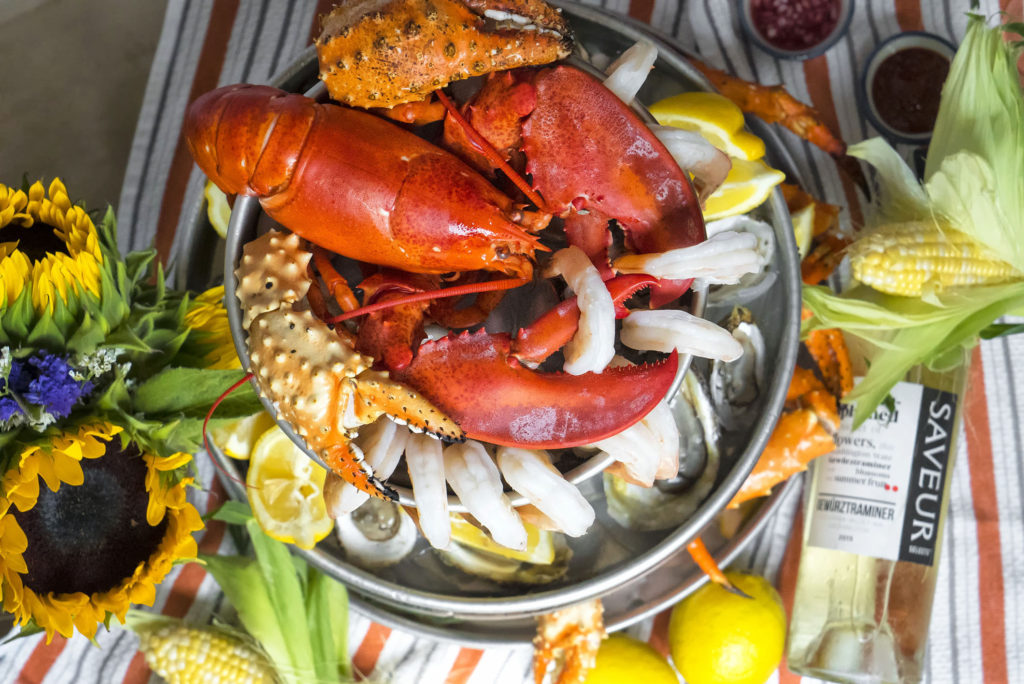
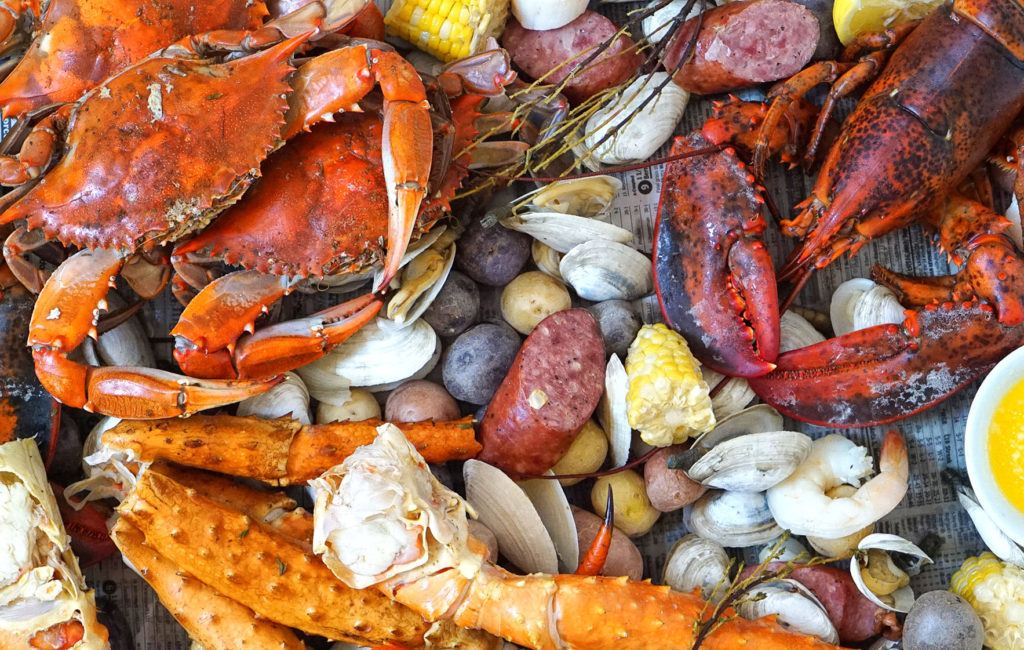
Fresh Direct gave us a $500 credit to use towards their incredibly high quality seafood. We broke this out into two main items: a huge seafood boil, and a colossal chilled seafood tower.
There was so much fucking food! Lobster, king crab legs, blue claw crabs, steamer clams, little neck clams, three varieties of oysters, jumbo shrimp, scallops, multi-colored potatoes, kielbasa and corn. My wife and I were always big fans of Fresh Direct but this seafood really hammers home the word FRESH in their name. The lobsters were delivered LIVE! And everything tasted incredible, which is obviously the most important factor.
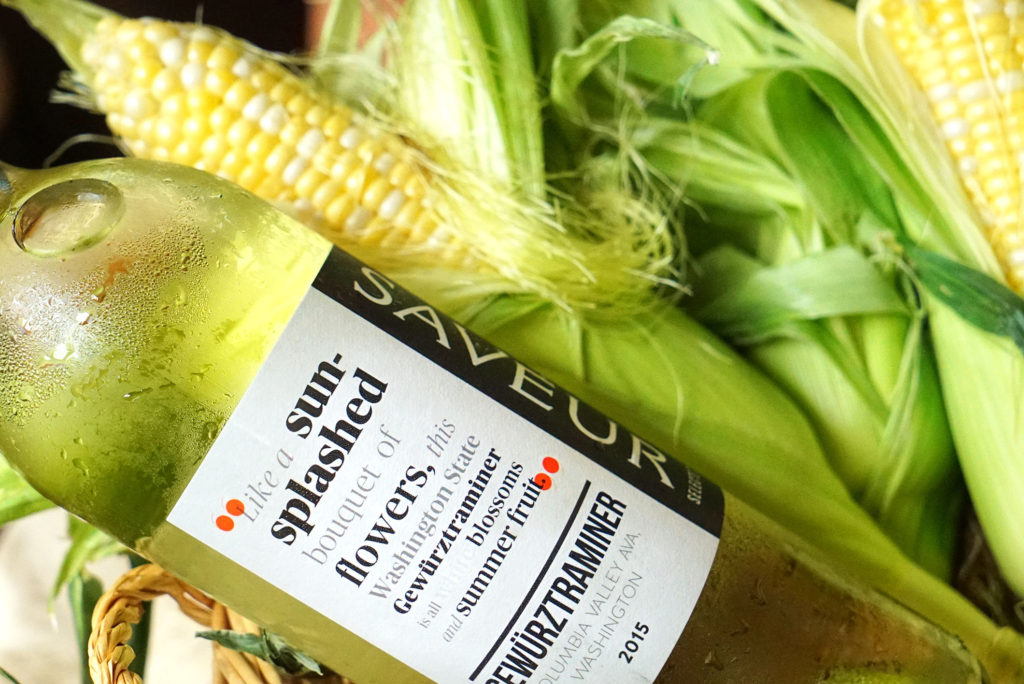
Saveur provided us with four bottles of crisp Gewürztraminer wine. This white German variety of wine was just the kind of refreshment we needed with this meal. We even poured some over fruit to make a white sangria.
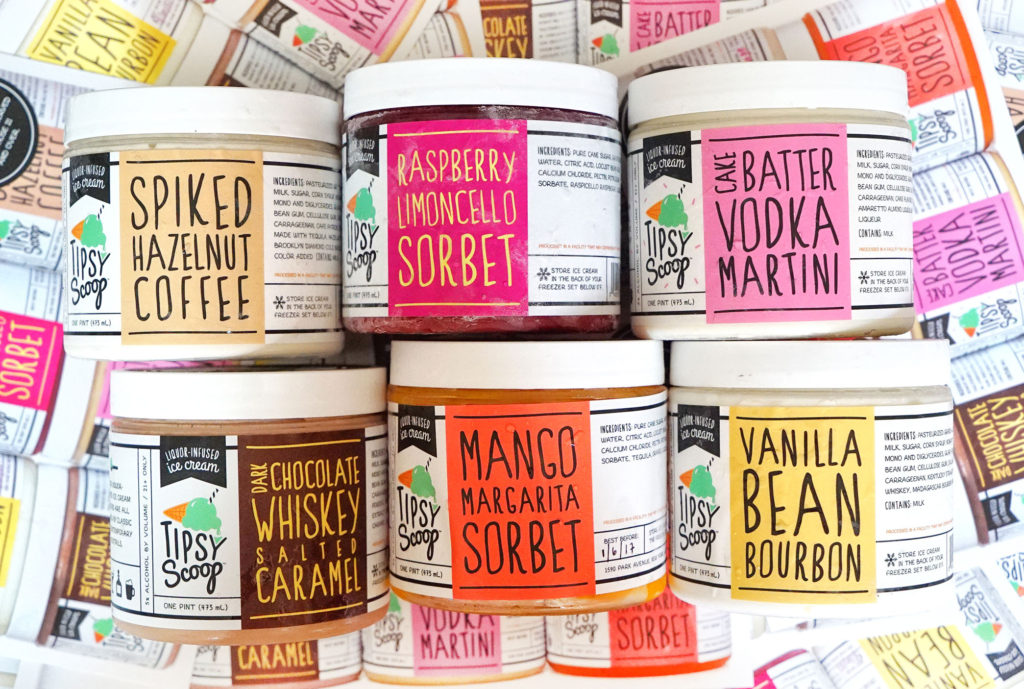
Tipsy hooked us up with six different pints of ice cream for dessert.
The flavors were incredible: spiked hazelnut coffee, raspberry limoncello sorbet, cake batter vodka martini, dark chocolate whisky salted caramel, mango margarita sorbet and vanilla bean bourbon.
We even scooped some into a few glasses of champagne for good measure. Why not?
Once again I am going to dedicate this post to dispelling some common misconceptions about the beef industry. Some of the biggest fabrications I hear these days is that the US beef industry is chock full of “factory farms,” where thousands of cattle are born and raised on feed lots, jammed into tight spaces, given nothing but grain and hormones for sustenance, and are generally mistreated and abused whilst farmers destroy the natural environment. ALL FALSE.
Most people don’t know that 97% of the 619,000 beef farms in this country are small, family owned operations with an average of 50 head of cattle. There goes the factory farm myth. And beef farming makes up about 29% of all US farms, in case you were wondering.
“Calving,” or the birthing of cattle, generally happens in a different area of the farm, removed from the feed yard, where farmers and veterinarians can more closely monitor the animals and keep them healthy. Once the calves are weened from their mother’s milk, they are put out in the pasture to eat grass and grow. Born and raised on feed lots? Screw that “bull crap.”
Cattle in the US are grass-fed in pasture for the majority of their lives. Don’t believe what you hear to the contrary. The development of grain feeding started way back, when the addition of grain into the animals’ diets was done to supplement meals for cattle during winter months and times when there were less live, growing grasses for cattle to eat. It was often mixed with stored hay silage as well.
Farmers noticed that the addition of grain to the diet caused cattle to grow faster. So today, grain is used for finishing and fattening up the cattle in the last months of their lives, prior to slaughter. This adds flavor content to the meat in addition to getting them up to a profitable weight for the marketplace. Grass finished animals (animals that only eat grass for their entire lives) take longer to get up to market weight, and are therefore older when they go to slaughter. That means they have to survive more winters and tough out more illnesses before getting to your dinner plate.
Jammed into crowded spaces? Nope. While cattle can withstand cold temperatures, farmers started using barns and other fully or partially enclosed shelters early on to shield their animals from the harsh weather in winter.
They found that cattle naturally gravitated toward one another anyway. They are social creatures. Even in pasture, when they’re out in wide open spaces, you will still see them huddled up together. Bison/buffalo do this as well. They even do it on the feedlot, where each animal has about 125-250 square feet of space, on average, in the US. Another myth bites the dust.
Now let’s discuss the environment. The US beef industry grasslands account for nearly 75% of US natural wildlife, and cattle spend a majority of their lives feeding on these natural grasslands. Up to 85% of our grassland in the US is actually not suitable for farming crops due to soil characteristics, topography, or rainfall. So cattle grazing is a good use of the otherwise inarable land that doesn’t do any additional harm. Lastly, bovine digestive systems are perfectly set up to convert the inedible plants on these grasslands into protein; beef that humans can eat!
I think that’s a good start for now. I’ll address animal care and animal health in the next BAM.
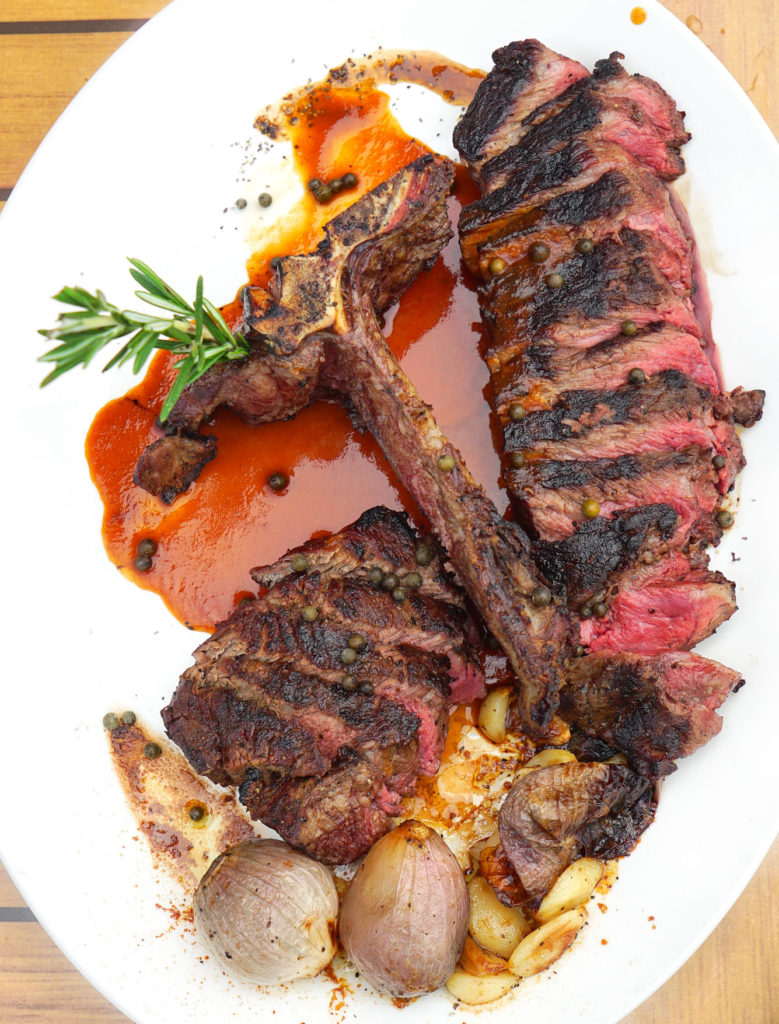
Every food-oriented website out there, whether it’s Eater, Grub Street, Thrillist or what have you, has their own version of “The Ultimate Guide for Cooking a Steak,” or whatever it may be. Many of them do offer good information, but they’re almost all incomplete. They set you up with one method for one cut of meat. This piece will serve as a place where you can get instructions for cooking several different cuts of steak via several methods. Let’s get right to it.
GRILLING
This is probably the method that most people are familiar and comfortable with. Since it is actually my least favorite way to cook one of the four major cuts, I will discuss it first, up front, with the caveat that I do actually prefer grilled skirt steak to any other cut that’s done on the grill. That said, there are some significant pros and cons for grilling. Depending on what you want out of your steak eating experience, you should take these into consideration before deciding if this is the right method for you. What time of year is it? Summer, winter? Are you grilling over charcoal or propane?
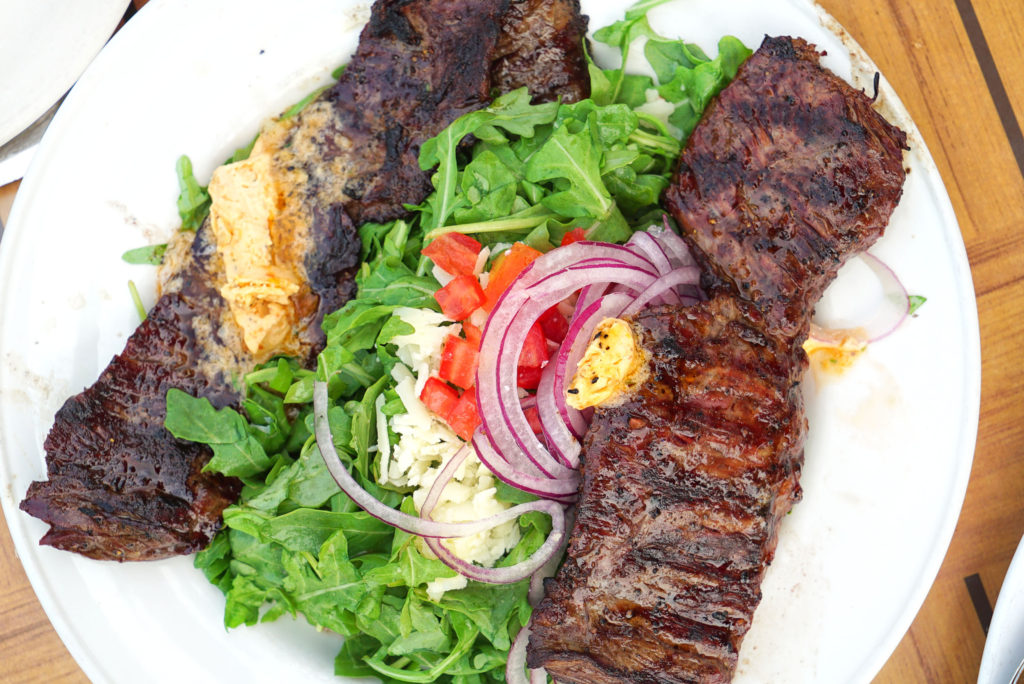
Johnny’s Preferred Cuts for Grilling: Skirt, Flank, Hanger
Pros
Easily accessible
Familiar and comfortable to most home cooks
No smells or smoke indoors
Can easily cook many steaks at once
Cons
Fat, flavor and juices fall through the grill bars
Can be difficult to control heat levels
Lowered ability to sear evenly
Grilling is perfect for outdoor cooking in the warm months, and especially for large groups of people. You don’t get any lingering smells in your home, and you can enjoy the day like a good American, beer in hand as you cook. Since I like a good even sear across the entire cut of meat, I generally don’t like cooking the four major cuts of beef in this manner. Generally I go for skirt or flank, something that benefits from a good, fast blast of heat; something where I don’t mind if I lose a little fat or juice through the grill bars; and something cheap that can be sliced up and served family style. Charcoal is a tough medium to master. Some people are experts at creating and maintaining even heat levels for a cooking session. Others use propane. This is easier, cleaner, and more convenient, but you lose some of that desired charcoal and smoke flavor unless you’re adding soaked wood chips to the grill as you cook. If grilling is right for you, then read on below.
Instructions
Get your steak up to room temperature and pat it dry.
Crank up your grill to as high as it will possibly get.
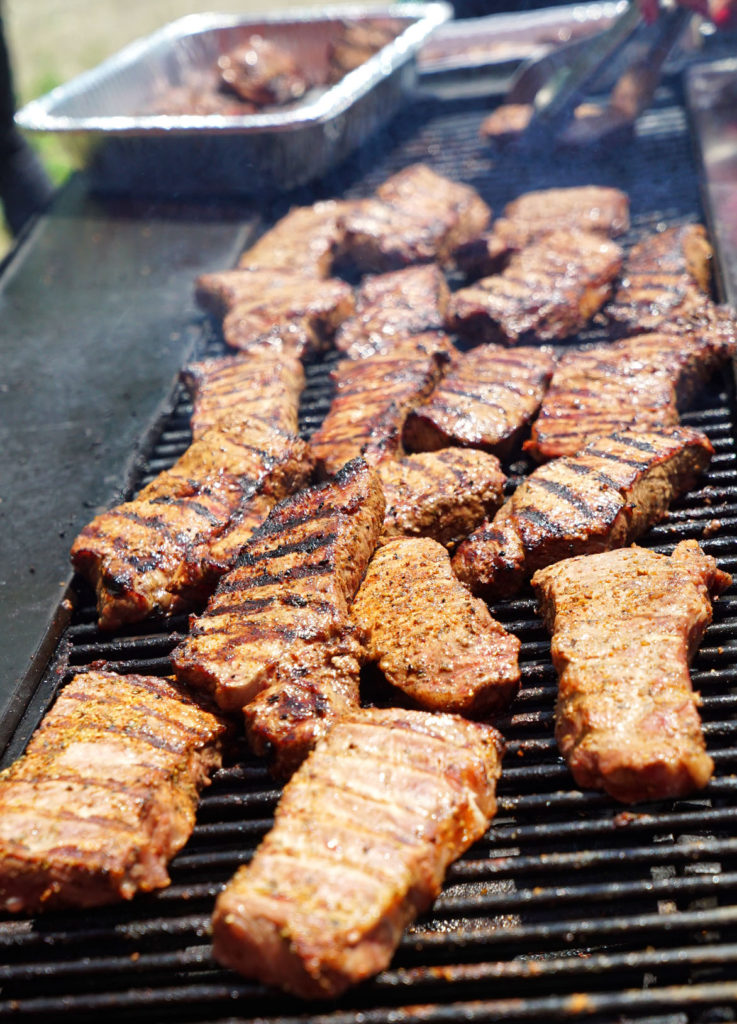
Season the skirt/flank generously with salt and pepper.
Grill the meat with the grill top open. Do not poke, prod, press or move the meat once it is set down on the grill bars. Allow the bars to create nice markings on your meat.
After a few minutes, flip once and repeat the previous step.
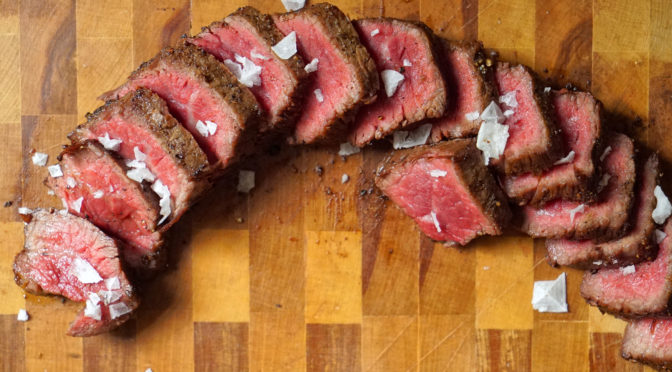
Use a meat thermometer or the “hand test” to ensure that your steak is properly cooked to medium rare. Remove it from the grill at 125F.
Let the steak rest for a few minutes on an elevated and porous surface, like a metal baking rack. During this time the meat will continue to cook a bit more while off the flames, and it will retain more juices during the next step.
Slice against the grain of the meat, or “against the bias,” and serve.
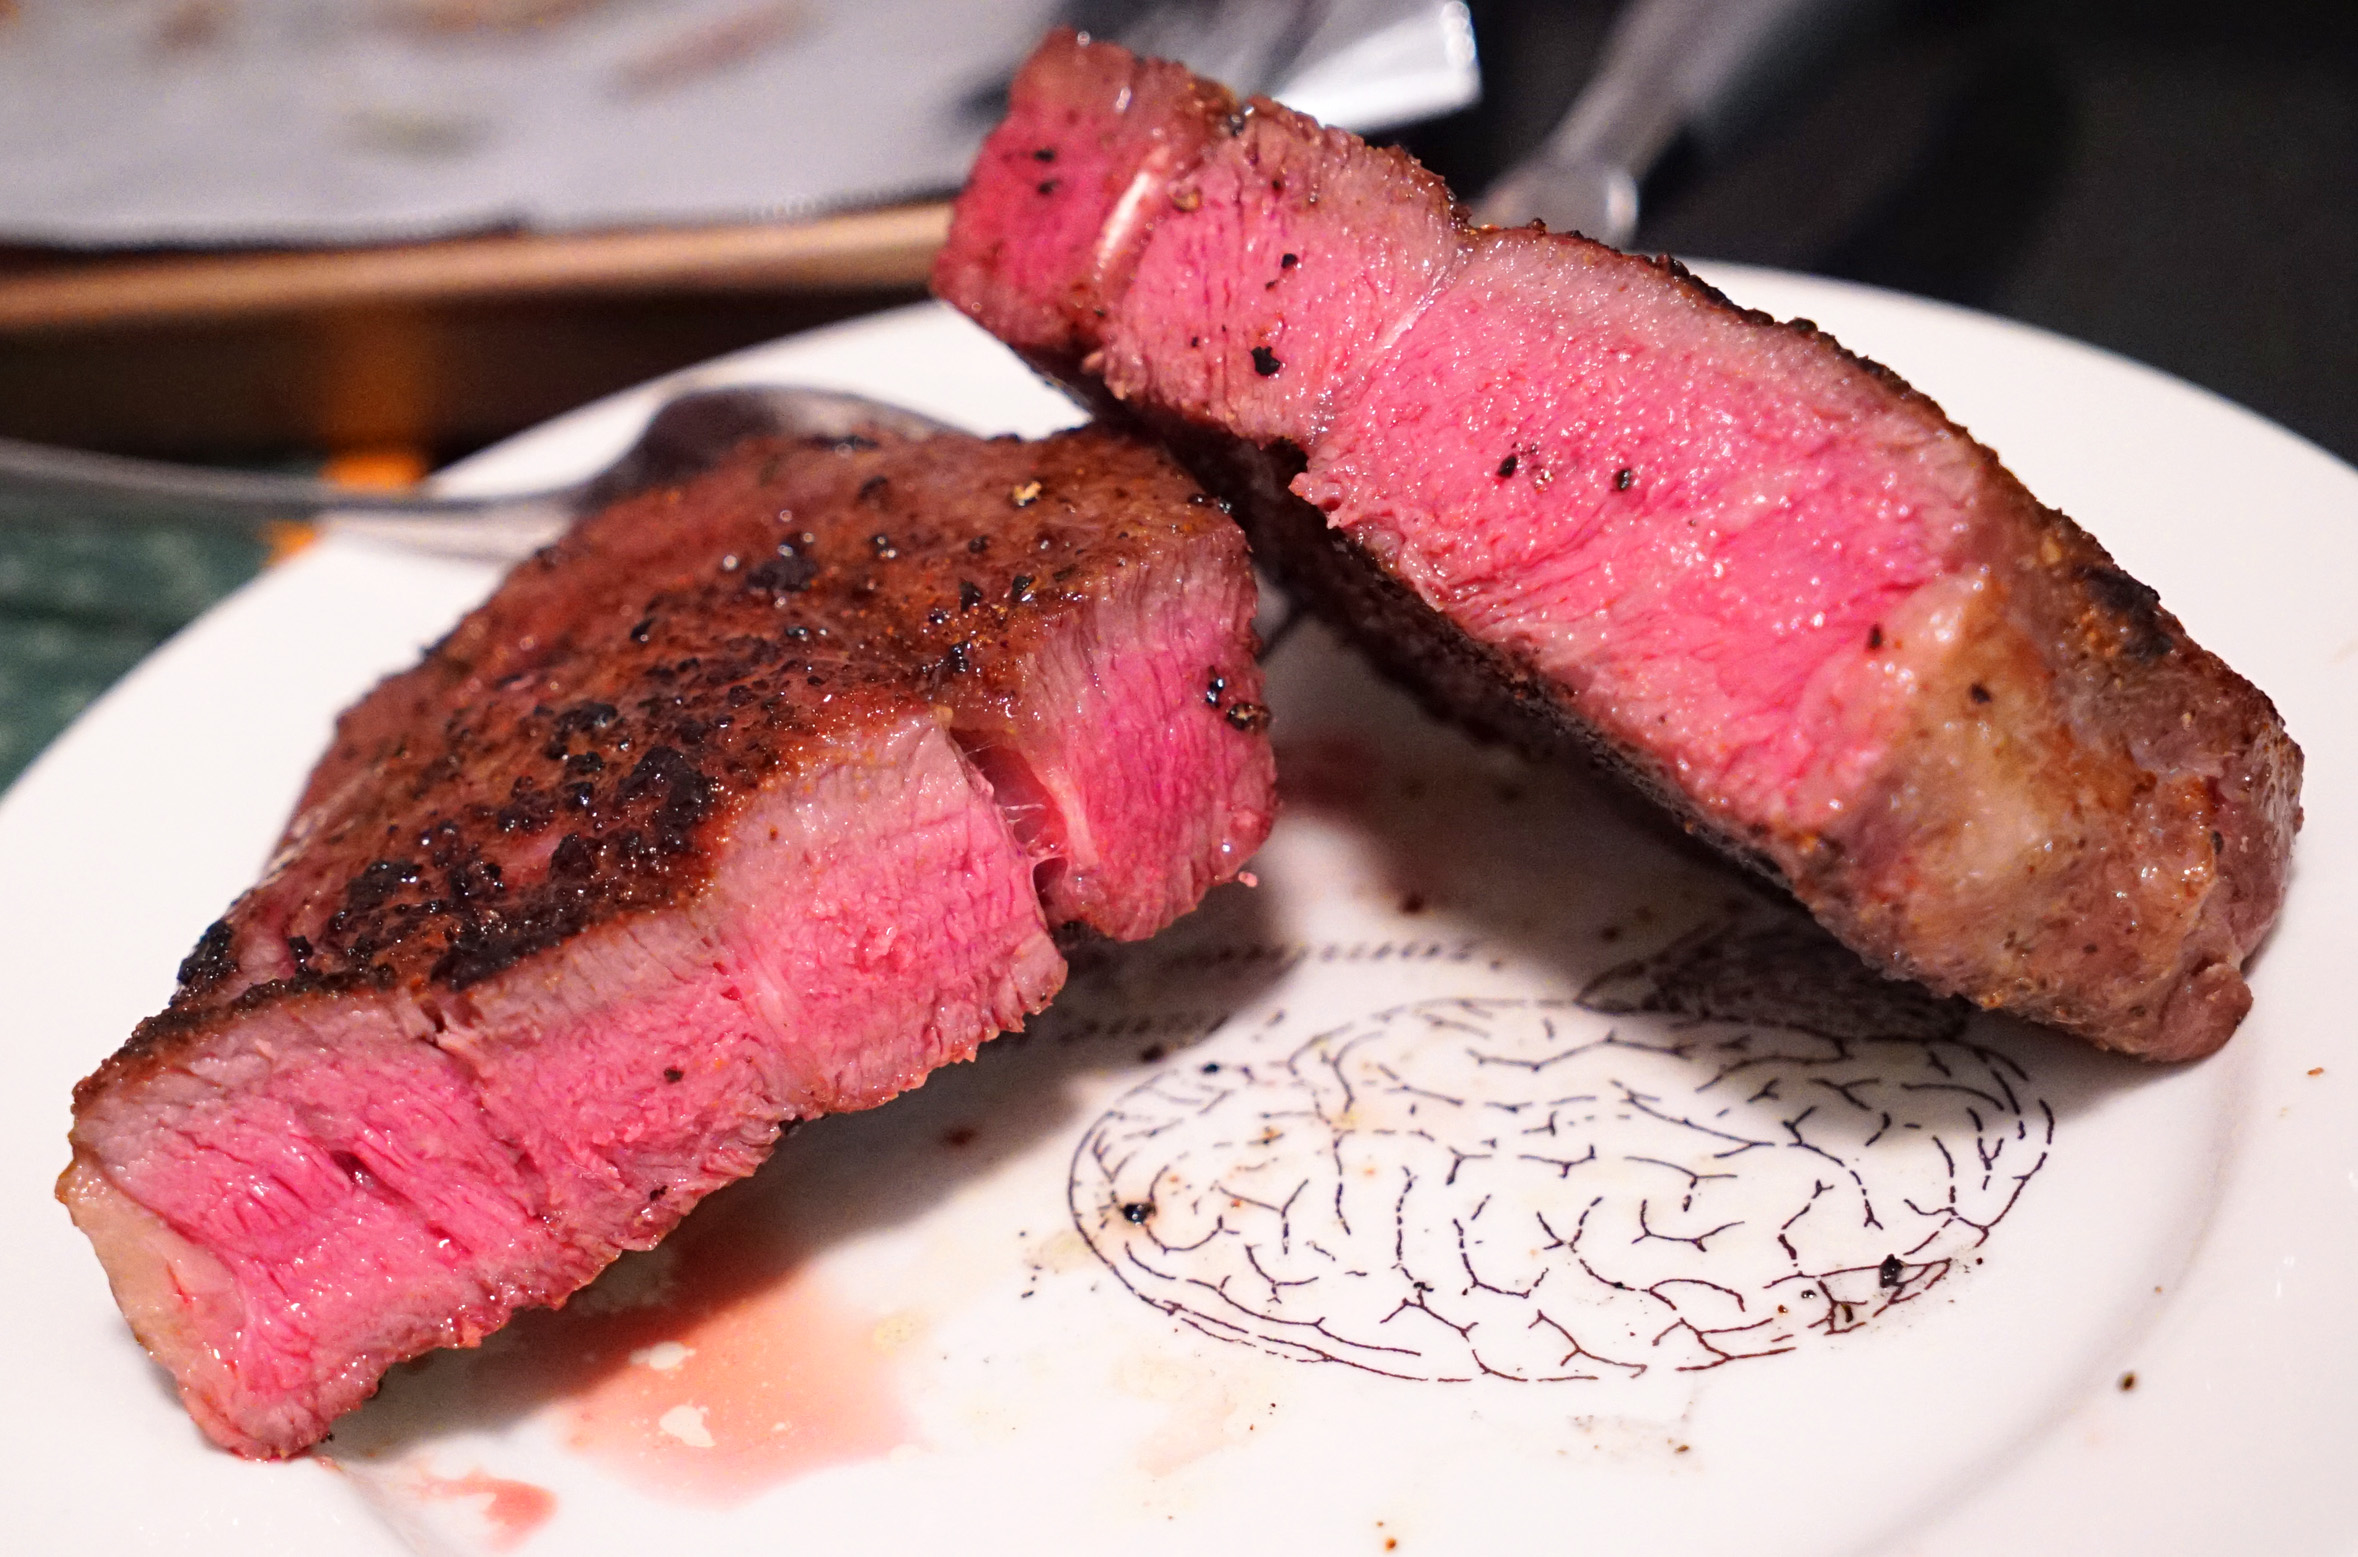
PAN SEARING
This is probably my favorite method for cooking steak. I always try to use a cast iron skillet, as they just work better for creating that crusty sear that we have all come to know as steak lovers. If you can’t get your hands on one, then a standard pan will do.
Smoke smell can permeate the home, set off smoke detectors
Pan cleanup can be annoying
Large pan needed for big or multiple cuts
Cast iron not ideal for glass electric cook tops
Instructions
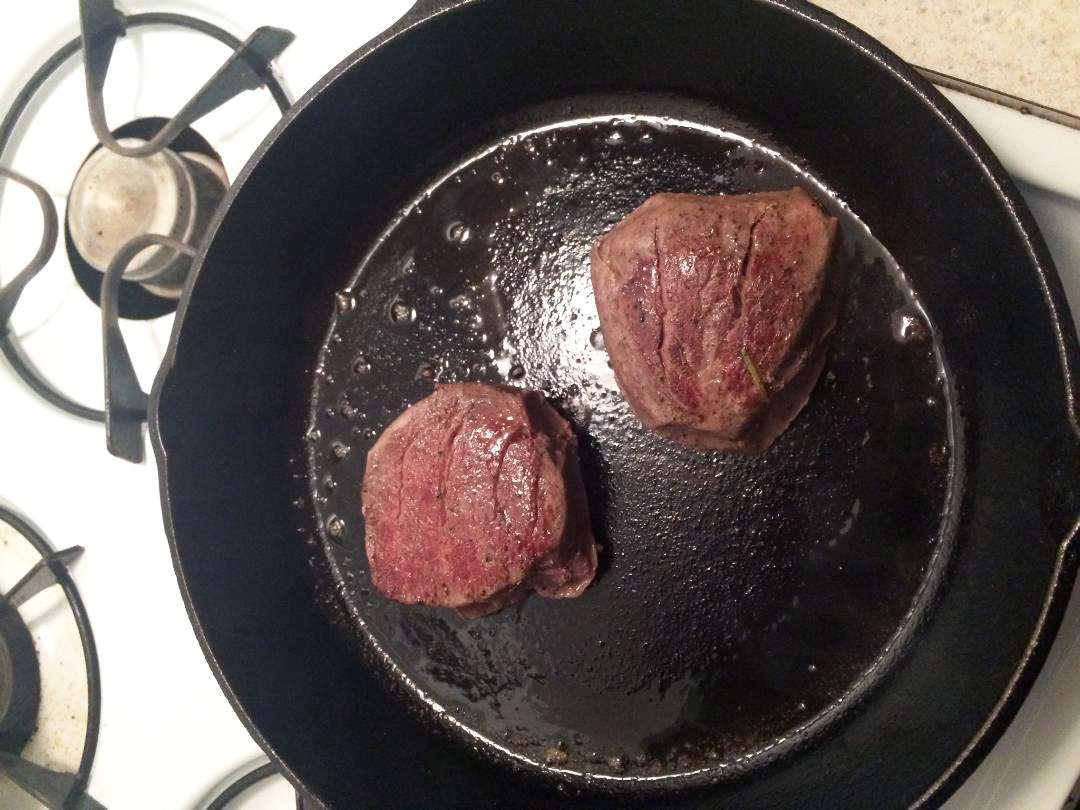
Get your steak up to room temperature and pat it dry.
Crank up your burner to as high as it will possibly get, and heat up the pan with a small amount of butter.
Season the steak generously with salt and pepper.
Sear the shit out of your steak, and add a wad of butter to melt in the pan. Throw in some rosemary and garlic too, if you like. Do not poke, prod, press or move the meat once it is set down. Allow the meat to stick to the pan a bit, with as much of the bottom surface touching the pan as possible.
Spoon the melted butter over the top as the meat cooks, basting it in flavor.
After a few minutes, flip the cut with tongs and do the same thing of the other side of the steak.
Once both sides are seared, then you should also sear the edges if you are working with a thick-cut steak. Anything over an inch and a half should get a little side sear if possible.
Use a meat thermometer or the “hand test” to ensure that your steak is properly cooked to medium rare. Remove it from the pan at 125F.
Let the steak rest for a few minutes on an elevated and porous surface, like a metal baking rack. During this time the meat will continue to cook a bit more while out of the pan, and it will retain more juices.
Alternative Instructions From Step 8 Onward
This secondary step is helpful if you have a very thick cut of steak, and a good, hard sear is all you can really get from the pan without overcooking. You want your meat to be pink from top to bottom, with no “grey band” in sight. To achieve this on thick cuts, lots of people will put the steak into the oven at a low temperature, like 250-300F, to allow the internal temperature to come up to medium rare once the pan-searing steps (1-7) are complete. Here, a meat thermometer is key to ensure that your meat is cooked to the proper temperature inside.
REVERSE SEARING
This is very similar to searing with an oven finish, like above, only done in the reverse order.
Johnny’s Preferred Cuts for Reverse Searing: Thick Cuts of Filet Mignon, Strip, Porterhouse, Rib Eye
Pros
Even sear across entire steak
Juices stay put
Cons
Slightly more difficult to execute than a simple sear
Multiple cooking steps and waiting
Instructions
Here, the first step is to cook your steak in the oven at a low temperature, like 250-300F, to allow the internal temperature to come up to rare or medium rare. Again, use a meat thermometer to ensure accuracy. Once that step is done, the steak gets finished in the hot searing pan with butter. This will form the desired crust on your steak. You just have to be careful not to overcook your steak in the pan as you are trying to get that crust to form. I recommend allowing your steak to cool down to room temperature before searing it off, and/or getting that pan screaming hot before you put the steak in.
BROILING
Generally speaking, broiling means that the heat source is coming from above the meat and close to the meat. Contrast with baking, which means that the heat source is below and more diffused or distant from the meat. Broiling a steak gives you more direct exposure to the heat source than baking, whether it’s an open flame (gas oven) or the heating element (electric). While not as direct as, say, touching a hot pan, broiling is better for cooking traditional cuts of steaks than baking, because you can get a charred outer crust easier and still get the inside of the meat to the desired temperature. Baking is better suited for roasting meats, since the heat source is often diffused a bit by the oven bottom when baking.
Johnny’s Preferred Cuts for Broiling: Thick Cut Bone-In Porterhouse, Thick Cut Bone-In Rib Eye, Bone-In Tenderloin, Bone-In Strip, Large T-Bone
Why the bones, you ask? When cooking with “surrounding” heat, like roasting or broiling in an enclosed oven, bones are very effective at radiating heat into the center of the meat tissue. This method, therefore, also makes large/thick cuts easier to work with.
Pros
Cleaner, less smoke and permeating odors
Relatively easy to execute
Easier to get an evenly cooked center of your meat
Cons
Easy to overcook if not careful
Requires meat thermometer (puncturing meat is never good)
Harder to get the desired crust than other methods
Instructions
Get your steak up to room temperature and pat it dry.
Set your oven to broil.
Season the steak generously with salt and pepper.
Bring your oven rack close to the heat source (near the top) and place steak in the oven in a shallow roasting pan that can catch any drippings.
Once the top crisps up a bit, flip the meat in the roasting pan to get the crust on the other side as well.
Use a meat thermometer to ensure that your steak is properly cooked to medium rare. Remove it from the oven at 125F.
Let the steak rest for a few minutes in the roasting pan. During this time the meat will continue to cook a bit more, and it will retain more juices.
Slice the major muscles off the bone, slice the muscle against the bias, and arrange the meat on a platter for serving.
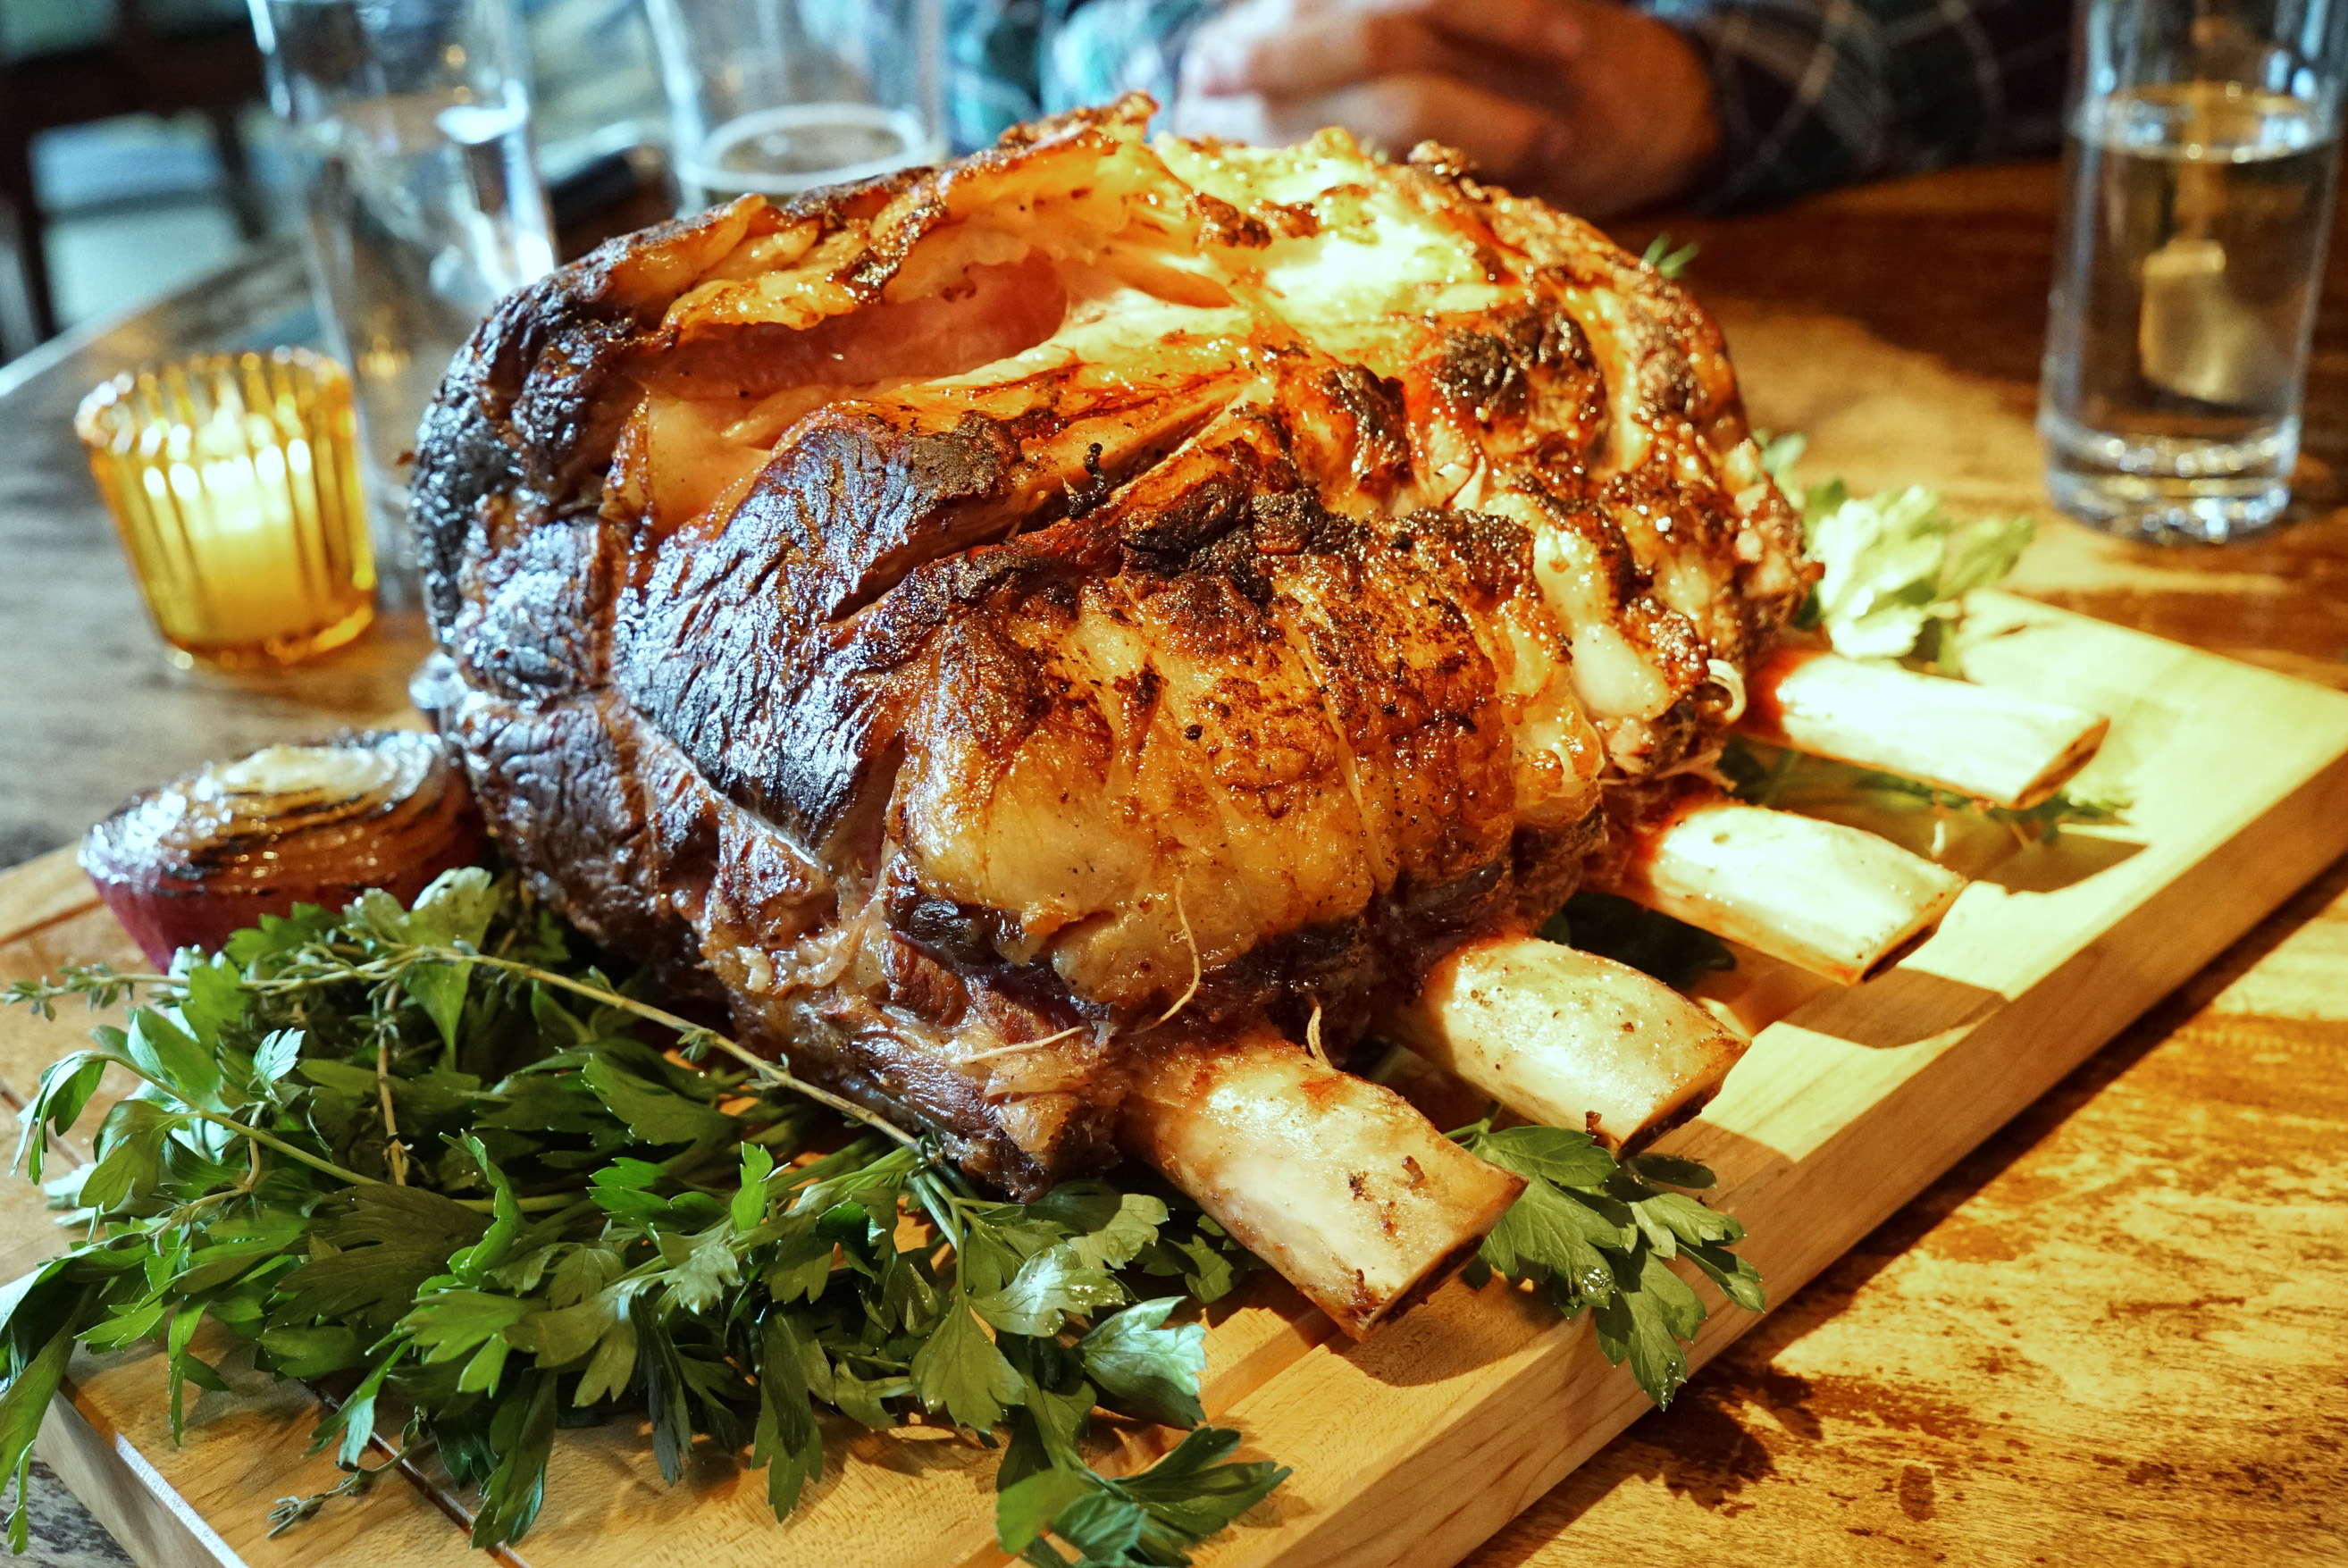
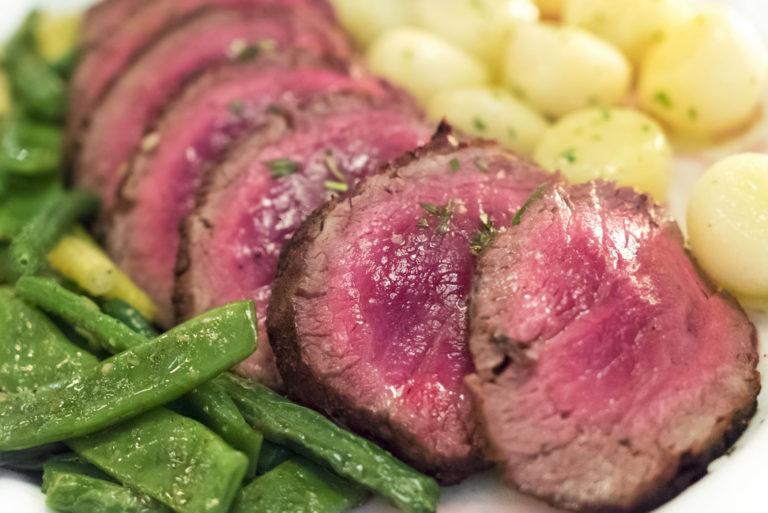
ROASTING
Roasting is synonymous with low and slow diffused heat from a bottom source, or all around the meat, from all sides. This method is best suited for large hunks of meat that take a long time to cook down to the center, generally for serving many people.
Johnny’s Preferred Cuts for Roasting: Standing Rib Rack Roast, Chateaubriand, Large Brisket
Pros
Great for large format dining
Easy to execute
Result is very juicy, tender and delicious
Cons
Takes a long time to finish
May require extensive carving
Generally lacks outer crust like a standard cut of steak
Instructions
Many people like to brine their meats before roasting. While this is generally more common with pork roasts or fowl, some steps can be taken with beef to increase flavors. You can crush up some garlic and stuff it into your roast (flavor injectors), or rub it on the outside of the meat; you can rub it with rosemary or roast it on a bed of herbs; and you should season it generously with a multitude of spices. You want all those flavors to permeate deep into the meat, so massaging, rubbing and pushing into the meat is all recommended. If you use a flavor injector, I suggest getting a lot into one or a few injections, that way you don’t pierce the meat too many times.
Set your oven to a low bake temperature, like 350F.
Place your meat on a roasting pan to catch any drippings, and set it in the center/middle rack of your oven.
Place your meat thermometer into the center of the roast.
As the meat cooks, use a turkey baster to suck up liquids from the bottom of the roasting pan, and squirt it over the top of the roast occasionally. This will add some flavor to the outside and help to create a flavorful edge to the roast.
Remove it from the oven at 125F. Let the meat rest for a few minutes in the roasting pan. During this time the meat will continue to cook a bit more, but the resting phase will help the meat retain more juices for the next step.
Slice and carve for serving. Sliced roast beef pairs perfectly with both hot gravy and cold horseradish sauces (either cream-based or tomato-based).
SOUS VIDE
Sous Vide means “under vacuum” in French. In this method of cooking, you are cooking your steaks in vacuum sealed bags by submerging them in a hot water bath to precisely the desired temperature, and then finishing them in a pan as a secondary step. This may sound like high tech restaurant science only kind of stuff, but there are items available in the consumer market to do this with great results at home.
Johnny’s Preferred Cuts for Sous Vide: Thick Cuts of Filet Mignon, Boneless Strip, Boneless Rib Eye, Bavette, Denver Cut/Blade Steak
Pros
Perfect internal temperature every time
No monitoring necessary
Easy to achieve success
Cons
Requires a special unit or item, a vacuum sealer and bags
Wait time can be lengthy
Still need to use a pan (or torch) to sear the outside
Instructions
Lucky for you all, I’ve got a nice discussion of the sous vide cooking method here, with pretty pics and everything. In any case, here is the gist of it:
Season the steak however the you want. I use salt, pepper, garlic powder, garlic oil and crushed red pepper.
Place steak into vacuum seal bag and seal it up with some butter and herbs inside (rosemary is always nice).
If you’re a poor bastard and can’t afford a vacuum sealer, you can use ziplock bags. Place your meat into the bag and begin to submerge the bag into the water bath. Once you are all the way close to the zipper, zip it shut. The water surrounding the outside of the bag will push out all the air from inside. This is the poor man’s vacuum sealer. If you do this, you may want to put a smooth, clean rock in there too, just for good measure, to keep the meat from floating.
Set your temperature to however you like your steak cooked. I put mine at 125F for a nice medium rare. I’m dealing with grocery store meat here, people. Don’t give me any shit about that being too well done.
Wait about an hour or two. Don’t panic! You can’t overcook your steak in a sous vide bath. That’s the whole point of it!
Remove your steak from the water bath and let it cool back down to room temperature.
Re-season it a bit, if so desired.
Sear it. I use a Searzall, because why not? But you can easily just toss this baby into a real hot cast iron pan with some more butter and herbs to get that brown and crispy coating.
DIRECT FROM FROZEN
Some food scientist people were messing around and cooking strip steaks in a test kitchen; some cuts were thawed in a fridge overnight, and others were still frozen. The results stunned them. The steaks were cooked more evenly, with less “grey band” when cooked direct from frozen, and those steaks retained more juices (they lost less moisture during the cooking process). While they took longer to cook, they still browned at nearly the same rate as a thawed steak.
I think a major issue that home cooks with have here is that it may be difficult to prevent ice crystals to form on the outside of the meat during the freezing process. When cooking, these ice crystals will melt into water or sublimate into water vapor. At that point you are either boiling or steaming the bottom of your steak in the pan, which is bad. When doing that, you won’t ever achieve the crust that we carnivores all desire.
The scientists attempt to solve this problem by freezing the steaks in a special way at first, uncovered and flat. Once they’re frozen, they are then wrapped and bagged for storage. If you’re going to attempt this you will want to be very careful to replicate the freezing technique that the scientists utilized, to avoid excessive ice crystals from forming on the outside of the meat.
This method involves cooking in a pan that contains a good amount of oil. This is done to ensure that the nooks and crannies of the steak surfaces all get cooked the same amount, and it helps to displace any water that may melt out of ice crystals. Second, it also retains more heat, so you can bring the steak surface up to browning point faster, without overcooking any of the interview (which should still remain pretty cold since it is frozen). The result is less grey banding, and a more end-to-end pink steak interior.
You will still need to finish the steak in the oven, however, since the interior will likely be too rare or still frozen if you only use the pan.
In any event, here is my analysis:
Scientists’ Preferred Cuts for Frozen Steak Cooking: Strip
Pros
No waiting for steak to thaw or come to room temperature
Less meal planning needed ahead of time
Nice, even cook temp throughout
Cons
Difficult to avoid ice crystals
Complicated freezing technique
Still requires second step in the oven
Instructions
Refer to this link and the embedded video below for proper steak preparation and cooking instructions.
DIRECT ON COALS
I haven’t tested this method out myself yet, so you’ll have to take this with a grain of salt, as above, with the “Direct from Frozen” method. My first exposure to this method was when I saw Alton Brown discuss it on his blog. I was intrigued enough to include it here, but since I no longer have the ability to cook often with real wood, I have never tested this out.
Alton’s Preferred Cut for Coal Cooking: Skirt
Pros
Fast
Natural flavors
Cons
Covering in foil step essentially steams the meat
Potential for soot contamination
Instructions
I think the best bet here is to just follow the directions from Master Alton, since he’s a culinary wizard, and I’m a mere apprentice. One thing I’m apprehensive about, which I noted in the “cons” section, is the part where Alton wraps the hot steak in foil. This means the meat will cook in steam. He then tosses it back into the juices. All of this makes me think “wet steak,” and that turns me off.
___
For more specific recipes, as opposed to these more general methods of cooking, check out my recipe page.